Springtime Flowers in Chocolate Video (Technique also featured in our Blog)
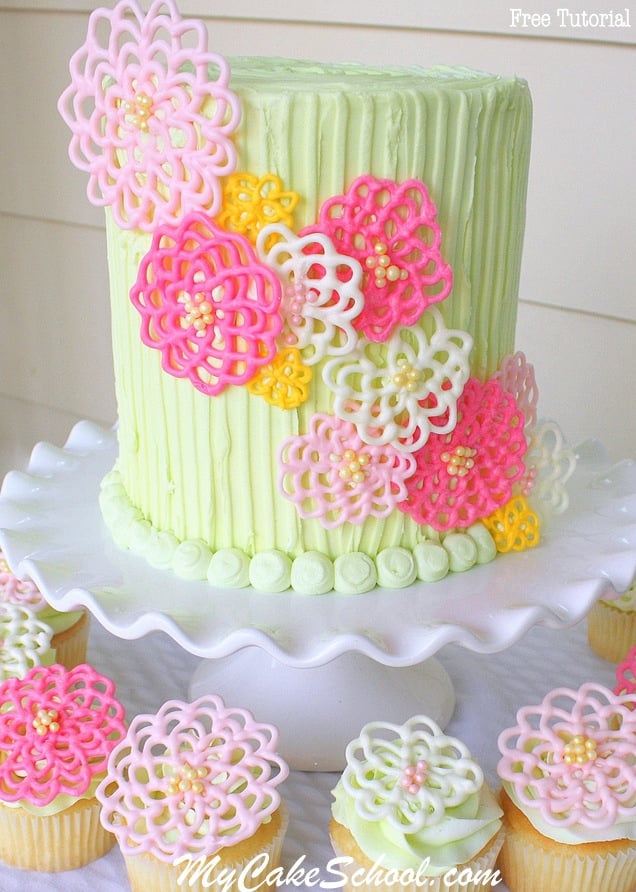
Learn how to make beautiful springtime chocolate flowers for your cakes and cupcakes in this quick and easy cake decorating tutorial!
These flowers are actually made with one of my favorite cake decorating mediums- candy coating!
I love working with candy coating/candy melts, because the process is so quick. You can pipe, create, chill & attach your accents in a matter of minutes.
The whimsical nature of our flowers' design makes it a perfect choice for any level of decorating--and for all sorts of occasions! Don't worry if your flowers don't look just like mine--you may discover a different style that you like even more.
I hope you'll share your creations if you try out this tutorial--make sure to check below the video for a few extra notes. Have fun! --
Table of Contents
Materials
*I used a four layers of white almond sour cream cake (with cake board midway up and supported beneath with bubble tea straws.) The cake is frosted with our Fluffy Vanilla Buttercream Recipe.
Colors: (Regular coloring gels will seize your chocolate. You'll want to use oil based candy coloring or coloring powders. Pre-colored candy coating is also an option.) We used Wilton Pink Candy Color for both our dark and light pinks. We also used Americolor coloring powder for our yellow, and Americolor Electric Green to tint our frosting.
Candy Coating-- Whatever your preferred candy coating/confectioner's coating/chocolate bark/candy melts. Our local grocery store carries a Ambrosia brand of white chocolate bark/coating - that's what we used today.
Ateco Cake Comb- Optional -- We used it to comb our buttercream
Piping Tips- Wilton 12 for ball border on cake, and Wilton 2D for the swirls on our cupcakes. I also used a Wilton 3 for piping the chocolate. ** Some people prefer to just snip the ends off of their piping bags rather than use a piping tip with their chocolate.
Waxed Paper- We piped our designs onto waxed paper lined cookie sheets & then chilled them.
Sugar Pearls--Optional. We used Wilton Yellow Sugar Pearls for our flower centers.
Misc: I used two cardboard cake circles, slightly smaller than my 6 inch cake. I used one beneath the tier, and one halfway up the tier (with bubble tea straw supports beneath). This design would be so cute also as a shorter cake also!
A Few Notes for you to Keep in Mind:
You can buy pre-colored candy coating (Candy Melts, etc.). However, if you are tinting your own as I did, you’ll want to tint your chocolate with candy coloring (which is oil based) or coloring powder. The usual coloring gels for frosting & fondant will cause your chocolate to seize. Water causes the melted candy coating to seize also.
Another option in a pinch is that you can paint your white chocolate pieces using petal dust mixed with a little vodka or lemon extract. (Coloring gel mixed with vodka/extract doesn’t cover well.)
*I like to keep my pieces in the fridge and pull them out a few at a time as needed. It makes them less fragile when handling. However, once on the cake or cupcakes, they should hold up just fine at room temperature.
* My cake is a 6 inch round and is approximately 7 inches tall. There is a cake board about halfway up with bubble tea straw supports beneath.
This keeps such a tall cake nice and sturdy, and keeps the serving sizes manageable. The look would be beautiful on shorter cakes as well.
Enjoy the Video!
We hope that you enjoy this tutorial for springtime chocolate flowers! If you give this method a try, we would love for you to leave a comment and photo below!
Hi Tammy, we used hi ratio.
So lovely and fresh looking
I am just curious Melissa or BeBe
When u do theses tutorials are u making theses cakes for clients or just making for us ....?...if for us what do u do with your cakes eat them lol :)
Just curious lol
Hi Genelle, the cakes we make are just for video and blog purposes. Sometimes we eat them and some are given away and some just get old because making the video takes longer than we expected and they are tossed.
No login link at the right below
No login link below on my smartphone
I absolutely love this technique! I used this for bridal shower cupcakes yesterday and they were a hit (see pic in gallery). THANK YOU for another wonderful tutorial!
Hi Kathleen---I'm so happy that you made these! Thanks so much for your feedback--I'm going to check out your photo in the gallery! ;)
Hi Melissa or Bebe,
You've mentioned that you made 4 layers of cakeand the final cake was 7 inches. Could you please tell me how thick each layer would have been please?
Cheers, Linda
Hi Linda--Each cake layer would have been approx 1.5" high... and then the frosting between the layers and on the outside would bring the cake to 7".
Hi Melissa, Once again, love this and will be making it. Is there a reason not to use a coupler in the bag with the chocolate? I would think it could be slightly rewarmed this way with the tip removed if necessary. Thank you for the help.
Hi paintmycake~
You can definitely try this design without the piping tip and see what you think. When working with candy coating/chocolate, a lot of decorators prefer the less fussy method of working without the tip. (Easy clean up!) I do this with certain designs, but usually I just throw in a piping tip. The reason is that when I use a piping tip, I feel that I get a cleaner look and I can be certain of the size of the opening. When I snip the piping bag instead, it still works well but the piping comes out a little less rounded...because the opening tends to flatten a bit. At least, this is true with the clear disposable bags. Hope this helps!
Hi Malissa.. i just love this cake. i made the chocolate flowers yesterday to put on my cupcakes. they looked really cute, but i dont think i like the wilton candy melt very much... i dont think it melts very nicely.. when i added colour to it, the colour came out very dull.. i live in london so i dont have access to the chocolate you used, could you recommend a brand i might get here?
btw everyone loved the cupcakes..but they havent seen yours so what would they know...lol