Quilling with Fondant-Fall Cake Tutorial
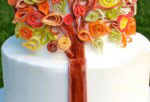
In today's free decorating cake video, I'm going to show you how to make a gorgeous autumn cake which features colorful fondant quilling!
Fondant quilling brings such a unique and elegant touch to cake decorating. While traditionally, quilling is done with paper, cake decorators can achieve a very similar look using thinly rolled strips of fondant.

A couple of years ago, we posted a tutorial on fondant quilling to our blog, and applied it to a spring themed cake.
We loved the look! In today's tutorial, I wanted you all to actually be able to see the technique in video form, and we found that creating leaves for an autumn themed cake showcases the technique beautifully! The technique is simple, but so elegant and effective.
Table of Contents
Materials for Fondant quilling:
(The cake that we're decorating today is 8"/6" stacked tiers, frosted in our "fluffy vanilla buttercream" .)
Fondant (We used Liz Marek's recipe)
Tylose powder- we added a bit to our fondant.
Coloring Gels- We used Americolor Super Red, Avacado Green, Lemon Yellow, Orange, Warm Brown, Electric Green
Vodka or Lemon Extract-Needed if you'd like to "paint" your leaves as we did.
Dusts: Optional. We used Super Pearl Dust and Super Gold luster dust for accents on our leaves
Multi Ribbon Cutter (affiliate.)- Optional. We used an FMM brand Multi Ribbon Cutter for cutting our strips
Cookie sheet or tray for holding your finished leaves
Piping Gel/Tylose Glue or your glue of choice. We used piping gel to attach our leaves.
Misc: Parchment Paper, sharp knife, rolling pin, small paint brushes, toothpicks, plastic wrap, etc.
The usual supports for tiered cakes: Cake cardboards, dowels/bubble tea straws
*We allowed our fondant leaves to dry overnight...but even after a few hours, our had set up enough that they could be easily handled. As always, dry times can vary depending on the climate in your area.
*As I mentioned in the video, if you do not have tylose powder, you could also knead a little gum paste into your fondant. If your fondant seems way too soft after rolling it out, allow to set up for a few minutes. Apply more tylose or gum paste as needed.
Enjoy the Video!
Thanks so much for stopping by! If you give this quilled cake design a try, we would love for you to leave a photo below!

This is so beautiful. I know what I will be doing this weekend. You have such amazing ideas!
Thank You, great tutorials, everything is stunning. I love the site keep up the good work
Beautiful, as always! I wish I had an opportunity to create larger cakes. Maybe I can apply some of the techniques to a smaller project. Thanks, Melissa, for the inspirational work you do!
Thanks so much for your comments! So happy that you like the technique & design ;0) --
@Kathy~ We alllllmost did this design as a sheet cake....I think that would have worked really nicely to. Maybe that could be an option for you ;0)!!
What kind of shortening did you use in your fluffy vanilla buttercream?
I love it as I do all of your videos. Thank you so much! AND, your nails are so pretty; what color is that?
Hi Tammy, we used Crisco as our shortening but at the bottom of our "fluffy" recipe, we have a note re: adjustments if you prefer high ratio/Sweetex.
@Melissa Calegan~ Thank you!! So funny that you noticed my nails..but then again, most of the video involves closeups of my hands quilling ;0) - The color is Sally Hansen (Insta-Dri) Go for Gold ;0) Fun color for fall!
Hi Melissa, I love it, this is so beautiful! Thank you for all of your tutorials.
Hi Melissa
Your cake is so beautiful, I love all the colours. This is a technique which I've been playing with for about two years now without success. I think my idea of using a quilling tool left me frustrated so I gave up on it. Your method is so much easier with no significant breakages. It's gotten me fired up to start this up again. With Christmas on the way I'm looking to put together some festive patterns. Thank you for another exquisite tutorial. Wish me luck for trying again!
Thank you Graciela!
@Roze~ So glad you're going to give it another try. You'll have to let us know how it goes! I've never tried it with a quilling tool--but would imagine that you'd have to really get the fondant paper thin in order to use the tool...and my fondant wasn't rolled paper thin. So, by hand or with the help of a trusty lollipop stick to get things started is probably easier! ;0) When looking at paper quilling on Pinterest, I saw some beautiful Christmas trees, etc. I'm sure you'll be able to come up with some really elegant designs for Christmas!
How sweet of you to reply to me! I am terrible, I don't know how to use pinterest, don't laugh at me!! I do have many paper quilling books so I have lots of inspiration. The best inspiration has been your method. I'm so grateful to you for sharing. When I was using the quilling tool I opened it up slightly to be able to feed the gumpaste through. It would not work with fondant at all for me because it kept stretching and sticking onto itself. I will definitely give it another go now that you have spurred me on. Thank you. x
Haha, well you'll have to give Pinterest a whirl sometime! I'll warn you that it is very addictive though! ;0) Soooo many ideas! - Thanks so much for your nice comments, looking forward to hearing how it goes for you next time around!