Pretty Textured Buttercream Technique with Heart Cake Toppers
In today's cake tutorial, I'm going to demonstrate a beautiful (and easy!) textured buttercream technique. We've made several textured buttercream tutorials over the years- but what I love about today's technique is the elegant pattern and two-toned effect.
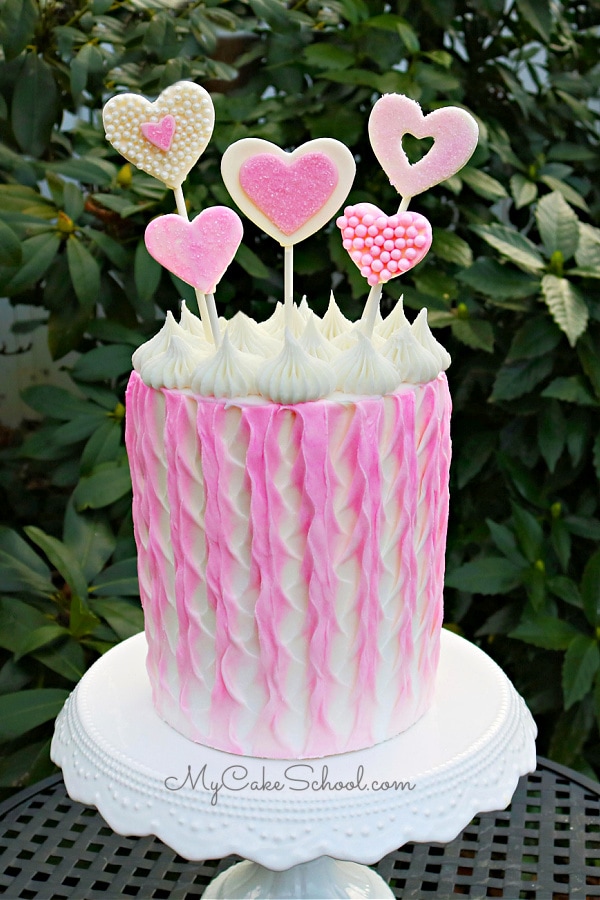
Table of Contents
Beautiful Two-Toned Textured Buttercream Technique
Instead of an offset spatula, today's textured buttercream was achieved with a simple, sharp knife from the kitchen.
I found this technique to be really easy to achieve, but I would recommend practicing on a sheet of wax paper or parchment to get a feel for it.
Also, with Valentine's Day just around the corner, we decided to create heart cake toppers as well for added height and color!
This cake design with it's heart toppers would be perfect for anniversaries too, and the techniques featured in this video can be applied to cakes for all sorts of occasions! We hope that you enjoy it!
Materials:
For today's cake, we decorated a 6 inch double barrel cake. Double barrel cakes are extra tall cakes with supports in the middle.
We are working with a four layer cake with a cake cardboard halfway up with 4 bubble tea straw supports beneath (cut to the height of the first two layers). This textured design would be beautiful tiers of any size! The cake is also resting on it's own cake cardboard cut to the size of the cake.
Coloring gels: Americolor Deep Pink
Sharp Knife- I used a thin, sharp kitchen knife to create my texturing. Experiment with what you have in your kitchen! You could probably get a similar look with a tapered offset spatula, although I enjoyed working with the sharp knife.
For the Cake Toppers:
Lollipop sticks
Gum Paste (we used Satin Ice Brand) -- You could also use fondant with a good amount of tylose powder kneaded into it to give it the qualities of gum paste (firmer, faster drying)
Tylose Powder- I mixed a little warm water with a little tylose to create tylose glue. I used this to attach gum paste strips to the back of the lollipop sticks for our heart cake toppers. I also used this to attach sprinkles.
Spinkles of choice for the cake topper - We used sugar pears and sparkling sugar
Heart Cookie Cutters in various sizesMiscellaneous: We used a French Tip 869, disposable piping bags, two cake boards for the double barrel design (one at the bottom and one halfway up)- Bubble Tea Straw supports or supports of choice if you are doing a double barrel cake. I applied the frosting with an offset spatula.
Notes
As I mentioned in the video, I applied the first coat of vanilla frosting (a bit thicker than a crumb coat) and then added a thin layer of pink frosting to that.
If you're going for a two toned effect, keep the top (tinted) layer of frosting thin so that the texturing step can more easily reveal the white frosting beneath.
For the gum paste heart cut outs, mine dried for about 24 hours on a parchment lined cookie sheet. You can flip them after the surface is firm.
Dry times can vary based on the humidity of your kitchen or your brand of gum paste. So, if you are new to working with gum paste creations, give yourself additional dry time just to be on the safe side.
Have fun with this technique!
Oh I just love how that technique looks! :-) Beautiful, simple and fabulous as always! Thanks Melissa. Love it! :-)
Love this one!
Beuatiful! Lovely, will be making for Valentines day!
Amazing!