Fun Haunted House Cake
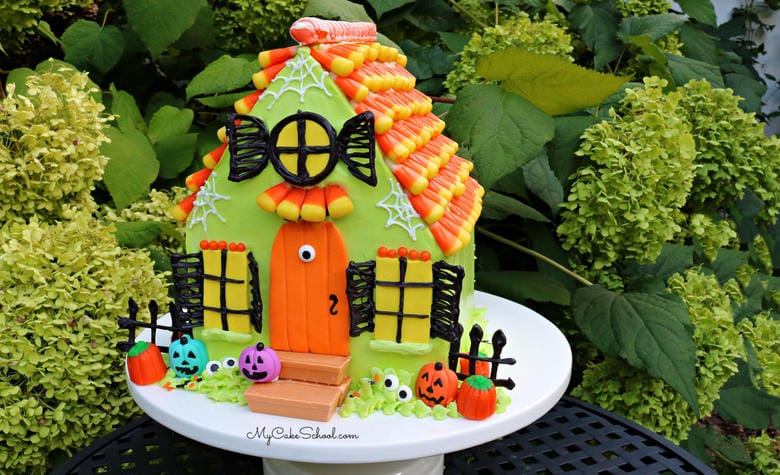
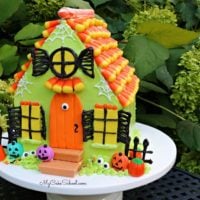
Hi everyone! This colorful and Fun Haunted House Cake is perfect for Halloween parties!
In this video, I'll demonstrate the simple construction used for this cake as well as the decorating process which uses lots sprinkles, candies, and a few additional details that I created for the project!
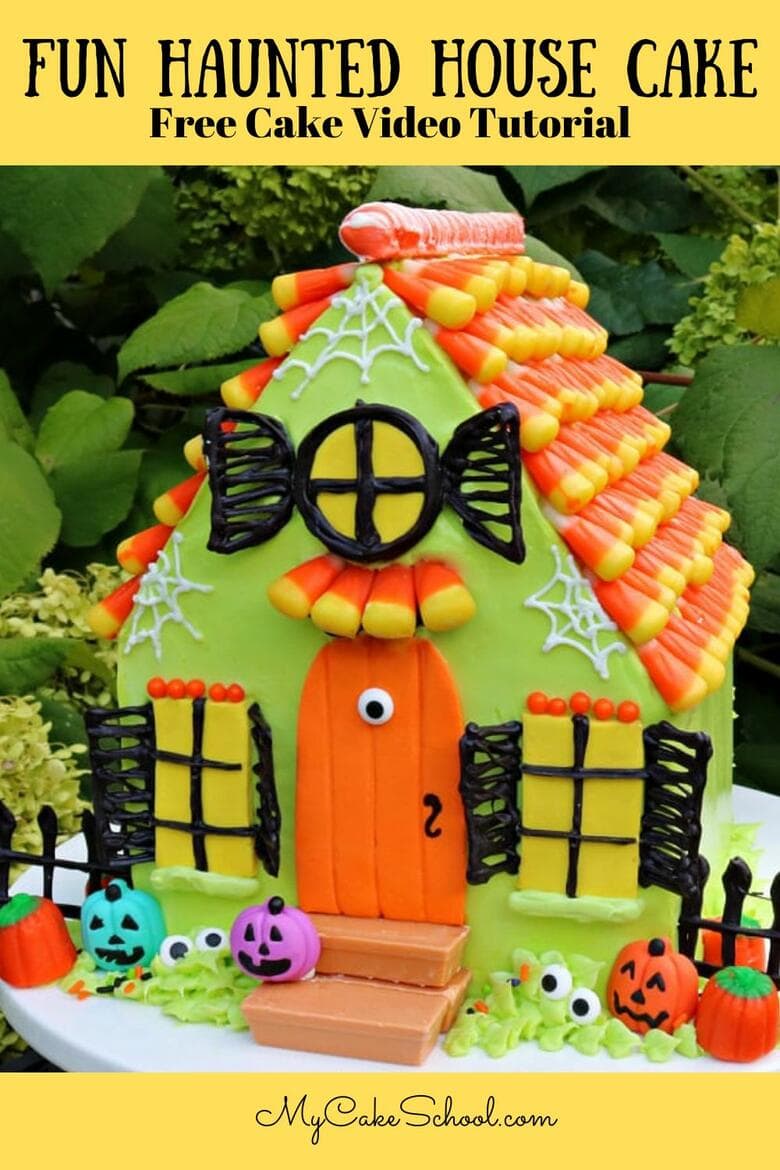
Table of Contents
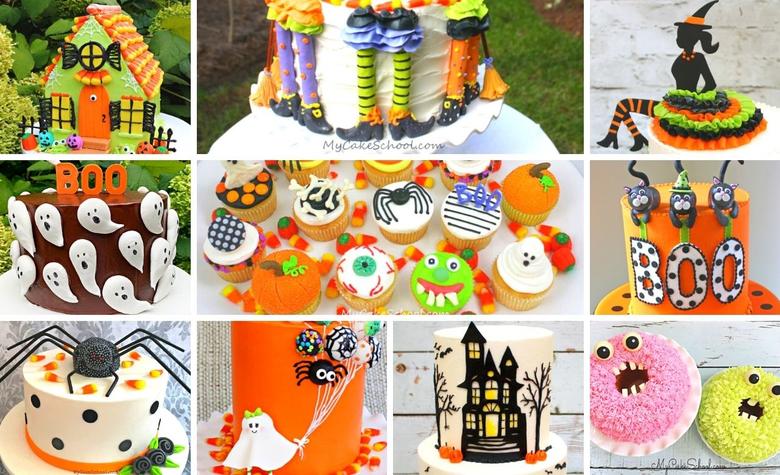
More Halloween Cakes!
We loved making this fun haunted house cake and hope that you enjoy it!
There are lots of options for decorating the house and so have fun changing it up with your favorite colors, candies, and more. If you give the cake a try, we would love to see your creations!
Thanks for stopping by, and don't miss our other Halloween Cake Videos and Step by Step Tutorials which you can find here (including our other Haunted House (Silhouette) Cake): Roundup of Favorite Halloween Cakes
Materials for our Fun Haunted House cake:
You can find the full, printable instructions for this colorful haunted house cake further down in this post!
For this video, I used a Duncan Hines Cake mix substituted in place of White Cake mix in our White Almond Sour Cream Cake Doctored Mix Recipe (minus the almond). I divided the batter between four 6 inch square cake pans.
I treated the four cake layers like two separate, filled cake tiers on their own cake cardboards cut down to size.
Simple Construction for House Shaped Cake
The bottom "tier" is the main part of the house. The top "tier" was carved into a triangular shape. I inserted 5 bubble tea straws cut to the height of the bottom tier before stacking on the top tier (on its own cake cardboard) and crumb coated the house.
Freeze to firm things up as needed for about 20 minutes. I usually freeze after crumb coating to firm things up before applying the final coat of frosting.
Decorating Supplies
Fondant for windows/door- (I kneaded a little tylose powder into mine but that is optional- it helps it to dry. more quickly)
Black Candy Melts for shutters, iron fence, etc. (You can also use candy bark coating tinted with oil based candy colors)
Coloring Gels: Americolor Electric Green,
Piping Tips: Tip 1 (or similar) for spider webs, 352 leaf tip
Food coloring pen- Optional- I drew on the door handle.
Templates- These are the shapes I used. Feel free to change things up!
Buttercream- I used our Classic Vanilla Buttercream recipe.
Candy/Sprinkles of choice- I used a couple of bags of candy corn, miscellaneous Halloween sprinkles/google eyes, mini (pumpkin spice) Kit Kats for stairs (optional). My Jack-o-lanterns were by Wilton (found at Michaels) but you could also make your own from fondant.
**I forgot to mention in the video but across the top of the roof is an orange chocolate covered pretzel which I found in the Halloween section in Target.
Miscellaneous: Disposable Piping Bags, bench scraper/spatula, turntable (optional),
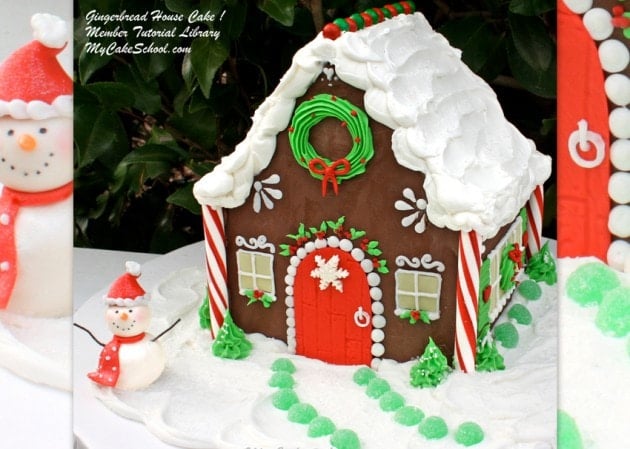
Gingerbread House Cake
We have a very similar cake that we like to make at Christmas! Our Gingerbread House Cake is made in the same way, but without the creepy shutters, candy corns, and spider webs- and it is made with a Gingerbread Cake Recipe.
You can find it here! Gingerbread House Cake Video Tutorial
Enjoy the Video!
Thanks so much for stopping by. We hope that you enjoy the video. If you give our haunted house cake a try, we would love for you to leave a comment and photo below!
Fun Haunted House Cake Tutorial
Ingredients
- For this video I used a Duncan Hines Cake mix substituted in place of White Cake mix in our White Almond Sour Cream Cake Doctored Mix Recipe (minus the almond). I divided the batter between four 6 inch square cake pans. Fondant for windows/door– (I kneaded a little tylose powder into mine but that is optional- it helps it to dry. more quickly)
- Black Candy Melts for shutters iron fence, etc. (You can also use candy bark coating tinted with oil based candy colors)
- Coloring Gels: Americolor Electric Green
- Piping Tips: Tip 1 or similar for spider webs, 352 leaf tip
- Food coloring pen– Optional- I drew on the door handle.
- Templates– I'm linking in the Notes section
- Buttercream– I used our Classic Vanilla Buttercream recipe.
- Candy/Sprinkles of choice– I used a couple of bags of candy corn miscellaneous Halloween sprinkles/google eyes, mini (pumpkin spice) Kit Kats for stairs (optional). My Jack-o-lanterns were by Wilton (found at Michaels) but you could also make your own from fondant.
- **I forgot to mention in the video but across the top of the roof is an orange chocolate covered pretzel which I found in the Halloween section in Target.
- Miscellaneous: Disposable Piping Bags bench scraper/spatula, turntable
Instructions
- I treated the four square layers like two separate, filled cake tiers on their own cake cardboards cut down to size.
- The bottom “tier” is the main part of the house. The top “tier” was carved into a triangular shape.
- I inserted 5 bubble tea straws cut to the height of the bottom tier before stacking on the top tier (on it’s own cake cardboard) and crumb coated the house.
- Freeze to firm things up as needed for about 20 minutes. I usually freeze after crumb coating to firm things up before applying the final coat of frosting.
- Add the final coat of frosting (I used buttercream tinted electric green).
- Create the melted candy coating and fondant accents- door, windows, shutters, gate, etc.
- Decorate with additional spider web piping , apply candy corn "shingles", short Kit Kat stairs (optional), etc. Decorate the cake with whatever sprinkles and candies you like!
So cute and fun! I love it! :-)
My birthday is close to Halloween so every year I have been using one of your designs to bake my own cake. Love it for the grandkids. Thank you for your wonderful teaching and creativity!!!?
@MsGF- Thank you! ;0)
@Nancy- I love that! Thanks so much!!
Hi! I am currently making this cake. I used a buttercream made icing bought at Michaels. I dyed it green with a gel. I froze the cake and now the green is melting. That is making it difficult to stick windows on. Is there something I can do to set the cake? Thanks ao much. I am new to baking.
Hi Cyndi- Did you freeze the frosted cake or was it that the layers were frozen at the time that you frosted?
If it is just condensation that has formed on the cake, it will evaporate over time but you can speed that up by placing in front of a fan. Condensation can happen when a cake moves from very cold to a warm temp.
If the frosting is actually way too soft and sliding, refrigeration will firm things up, but if the frosting is that ultra soft, you could consider removing the excess/melty frosting (trying to not remove so much that you pick up crumbs)- and thicken with powdered sugar.
Hopefully this is just a matter of needing to let the condensation evaporate and then you can chill in the refrigerator to firm things up before decorating. I'm sorry that you're having to deal with this!
Thank you so much for answering me so quickly. I think it is the condensation. I will try putting it in front of a fan. Thanks again for providing such useful information! I love all of the cakes that I have tried!
Here is my interpretation of this cute cake. First time to ever attempt anything like this.
Awe it is so cute and fun, Cyndi! You did a great job! Thanks so much for sharing a photo! xo