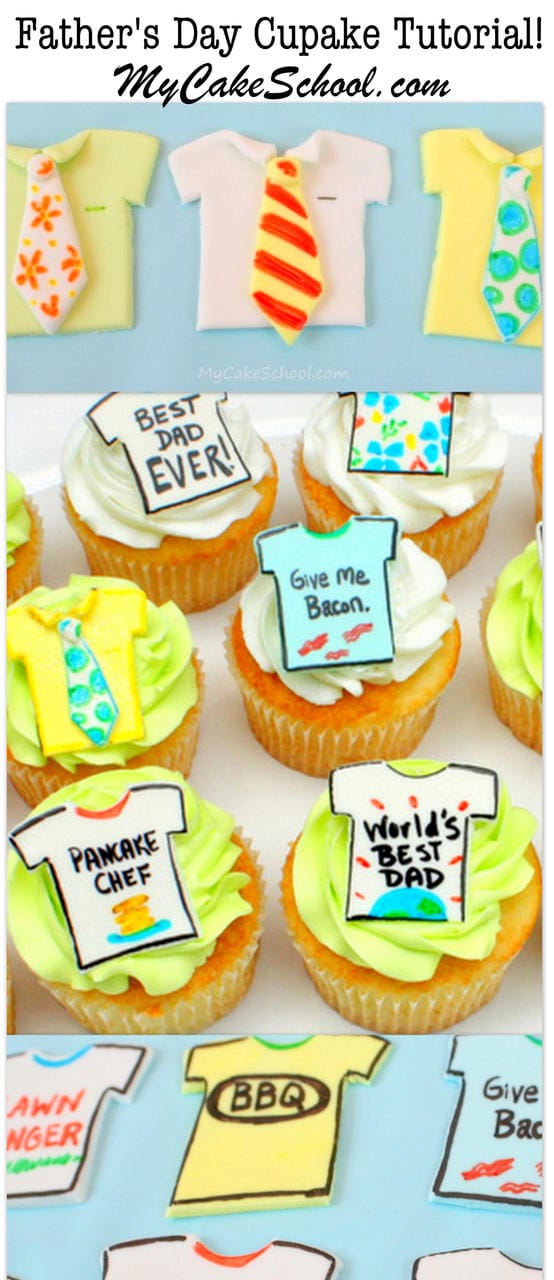
Father's Day Cupcakes
Today we are sharing how to make cute and easy Father's Day Cupcakes!
These colorful fondant "Ties & Tees" cupcake toppers can be used year-round but are the perfect way to celebrate the dads in your life!

Table of Contents
Our Father's Day Cupcake Toppers
I'm going with a theme of neckties and t-shirts. Neckties, because I just think they are just so cute as cupcake topper....and t-shirts--because you can put anything on a t-shirt!
It's the perfect solution for personalizing the cupcakes to fit the man of honor...and also a great way to add some laughs! Coming up with a theme for Father's Day can really be tricky--since not every dad is into golf or fishing..(or even neckties)! I think this is the perfect answer...and it's so easy too!
How to Make Father's Day Cupcakes
Today's design is all about colorful ties and funny t shirts!
First, you'll need something to make a shirt with. They do make t-shirt cookie cutters...but if you have a square cutter, that is all you really need. (I wish we had figured this out before buying the way-too-big t-shirt cookie cutter this morning). We actually used the same square cutter to create both t-shirts & collared shirts.
I rolled out some fondant (with a little tylose powdered kneaded in for quick drying.) Here I am forming my shirt with a 1 ½ inch square cutter.
Of course, don't feel obligated to get the exact size as mine. Next, just snip away the lower edges of the square, to form two short sleeves.

I then turned the short sleeves downward just slightly.

Here is the point where you'll change your technique a little depending on if you are making a t-shirt or a shirt with a collar. On the right, you can see that I formed a t-shirt neck with the bottom end of a standard piping tip. That's it!
Creating a shirt with a collar is very simple too. Rather than cutting out a half circle for the neck as we did above, I just created a small slit with a sharp knife.

Then, I folded down the two sides to create the collar. This can be an easy golf/polo shirt look, or a short sleeve button down (which is the look I went with).

*Let your shirts dry on a surface dusted with a little cornstarch or powdered sugar to prevent sticking.

Next, I cut out necktie shapes from fondant. (I kneaded in a little tylose powder into it so it would dry more quickly.) Once I had one tie that I liked, I used it as a basic guide to cut out my other ties.
You could also create your own template for your necktie by cutting out a tie shape from paper (photo paper or cardstock is easiest to work with because of the thickness.) Lay it on the fondant and cut around it for uniformity....or just wing it with no template at all! ;0)
Then, I placed the tie (dampened in back with a little water) onto the shirt, and pressed a little dot of fondant at the top to create the knot of the tie.

Food Coloring Pens!
As you've probably guessed already from the pictures above, food coloring pens play a big role in decorating the toppers! I had so much fun with this part.
Once your fondant has set, you can easily write your messages or designs. There are several brands out there...but the ones that I used today were Americolor and FoodWriter pens.
If you don't have any food coloring pens, you can also create a paint by mixing a little vodka or lemon extract with food coloring gel. I use vodka. Then, just brush it on with a tiny brush or toothpick.
I only made three shirt and tie combos--so much fun though!
I also made a luau shirt :0) 
Finally, it was time to decorate the t-shirts! My favorite part. I made t-shirts that apply to my husband (and I suspect a lot of other dads out there)!
He gave them his stamp of approval :0) -- Cafepress.com has some really funny shirts & sayings which are great for inspiration too.

A Note About Airtight Containers
That's all there is to it~ We're done! -- Now they just need to find a cupcake to call home. Just fyi, I don't trust airtight containers with my cupcakes --especially if they are topped with fondant toppers.
The risk of peeling liners or softened fondant accents is too great. You want your containers to breathe a little to be on the safe side! A bakery box in the refrigerator works just fine.
I hope that you enjoyed this tutorial! Feel free to borrow my shirt designs or come up with your own twist! I can't wait to see what you come up with!
Have fun!
We hope that you enjoyed this quick tutorial! Have fun creating Father's Day cupcakes of your own! You can easily transfer this idea to birthdays as well! If you give it a try, we would love to see in the comments below.
*You may also enjoy our Father's Day Coffee Mug tutorial for another cute option!


Thanks for the great idea! Just bought a new car and wanted to make a "thank you" for the salesman, plus, he's a new daddy! I made shirts to represent both. Also, made some of my shirts like tank tops. Pictures didn't turn out well so won't post.
What a nifty idea for Farthers day! Thanks a lot for sharing :)
Great Fathers Day ideas. So easy. Been out of state for one week and couldn't wait to get back to my computer and this cake school.
Oh thanks for this tutorial!! I cant wait to make it!!
:D
these shirts were really cute...and easy! Im a big fan of easy :) What brand of edible markers do you use? I can only get the Wilton ones locally...
Hi Brenda, we used the AmeriColor Gourmet Writer, we order it online.
Loved these!!! And I certainly made them and posted pictures!! Melissa you have such great ideas! Thank you for sharing
Oh so cute!! Thanks for sharing!!
Fantastic ideas. I absolutely love being part of your wonderful school as I learn so much. A big thank you from Australia ??