My Cake School

Cake Tutorials & Recipes

  • About
  • Recipes & Tutorials
  • Newsletter
menu icon
go to homepage
  • About
  • Recipes & Tutorials
  • Newsletter
    • Facebook
    • Instagram
    • Pinterest
    • Twitter
  • search icon
    Homepage link
    • About
    • Recipes & Tutorials
    • Newsletter
    • Facebook
    • Instagram
    • Pinterest
    • Twitter
  • ×

    Home » Recipes » Cake Decorating Tutorials

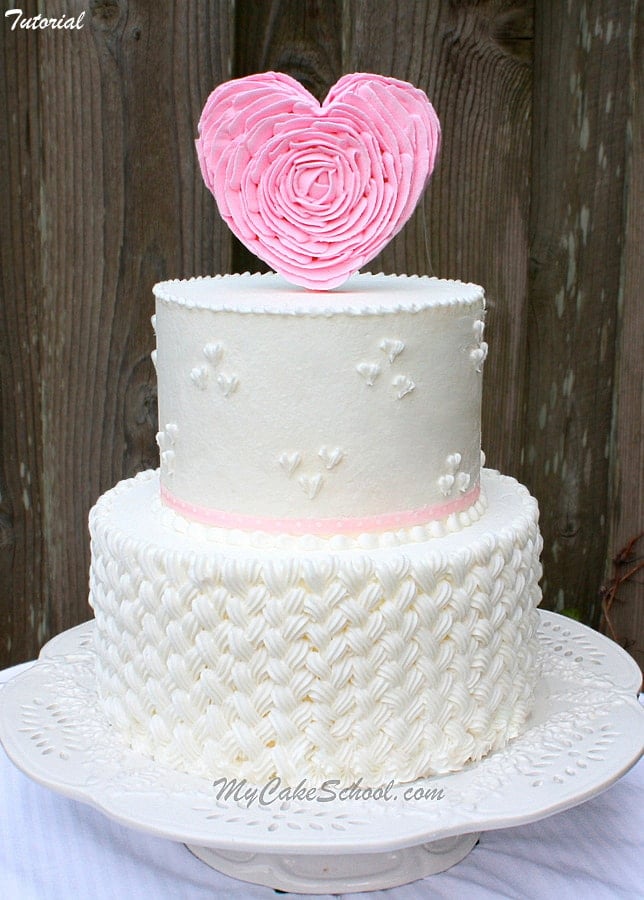
    Braided Buttercream Cake with Ruffled Heart Topper~ Video

    February 12, 2015 By Melissa Diamond 23 Comments

    265 shares
    • Share
    • Tweet

    In this short cake video tutorial, I'll show you how to make an elegant braided buttercream cake design with a ruffled heart cake topper!

    These are such elegant techniques and can be applied to cakes for all sorts of occasions from birthdays to Valentine's Day, anniversaries, and more!


    Braided Buttercream & Ruffled Heart Topper Tutorial by MyCakSchool.com


    Materials:

    *In the tutorial, I'm working with 8"/6" cake dummies (4 inch height).  As always, we recommend settling the tiers & crumb coating before adding the final layer of frosting.  You will need a cake board for each tier, as well as bubble tea straws (or supports of choice) to support the weight of the upper tier, as with any stacked tier construction.

    Vanilla Buttercream- We used our Fluffy Vanilla Buttercream, but any buttercream that holds it's shape nicely will work

    Royal Icing, medium consistency (Recipes section)

    Coloring Gel: Your pink of choice, we used Wilton Rose

    Piping Tips: Desired sizes of star & round tips--We used  Wilton 18 & 13 star tips, and round tips 2, 6, 12 (for various sizes of bead border).  Also, 104 (petal) tip for cake topper

    Gum Paste or Fondant with Tylose- Cut out desired heart shape

    Lollipop stick for anchor

    Heart Shaped Cookie Cutter in desired size for topper

    Piping Gel or "glue" of choice


    Notes:

    For the heart cake topper, allow the gum paste (or fondant/tylose) heart shape to dry for at least 2 days to be on the safe side. Also, make an extra gum paste heart just to be on the safe side.

    After piping your royal icing, allow to set up preferably for 24 hours before handling.  I do not like to refrigerate royal icing pieces.  This is something that I would add to a cake close to the time of the event.

    Related posts:

    1. Tree Stump Cake with Carved Initials- Tutorial
    2. Lots of Love!~ A Valentine's Cake Tutorial
    3. Petal Cake Tutorial
    4. Brush Embroidery with Buttercream- Free Video Tutorial
    5. Learn to Make Succulents! ~ A Video Tutorial
    « Candy Pour Cake~ A Gravity Defying Cake Video Tutorial
    Pink Champagne Cake {Scratch Recipe} »

    Comments

      Leave a Reply Cancel reply

      Your email address will not be published. Required fields are marked *

      The maximum upload file size: 2 MB. You can upload: image. Drop file here

    1. PattyBug February 27, 2015 at 9:59 pm

      Loved the video and love your creativity!

      Reply
    2. Melissa Diamond February 27, 2015 at 11:57 pm

      Thank you PattyBug!! xo

      Reply
    3. Dene Swearingen March 4, 2015 at 11:22 am

      I am baking this cake this weekend. Did you freeze this one?

      Reply
    4. Melissa Diamond March 4, 2015 at 5:16 pm

      Hi Dene, do you mean the cake layers? You can if you would like to. We often bake and freeze in advance, then thaw before decorating. Maybe I'm misunderstanding your question though, let me know if I am!

      Reply
    5. MsGF March 5, 2015 at 4:34 pm

      Beautiful and clever as always. I love the finished look of the braided tier. The RI topper is awesome! Love it!

      Reply
    6. abdamina de jesus March 8, 2015 at 5:04 pm

      Beautiful.... Thanks

      Reply
    7. Karen Merritt March 10, 2015 at 7:50 am

      Hi Melissa. Love the braid! I was wondering if you have tried piping the ruffle on both sides of the heart? I am thinking that I would have to do this a week in advance - piping one side, waiting 2-3 days then CARRFULLY piping the other side. What do you think?

      Reply
    8. Melissa Diamond March 10, 2015 at 9:12 am

      Thanks Karen! No, I haven't tried piping on both sides. I think that it would work if as you said, the first side has dried firm before doing the other side. It will be a bit on the heavy side, but as long as your anchor runs the height of the tier (or you can thread the anchor through a straw that is cut to the right height, it will be supported. Good luck!

      Reply
    9. Anita Barron March 27, 2015 at 9:44 pm

      Very Beautiful Melissa

      Reply
    10. Rebecca Pregnell August 27, 2015 at 1:54 am

      Wow thank you Melissa and Bebe! What a stunning cake. I've saved this as a favourite in case my brother proposes to his girlfriend! It would be perfect as a centrepiece for a bridal shower

      Reply
    11. BeBe August 27, 2015 at 7:06 am

      Hi Rebecca, Thank you for posting your nice comment!

      Reply
    « Older Comments

    Popular Recipes

    • Sliced Hummingbird Bundt Cake on a white pedestal
      Hummingbird Bundt Cake
    • Collage of Cake Recipes with Fruit
      100 Cakes with Fruit
    • Sliced Irish Cream Cake on pedestal
      Irish Cream Cake
    • Sliced Strawberry Lemonade Cake
      Strawberry Lemonade Cake
    • Sliced Lemon Coconut Pound Cake on pedestal
      Lemon Coconut Pound Cake
    • Boston Cream Pie from Cake Mix on a white pedestal
      Boston Cream Pie (from Cake Mix)

    Featured Holiday Cakes

    More Seasonal Cakes

    Popular Recipes

    • Lemon Bundt Cake on white Pedestal
      Lemon Bundt Cake
    • Collage of Cake Mix Photos
      35+ Box Cake Mix Recipes!
    • Mocha Cake on pedestal
      Mocha Cake (Doctored Cake Mix)
    • Closeup of Oreo Cupcakes
      Oreo Cupcakes (Doctored Cake Mix)
    • German Chocolate Cake, Sliced
      German Chocolate Cake (Cake Mix Recipe)
    • Chocolate Chip Pound Cake on Pedestal
      Chocolate Chip Pound Cake

    Featured Holiday Cakes

    More Seasonal Cakes

    • Free Blog Tutorials
    • Free Cake Videos
    • Recipes
    • Contact
    • About

    Copyright © 2023 My Cake School. Melissa Diamond. All rights reserved | Terms and Conditions | Privacy Policy