The Very Hungry Caterpillar--Pull-Apart Cupcake Cake Tutorial!
We are excited to share a CUTE cupcake cake tutorial based on one of my favorite children's books--The Very Hungry Caterpillar (by Eric Carle)!
This would make an adorable birthday cake or even baby shower cake.
This sweet little hungry guy seems to be making quite a comeback. Lately I've seen birthday party themes, toys, and even Hungry Caterpillar children's bedding--(See Pottery Barn Kids--The Cutest!!!) -- So, the time has come to cupcake-cake him.... you will love it!
Table of Contents
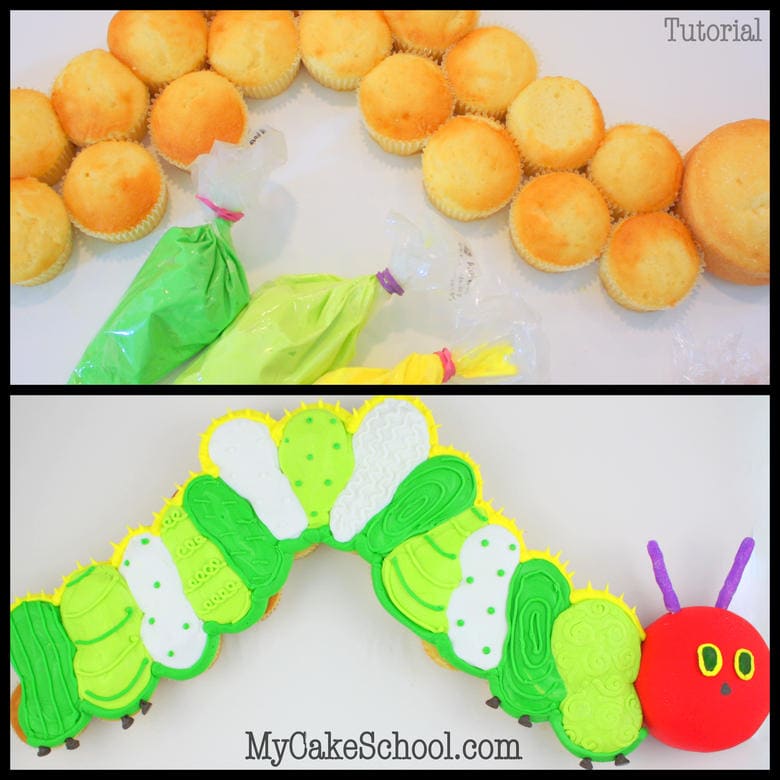
Mapping out the Cupcake Cake Design
In case you've never made a pull-apart cupcake cake, you'll want to make sure to add a dot of icing to the bottom of your cupcakes--this will help them to stay put. Notice the head that I added to the end-- it's a 4" round.
You'll also want to stagger your cupcakes so that they are nicely nestled next to each other---we don't want any large spaces in between. This feels a bit like assembling a puzzle!
I've loaded up my piping bags with a medium consistency crusting buttercream--and fitted them with a piping tip 12.

Let the buttercream piping begin!
Here, I'm piping over the cupcakes wtih alternating "stripes". I'm somewhat staying within the color scheme of the actual caterpillar from the story--but not exactly. 
Now, I'm smoothing over my slightly crusted buttercream with a piece of a Viva brand paper towel. This step is optional, I just felt like a smooth finish today!
However a little lumpy bumpy texture would be great too- there's no wrong option.
Some of my stripes are pretty chunky and thick--I wanted to add a little extra dimension.

Remember when I said that I wasn't going for the exact look of the caterpillar from the story? Well... now you'll really see what I mean. I love patterns--and I love piping! :0) -- I think that our caterpillar needed a little extra pep!
All of my piping is done with a tip 3 or 4-- with the exception of the outlined border on top and bottom---that is done with a tip 12.

Hungry Caterpillar Face and Final Details
Now, time to make our caterpillar really look like a caterpillar! Earlier, I covered my 4" cake with some pre-colored red fondant. If you are not a fan of fondant, you could also use buttercream.

That's all there is too it! Are you ready? Here he is!
Yay! I love him ;0) I hope that you enjoyed the tutorial! It really is a fun one.

Thanks so much for stopping by the blog today.....now, who's hungry for cupcakes? ;0)
Hi Gemma, we used a 24 x 24 board, there is more information on this in the above post dated Sept. 1, 2011.
I just adored this tutorial and I used it in British talent week in the book category and drum roll please I got 1st place in my category and most brilliant idea award from the judges once again thank you so much
Hi
Thanks for answering my query before, I am going to make the cake in 2 weeks time.. just wanted to have a trial with the frosting, what is 2 teaspoons (8 gr) vanilla, clear vanilla for a whiter frosting... is this vanilla bean or essence?? I live in Australia so might be called something else!
Thank you
Thankfyou for you guidance and assistance.. The cake was a winner!
Would love to send u an image!
Hi! What's the recipe for the buttercream? I would like enough to do the head too, as fondant scares me ;)
And can I use baking paper? All our paper towels are textured :) Thank you, Melissa!!
Hi Karen! Parchment may work also although I wouldn't worry about it if the paper towels are textured ;0) It would just look like it was meant to be that way.
Also, if you have any trouble, just know that a little texture from your palette knife, or piped details, etc. is a really common style of decorating-- back when I made this tutorial there was way more emphasis on everything having a smooth finish. Now, textured styles are everywhere. Have fun with it!
Here's a link to our Classic Vanilla Buttercream:
https://www.mycakeschool.com/recipes-tutorials/classic-vanilla-buttercream/
Thanks Melissa! How much buttercream would be needed for this? Double this recipe or otherwise? And would the sugar need to be reduced, as it said for cupcakes to consider a decrease? First birthday party this weekend...getting amp'd!! :)
Hi Karen, The Classic Vanilla Buttercream recipes makes 4 1/2 cups and I think that would be enough. You could increase the recipe by 1/2 and have no worries. Decreasing the powdered sugar by 1 cup will give you a softer frosting and softer crust which some bakers like. It is personal preference, we most often use the full amount. Have you made red buttercream before now? If not, it can take the red color hours to fully develop its depth of color, depending on what brand of food coloring you use. Even if it does not look like a true red, once it is on the cake board with the other cupcake colors, it will look red. Hope all goes well.
Aww, these are so cute caterpillar cupcake, going to make these for my kids today.