In this fun and easy cupcake tutorial, you will learn how to make adorable pull-apart Ice Cream Cone cupcakes!
These can be easily adjusted to fit the number of guests or desired colors for your party – this unique design is always a crowd pleaser!
Update: We have added a “minute video” version of this cute & simple ice cream cone cupcake tutorial! We originally posted this summertime favorite back in 2011 and the response over the years has been wonderful.
It is such a fun and EASY design! The only difference that you will notice between the video & the blog tutorial below is that I no longer use piping tips to frost these cupcakes. I simply snip the end off of my disposable piping bags. This saves on cleanup time. Enjoy!!
How to Make Ice Cream Cone Cupcakes
Blog Tutorial: May 20, 2011
Today we made ice cream cone cupcakes! This theme is perfect for summer parties and the best part of all is that they are SO quick to make! The most time consuming part is tinting the frosting.
As an added bonus, there are no worries of making the icing super smooth because ice cream is kind of swirly & lumpy-bumpy–hooray!
Here’s what I did…
First, I cut notches out of some waffle cones so that once flipped, the cones would lie pretty flat on my cake board. It’s best to saw your cones with a serrated knife. It’s a little tricky, but not too bad…I broke one though! :0)
We could have used one wide board but we decided we liked the look of three narrow ones better…
I piped a little frosting on the back of the waffle cone to secure it.
Now the fun part begins! It’s time to add our cupcakes. once again, use a little frosting dot to secure it to the board.
I pushed it into the cone so that it would fit snugly.
Next, it’s time to add our vanilla buttercream to create our ice cream scoops! I did the piping using a medium sized (tip 12) round piping tip but you could also simply snip the tip away from a disposable piping bag.
To add a little color & fun, we used confetti sprinkles, mini chocolate chips, & toffee bits for decorations.
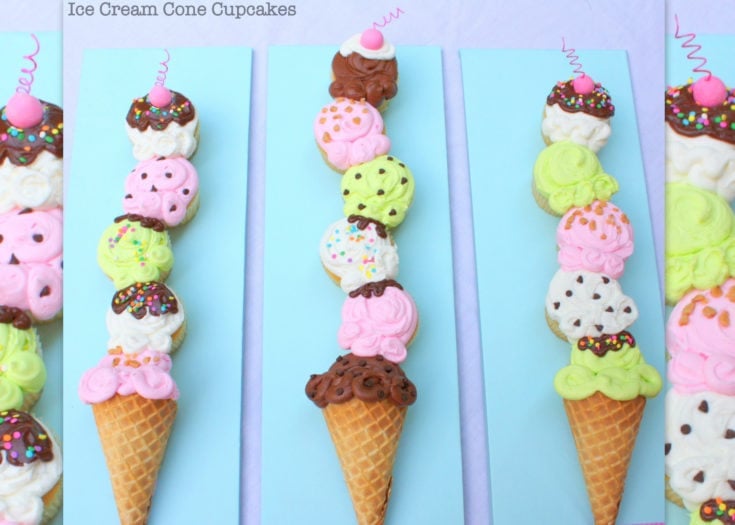
Here’s the side view of our tall cupcake ice cream cone! For “hot fudge”, you can use store bought icing, or you can melt chocolate chips or candy coating and pipe it onto the ice cream.
Create as many tall ice cream cones as you’d like!
As a final touch, I added a fondant cherry with a coiled stem. The stem is paper covered floral wire which I painted pink using coloring gel mixed with a small amount of vodka. (You could also use a little lemon extract). This is an optional step but it’s fun!
That’s all there is to it!! I made three tall ice cream cones for a total of 16…but wouldn’t it be fun to make a super long cone the length of the picnic table? Maybe another time…. But for now, these happy little ice cream cones make me smile… :0) —
Keep this fun ice cream cone cupcake cake design in mind for summertime parties, kids birthdays, ice cream themed parties, and so many more special occasions!
More Fun Tutorials for Ice Cream Themed Cakes and Sweets!
Looking for an ice cream cone cake design that is cute and easy? Check out our free tutorial for this tall ice cream cone cake! I love how simple this design is, and it could easily be piped onto a sheet cake as well. Check out our free video tutorial! Ice Cream Cone Cake
For more Ice Cream fun, check out our easy pull-apart Ice Cream Sundae Cupcake Cake!
And this Ice Cream Cone cake topper tutorial from our Member Cake Video Section would make the perfect centerpiece for the dessert table! So fun! Ice Cream Cone Cake Topper Tutorial
Ice Cream Cone Cupcakes!!!!-Minute Video & Blog Tutorial!

Learn how to make cute and easy Ice Cream Cone Pull Apart Cupcakes!
Materials
- We used three 9×13″ sheet cake cardboards if you are doing the exact same setup as I used in my blog tutorial. (Each board is sliced longways, stacked, & wrapped to create one narrow base board.)-- Adjust to the number of cones you'd like to make.
- Your board covering of choice. I used a plastic tablecloth secured in back with a stapler.
- Your vanilla buttercream frosting of choice- We like our Classic Vanilla Buttercream (Recipes Section)
- Cupcakes of choice
- Waffle Cones for the number of cones you're building
- Desired number of cupcakes
- Disposable Piping Bags
- Coloring Gels: I used Americolor Electric Green, Wilton Rose, & Chocolate Brown
- Chocolate frosting for the “hot fudge” (canned chocolate frosting is a good shortcut)
- Pink fondant with white 18 gauge floral wire (painted or colored pink with food coloring pen) to create cherry on top.
- Misc sprinkles, mini chocolate chips, etc. of choice
Instructions
- Cut little notches from the back of the waffle cones that you'll be using so that they will not roll off of the board and will lie a little flatter.
- Attach to the board with a couple of dots of buttercream
- Pipe a dot onto the back of the cupcake and push it partially onto the cone. The buttercream on the bottom will secure it.
- Continue adding cupcakes, dotting the bottom with a little buttercream for "glue". Repeat until the cone is as tall as you'd like.
- Tint your buttercream as desired, add to disposable piping bags with either the tip snipped away, or you can use a tip 12 (medium round tip). Pipe onto each cupcake to look like ice cream scoops.
- Add details like sprinkles, mini chocolate chips & jimmies. You can use white frosting for "whipped cream" and dark frosting or melted candy melts/chocolate for "hot fudge".
- Optional: For a cherry on top, take a ball of hot pink fondant and add a coiled piece of white paper colored floral wire that has been painted with coloring gel + vodka or lemon extract. (The alcohol helps the "paint" to dry faster.) Coil the wire around a spoon handle or straw and slide off.
My Cake School Cake Tutorials, Recipes, and More!
Don’t miss our full collection of free cake tutorials in our Free Tutorials Section, which also includes a Free Cake Video section! We’d also love for you to check out our FAVORITE cake and frosting recipes in our Recipes Section!
If you are interested in learning even more about cake decorating, you should consider becoming a member for our site! We have hundreds more cake video tutorials to share, which are accessible to our members. As a member, you can watch and rewatch our tutorials as many times as you like for as long as you are a member. You can find all of the details here! Membership Information for My Cake School- Learn Cake Decorating with Us!
Adorable!!!! =)
Madame Sweet you have done it again…so so so so cute. Do you dream cake ideas?? I do sometimes….anyway, these are darling. I am trying to figure out a way to do it with mini cupcakes….Thanks, when I saw this come up in my blogroll I was excited!
That is the most creative thing I’ve seen in a long time. I love it! Thanks for sharing it with us.
This is so cute!!
Thanks so much everybody! Trish, I’m sure that you could do the same with mini cupcakes—how cute! I would just saw off the top half of the cone (give or take), so you would have a shorter , cute little cone to work with :0)
I LOVE THESE! Way cute have to do them this summer!
This might be the cutest thing I have ever seen!!! What a clever and unique idea!!!
Amazing!!!
This is too cute!
I really LOVE these cupcakes!!!! I need to find an excuse to make them!!!
I can only imagine how much fun it would be to do these with my lil neices! I’m in awe of your creativity!
WOW!!!! They look fantastic! Very creative!
That is the cutest thing I have ever seen!!!! I will have to share this!!! Thanks for sharing!!!
These are so fantastic! LOVE!
Those are super-cute!! Love them!!
Those are just so adorable! It makes me want to have an ice cream party now!
This such a great idea for the summer. I was thinking of a ice cream social party now you give me the idea. Great work.
LOVE them!! How creative. :)
ABSOLUTELY darling and creative as usual!! Melissa….THANK YOU so much for sharing your talents and ideas with us!! ( : Will definitely have to do these soon!
What a clever creation! Cupcakes and ice cream the combination of the two doesn’t get much sweeter! Love the presentation!
These are absolutely adorable! I hope I get a chance to try this out!
Thank you so much for all of these nice comments! If anyone makes them, send me a picture! I would love to see!!
This is super duper creative and darn cute! awesome work!
I LOVE IT!!!! very nice and such a fun idea
OMGoodness…I love this. And I love Trish’s idea of doing this with the smaller cupcakes. Adorable!!! I just made the vanilla wafer “burgers” yesterday for a picnic themed party. Now we need to have an ice cream party!!! I am SO glad that I found My Cake School! You’re awesome!
I was just shown your blog today and I am already in love with you!!! This is the cutest thing I have ever seen to do with cupcakes. I can’t wait to make these!
OMGoodness!!!! These ABSOLUTELY ingenious! I love all your creations. You indeed must dream cake! Thank you for sharing your creativity and your skills with us. And just think, I found your site by mistake…so glad I did.
100% ADORABLE! So very creative! LOVE IT!
Cool…….
very cool
cool
Super cool! what a great party idea!!
Love this love this love this..i love cupcakes!! Wish i could bake like you but i will pass on idea to someone who can make them for me!!
Love, love, love this idea. So adorable. Reposted on my FB page.
These are the cutest cupcakes I’ve ever seen!! Love! I shared them on my fb page. http://www.facebook.com/iheartnaptime
OMW!!!! that is sooooo cute, and just perfect for my baby girls birthday party (In August). She will be turning 2, and the theme i choose is flowers, cupcakes and butterflies :)
Ohhh, I will have to give this a try, The kids are going to love this ;)
OMG…..luv it!
Thank you!! And Jamielyn, what a cute blog you have!!!!! Love it! :0)
LOVE this!! I might use it for my sons birthday!!
I have been scanning through your blog as I waited on my pressure cooker to finish…I laid down my butter and sugar for a short stint with fresh veggies. I just wanted to tell you how very much I have enjoyed your blog (went back to last December) and express how gifted and blessed you are to have such talent. Thank you for sharing.
So very very brilliant. I just adore this idea. I posted a link on EdibleCrafts.CraftGossip.com (spotted on pinterest). :)
This is one of the cutest cupcake ideas I have ever seen. I just saw it over at Edible Crafts and had to stop by to see what else you have created.
This is fantastic! Do you know the iPod app “Scoops”? It’s just like that!
This looks incredible :D
This is so cute! I’ll be featuring it on my blog today.
What an outrageously awesome idea!!!
I too am very excited to come across your site ITS FANTASTIC you are amazing and Thank you so much for sharing with everyone step by step. cant wait to share my cones with my family and friends.
Making these for July 4 th– wish me luck!
These are adorable!! Making them for a summer party! So far- these look the yummiest, the coolest and believe it or not the easiest!!!!!!
LOVE these!!! I have decided to do an Ice Cream themed party for my nieces birthday next month just because I HAVE to make this! lol! Can’t wait to give it a go! Thank you for this amazing idea.
I am not a cakey, sweet-making, baking or very creative/talented in the kitchen at all but I might could actually do this, and might even want to try (which is also highly unusual). Wow! Thanks for a great blog and cake/party/shower idea that would not cost a fortune and could feed however many you needed it to. I will definitely be bookmarking this page. You rock!!
Holy Smokes! You are awesome! I am going to try this idea this coming weekend for my son’s 5th birtdhay. I was going to attempt a star wars cake but this would be great with light sabers as the theme ! Thank you for sharing!
These are the sweetest, I am going to have to try this, wish it would turn out as beautiful as yours!
I absolutely adore this! I am doing an ice cream theme for my daughter’s bday this weekend and was still trying to decide on the cake! Thank you so much!!!
This is AMAZING! LOVE IT! So glad my daughter just happened to tell me a couple days ago that she wants an ice cream birthday party next year…otherwise I may have tried talking her into one after seeing this!
My daughters birthday is next week, i am going to make thse, this is so cute
This is super cute!!!
I used your idea this past weekend for my sons bday party! Big hit! Thanks :) I hopefully backlinked you correctly on my site! Posted pics of the party and cupcake cones!
Too cute. I also like to create edible sweets. Candy buffets, cupcake & candy bouquets, etc., etc..
I made it! I was makign food for a “Gruffalo” birthday party (after the book by Julia Donaldson), and created “Owl Icecream” using your idea as a starting point. You can see the result here: http://madebybronwyn.blogspot.com/2011/09/austins-gruffalo-birthday-party-food.html
Thanks for your comments everybody! Bronwyn– LOVE how you put an owl spin on these, lol. Yours came out awesome!
i love this so much~!
Sweet!
Saw your ice cream cone idea online and just loved it! We made this for my daughter’s birthday. We filled with pudding and topped with real cherry. Kids loved them. Thank you!!
Julie—that is great to hear! So glad that you tried them out! ;0)
Soo Cool!
Me encanta!!!!!!, desde Costa Rica, muchas gracias!!!!!
Thank you for sharing!!! I just made two for a dessert auction my husband’s church is having tomorrow to raise money for a mission trip. I hope they bring in a lot of money.
Oh, I hope so too.
They are so cute, a great thing to do with the grandkids! They are going to live it! I love the way you think!
This is way to kool .
I never saw those, how cute!
Hi!! I absolutly love this cupcakes!!! So supercute!! xo
OMG these are SERIOUSLY the CUTEST cupcake/ cake idea ever. I am making them next weekend for my daughters 4th birthday party. I do have a quick question, for the painting of the floral wire is there anything you can use besides Vodka? I dont have any on hand and really dont want to have to go buy a bottle just to paint the spirals ya know. I am not a Vodka drinker I prefer rum lol. Anyways if you could get back to me and let me know I would greatly appreciate it! Thanks so much for sharing this idea! LOVE IT!
Hi Kristin–Thanks, I’m glad that you are going to make them! If you happen to have lemon extract (or any clear extracts that have a decent amount of alcohol in them), that will be fine—but if not, just mix a little water into your coloring gel! The purpose of mixing with alcohol is for fast drying, but for something like this, water would be fine.
These are so cute, I’m making them for my daughters bday on Saturday. Is one batch of buttercream icing enough?
Yes, that should be plenty!
I have a customer who wants something like this… how in the world would it travel for delivery/pick-up (she actually lives farther than I deliver, so she would need to pick them up)??
Hi Rose– I don’t think that your customer will have any problems. A dot of buttercream on the bottom of each cupcake will act as a good glue, and so will the frosting “scoops” across the top. For the ice cream cone itself, with it being a little heavier you may want to use warm (melted) white candy melts as your glue….but I remember that even with buttercream, it seemed nice and secure after it had a chance to set up.
If your boards are the same size as mine, you can transport each one in it’s own sheet cake box (meant for 9×13″ cakes). A little snippet/square of rubber shelf liner is also good for preventing sliding. You could use this beneath your cake board if your box is a lot larger than the cake, or even beneath the bakery box as you load it in the car. *Cake boards really need to travel on a completely flat surface. Hope this helps!
Thanks Melissa!
Thank you so much for sharing this great tutorial. I used it to create a cake for my little girl’s birthday ! You can see the pictures here: http://www.thatcutelittlecake.com/2012/09/ice-cream-party-ice-cream-cone-cupcakes.html
I have linked back to you so my readers can find your tutorial
Thanks again
Virginie
My daughter works at a ice cream shop and this would be so cute for her birthday!!
I just made these for my daughter’s 1st birthday. They were adorable and were a hit! Thanks so much for the creative ideas and clear instructions:)
I am making these for my sons 5th birthday party. I have my cake boards cut and taped together, however I’ve ran into a bit of a wrinkle. How on earth do you get the wrinkles out of the plastic table cloth. Yours look absolutely perfect. Love this idea and hope mine turn out as cute.
Hi Melanie, I tape the plastic tablecloth on the board, once it is on, there are usually some wrinkles remaining. I add additional pieces of tape that will pull those areas that have wrinkles…….the plastic will stretch and remove those wrinkles………often there is a lot of tape on the back of the board. The plastic used for tablecloths seems to vary and the tape that will stick vary also. You will need to experiment to see what holds best for the plastic you use. I most often use the silver duct tape, but have used regular household Scotch tape, even electrical tape.
Thanks for your advice BeBe. I got the plastic taped on just fine. Regular scotch tape work really well. I decorated a test batch with three cupcakes and they turned out super cute. Thanks again for this darling whimsical idea.
I need to have a BBQ or something so I can have an excuse to make these this weekend.
So creative and bet it’s delicious
Wow! Just pinned this and am featuring it in my fourth Cupcake Parade on Ducks’ na Row this Friday! Hope you can stop by:)
That is lovely. Thank you.
So cute
To trim the cones a zester/grater works super and the cones don’t break. I’ve used it several times for other decorating with sugar cones.
Thanks everyone for your nice comments!! @Nancy~ Great tip about the zester/grater. Will have to try it next time!
Love it!!!! Perfect for summer!!
These are adorable – can’t wait to start making my own!
Hi, my name is Kayla, I’m 9, and I love your website. I made this cake today for my brother’s birthday. This was so much fun. Thank you for sharing your ideas.
@Kayla- Yay! I am so happy to read your comment, you did an amazing job & I love the photo! I know your brother was thrilled with it! Thanks so much for sharing. xoxo