Ice Cream Cone Cake Tutorial
I'm so happy to share this CUTE and simple ice cream cone cake tutorial with you! It really couldn't be simpler to create and I love how it turned out!

In this cake video, you will see a quick review on how to make buttercream stripes- (you can see a more in depth video on buttercream stripes here)- and then the ice cream fun begins! This cake would be perfect for ice cream parties, summer birthday cakes, or for the ice cream lovers in your life!
*Of course, you don't have to make this ice cream cone design on a striped background- if you'd like to simplify things, a solid shade of buttercream would be adorable also!
Table of Contents
How to Make an Ice Cream Cone Cake
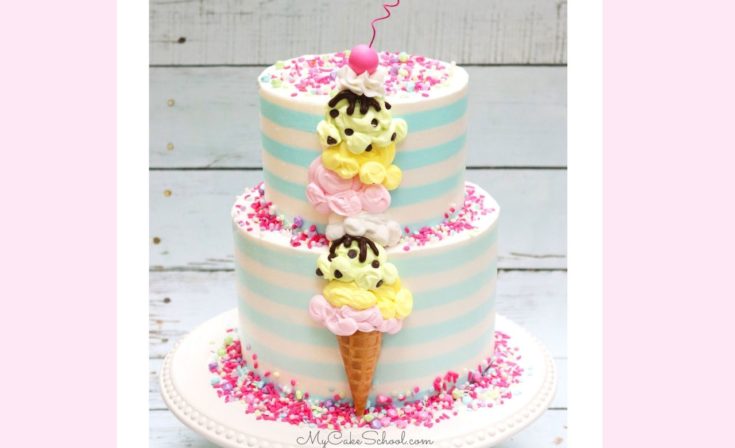
- As you'll see in our video tutorial, we pressed an ice cream cone (cut down to a smaller size) into the front of the cake.
- Then, we piped on our buttercream scoops. This is the fun part as you can change up the colors, add sprinkles or chocolate chips, "hot fudge" here and there, and stagger them a bit as you build higher and higher.
- To top it all off, we made a fondant cherry and curled stem.
- The actual ice cream cone design is something that comes together in a matter of minutes! I love how simple and cute it is. You could easily use this tall ice cream cone design on sheet cakes, double barrel cakes, and more.
Ice Cream Themed Cakes and Cupcakes
I'm a fan of cute ice cream themed sweets! We've made a few of these designs in the past! Make sure to check them out for more fun ideas!:
Giant Ice Cream Sundae Cupcake Cake Tutorial - A free step by step tutorial
Ice Cream Cone Cupcakes- A free video and step by step tutorial for pull apart cupcakes

Ice Cream Cone Cake Topper Video Tutorial- from our member cake video tutorial section
Enjoy the video!
Thanks so much for stopping by! We hope that you enjoy the video. If you give this cake a try, we would love for you to leave a comment and photo below!
We have hundreds more free cake decorating video tutorials and recipes to share with you. You can find a complete listing in our Recipes & Tutorials Section!
Ice Cream Cone Cake- A Free Cake Decorating Video Tutorial
Learn how to make an adorable buttercream Ice Cream Cone Cake with buttercream stripes in this free cake decorating video tutorial! This cake is perfect for birthdays, summertime parties, and more!
Ingredients
- For this cake, we used an 8 inch tier and 6 inch tier frosted in Classic Vanilla Buttercream Frosting (or your frosting of choice, just make sure that it contains butter so that it will firm up when chilled).
- Two cardboard cake circles cut to the size of each tier as usual.
- Four bubble tea straws cut to the height of the bottom tier to support the top tier.
- Cake Comb if making buttercream stripes (This one is from Evil Cake Genius)
- Coloring Gels: Americolor Sky Blue, Electric Green, Deep Pink, Lemon Yellow
- Ice Cream Cone (trimmed down and halved).
- Sprinkles of Choice
- Fondant (for cherry)
- Paper covered floral wire (I used a 20 gauge but any flexible gauge will do)
- Everclear, vodka, or lemon extract (for mixing "paint" for cherry stem). If you don't have this, use water.
- Chocolate candy coating for "hot fudge"
- 2D piping tip (for "whipped cream" on top), Tip 12 for filling in stripes
- Miscellaneous: Turntable (optional but always helpful), bench scraper, small angled spatula, disposable piping bags, small paintbrush, cake base or pedestal of choice
Instructions
For the Buttercream Stripes:
- Crumb coat the cake tiers and chill to firm up the buttercream for about 15 minutes or until firm.
- Follow that with a second layer of frosting. Then comb the cake. Chill again until firm.
- Using a medium sized piping tip 12 (or whatever makes sense for your size of stripe), fill in grooves to create stripes. Using a bench scraper (heating it in hot water is helpful), smooth over everything, removing the excess. It may take a few spins around the cake to remove the excess and reveal a clean striped pattern.
- Return to freezer as needed to firm up the frosting and go back in and find tune things.
Stacking the Tiers:
- Chill both tiers for about 20 minutes or until very firm before stacking. You just want to firm up the frosting, don't freeze the cake for hours or you will have a lot of condensation.
- Move bottom tier, which is on it's own cake cardboard, to cake base (secure with buttercream).
- Insert 4 bubble tea straw supports in the area where the top tier will be placed. My top tier was placed slightly off center, towards the front of the cake (to minimize the distance between ice cream scoops that will be added later.) . Add the top tier which is also on it's own cake cardboard.
Ice Cream Cone Decoration
- Trim down ice cream cone to desired length and also trim away the back (I halved mine).
- Push into the cake so that the bottom of the cone touches the cake base.
- Pipe on ice cream scoops in desired colors, add melted candy coating for "hot fudge" if you'd like.
- Add fondant cherry
Notes
Butter based frostings are best for striped buttercream cake designs as they get nice and firm when chilled, making the process much simpler.
Recommended Products
As an Amazon Associate and member of other affiliate programs, I earn from qualifying purchases.


So cute! Can't wait to make one myself for my next project :) thanks Melissa!
P.S. Still looking forward to your tutorial on how to use the St. Honore piping tip :)
I love this cake! Simple and fun with a big wow factor!