My Cake School

Cake Tutorials & Recipes

  • Facebook
  • Instagram
  • Pinterest
  • RSS
  • Twitter
Login
  • home
  • Videos
    • The Basics
    • Buttercream Techniques
    • Carved/3D
    • Chocolate Techniques
    • Cupcake, Cake Pop, etc. Methods
    • Gum Paste & Fondant
    • Themes and Occasions
    • See All Videos
  • Shop
    • Miscellaneous Cake Decorating Supplies
    • Kitchen Appliances
    • Chocolate and Candy Making
    • Fondant and Gum Paste
    • Piping Tips
    • Molds, Mats, Embossers, and Cutters
    • Cookbooks
    • Dusts and Sprays
    • Pantry Items
    • Bakeware and Tools
    • Sprinkles and Candy
  • Free Tutorials
  • forums
  • recipes
    • Cakes and Cupcakes
    • Fillings
    • Fondant/Gumpaste
    • Frostings and Glazes
    • Miscellaneous
  • contact
  • join

Father’s Day Cupcakes~Ties & Tees–Blog Tutorial!

June 5, 2012 By Melissa D. 21 Comments

654 shares
  • Share
  • Tweet

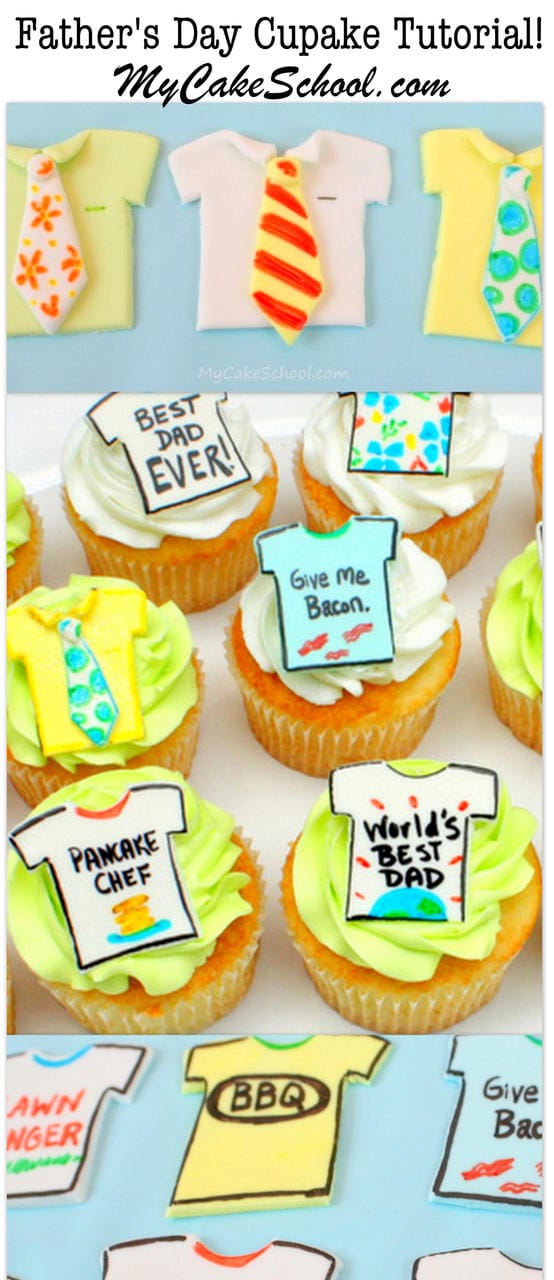
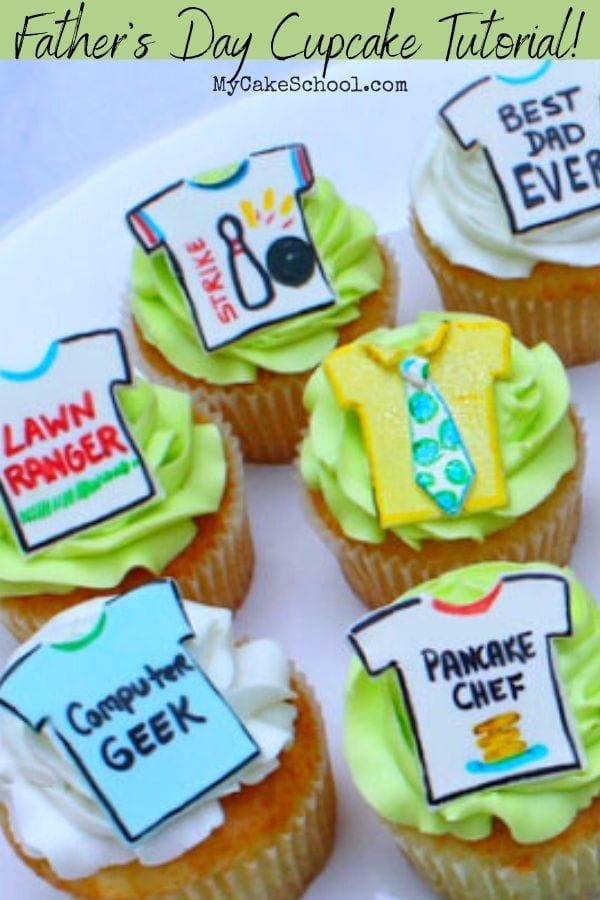
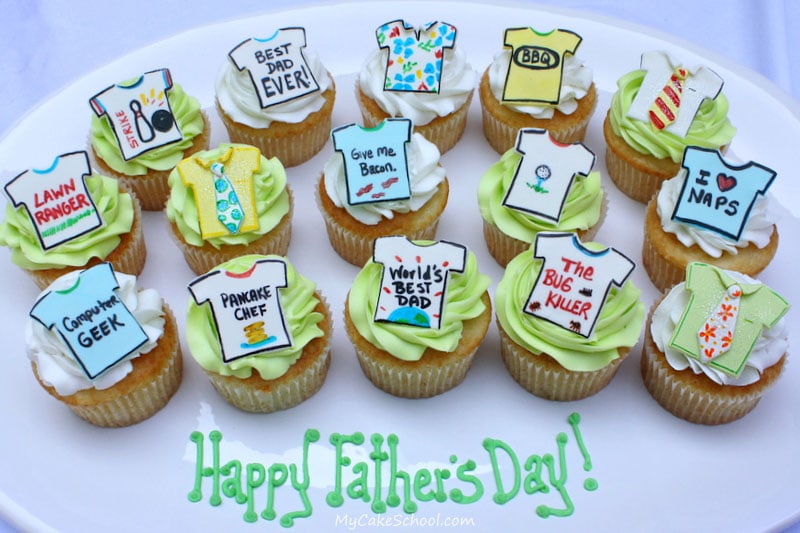
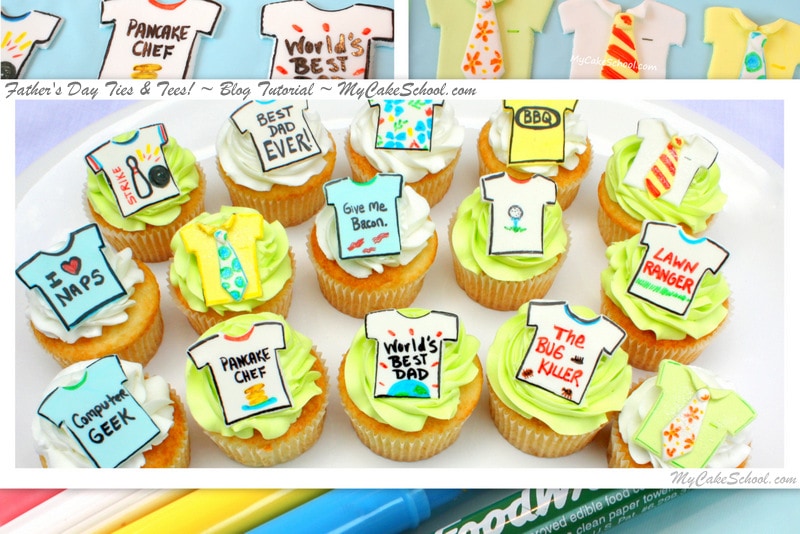
With Father’s Day just around the corner, today I’m going to share some cute & fun Father’s Day cupcake designs! These colorful “Ties & Tees” cupcake toppers can be used year-round but are the perfect way to celebrate the dads in your life!

Learn how to make funny Ties & T-Shirt Cupcake Toppers in this free Father's Day Cupcake Tutorial!


I’m going with a theme of neckties and t-shirts.  Neckties, because I just think they are just so cute as cupcake topper….and t-shirts–because you can put anything on a t-shirt!  

It’s the perfect solution for personalizing the cupcakes to fit the man of honor…and also a great way to add some laughs!   Coming up with a theme for Father’s Day can really be tricky–since not every dad is into golf or fishing..(or even neckties)!  I think this is the perfect answer…and it’s so easy too!

Father's Day Cupcake Tutorial by MyCakeSchool.com! Learn to make CUTE Ties and Tees toppers!


How to Make Father’s Day Cupcake Toppers- T Shirts & Ties for Dad!

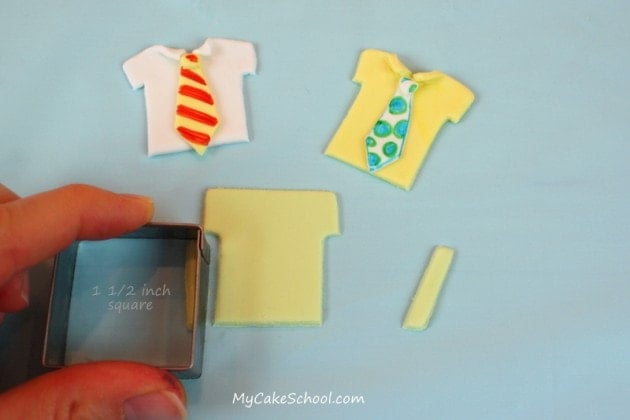
First, you’ll need something to make a shirt with.   They do make t-shirt cookie cutters…but if you have a square cutter, that is all you really need.  (I wish we had figured this out before buying the way-too-big t-shirt cookie cutter this morning).  We actually used the same square cutter to create both t-shirts & collared shirts.

I rolled out some fondant (with a little tylose powdered kneaded in for quick drying.)  Here I am forming my shirt with  a 1 1/2 inch square cutter.  

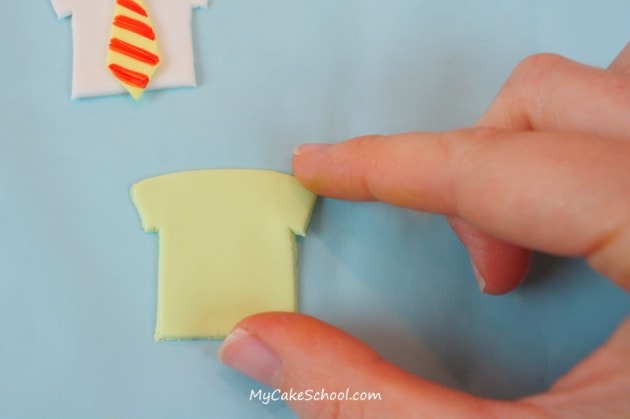
Of course, don’t feel obligated to get the exact size as mine.  Next, just snip away the lower edges of the square, to form two short sleeves.
 

Father's Day Cupcake Tutorial by MyCakeSchool.com!

Father’s Day Cupcake Tutorial by MyCakeSchool.com!


I then turned the short sleeves downward just slightly.Father's Day Cupcake Tutorial by MyCakeSchool.com!
 

Father's Day Cupcake Tutorial by MyCakeSchool.com!

Father’s Day Cupcake Tutorial by MyCakeSchool.com!

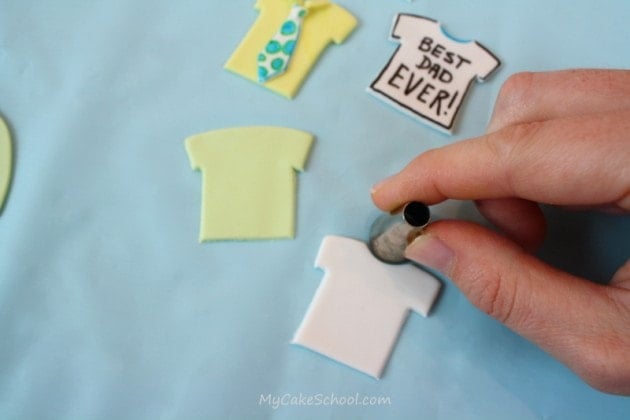
Here is the point where you’ll change your technique a little depending on if you are making a t-shirt or a shirt with a collar.  On the right, you can see that I formed a t-shirt neck with the bottom end of a standard piping tip.  That’s it!

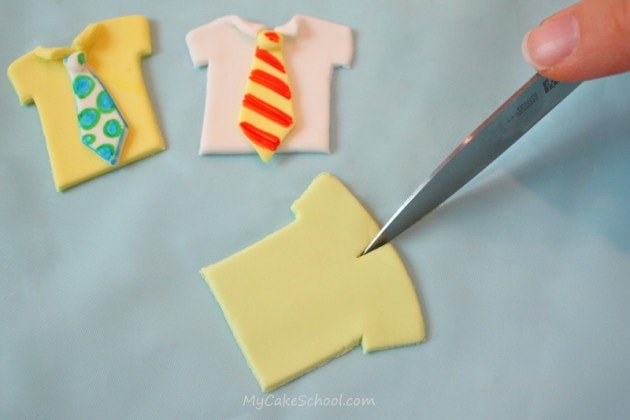
Creating a shirt with a collar is very simple too.  Rather than cutting out a half circle for the neck as we did above, I just created a small slit with a sharp knife.  
 

Father's Day Cupcake Tutorial by MyCakeSchool.com!

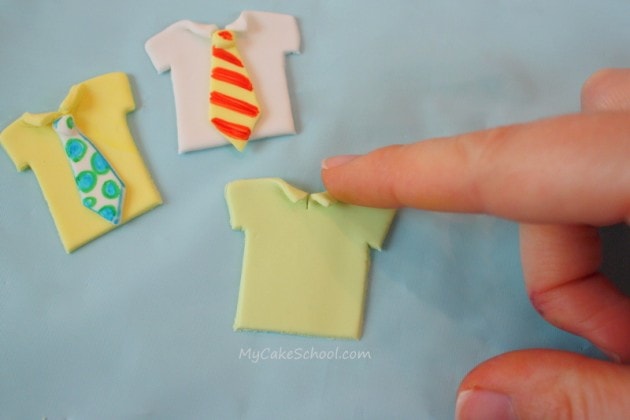
Then, I folded down the two sides to create the collar.  This can be an easy golf/polo shirt look, or a short sleeve button down (which is the look I went with). 
 

Father's Day Cupcake Tutorial by MyCakeSchool.com!

*Let your shirts dry on a surface dusted with a little cornstarch or powdered sugar to prevent sticking.  
 

Father's Day Cupcake Tutorial by MyCakeSchool.com!

Father’s Day Cupcake Tutorial by MyCakeSchool.com!

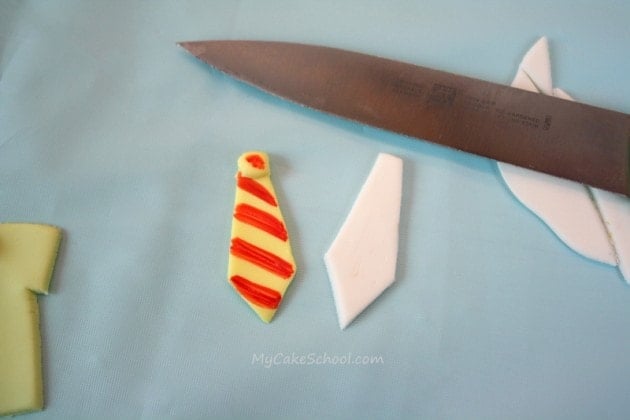
Next, I cut out necktie shapes from fondant.  (I kneaded in a little tylose powder into it so it would dry more quickly.)  Once I had one tie that I liked, I used it as a basic guide to cut out my other ties.  

You could also create your own template for your necktie by cutting out a tie shape from paper (photo paper or cardstock is easiest to work with because of the thickness.)  Lay it on the fondant and cut around it for uniformity….or just wing it with no template at all!  ;0)


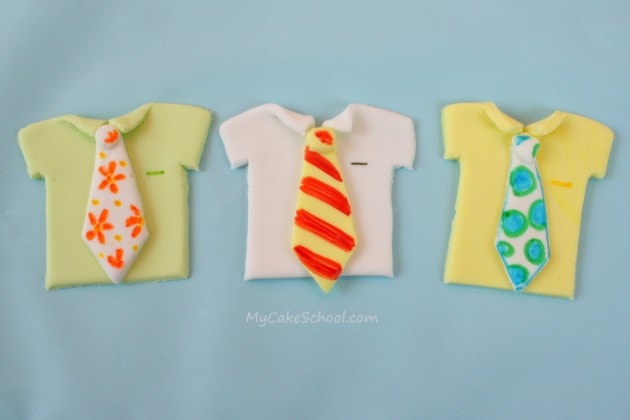
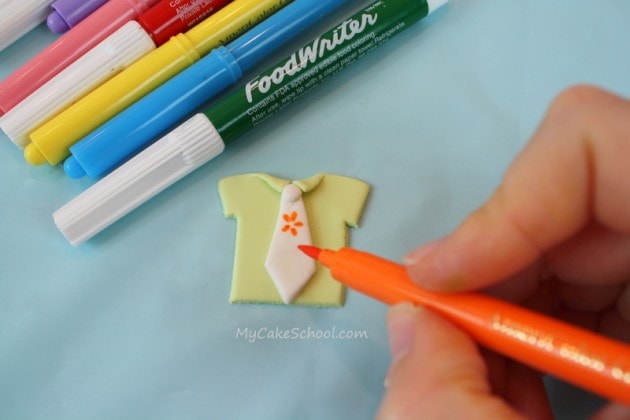
Then, I placed the tie (dampened in back with a little water) onto the shirt, and pressed a little dot of fondant at the top to create the knot of the tie.
Father's Day Cupcake Tutorial by MyCakeSchool.com!

Father’s Day Cupcake Tutorial by MyCakeSchool.com!

As you’ve probably guessed already from the pictures above, food coloring pens play a big role in decorating the toppers!  I had so much fun with this part.  

Once your fondant has set, you can easily write your messages or designs.  There are several brands out there…but the ones that I used today were Americolor and FoodWriter pens.  

If you don’t have any food coloring pens, you can also create a paint by mixing a little vodka or lemon extract with food coloring gel.  I use vodka.  Then, just brush it on with a tiny brush or toothpick.

I only made three shirt and tie combos–so much fun though!Father's Day Cupcake Tutorial by MyCakeSchool.com!

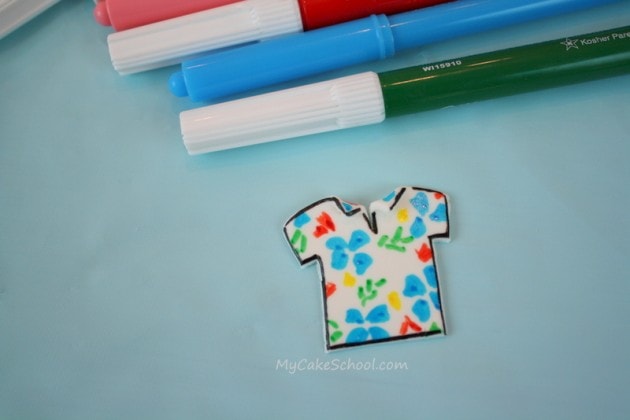
I also made a luau shirt :0) Father's Day Cupcake Tutorial by MyCakeSchool.com!

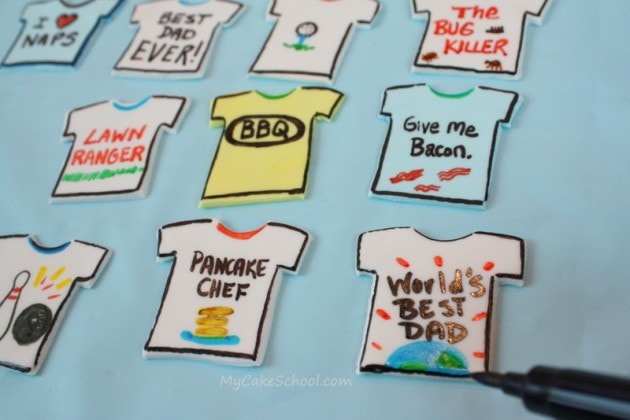
Finally, it was time to decorate the t-shirts!  My favorite part.  I made t-shirts that apply to my husband (and I suspect a lot of other dads out there)!  

He gave them his stamp of approval :0)  — Cafepress.com has some really funny shirts & sayings which are great for inspiration too.  
Father's Day Cupcake Tutorial by MyCakeSchool.com!

That’s all there is to it~ We’re done! — Now they just need to find a cupcake to call home.   Just fyi, I don’t trust airtight containers with my cupcakes –especially if they are topped with fondant toppers.  

The risk of peeling liners or softened fondant accents is too great.  You want your containers to breathe a little to be on the safe side!   

I hope that you enjoyed this tutorial! Feel free to borrow  my shirt designs or come up with your own twist!  I can’t wait to see what you come up with!


Father's Day Cupcake Tutorial by MyCakeSchool.com! Ties & Tees!


Father's Day Ties and Tees-MyCakeSchool.com

Related posts:

  1. Cookout Cupcakes!~ Free Blog Tutorial
  2. Witchy Woman
  3. Spiders Love Candy– How to Make a Spider Topper!
  4. El Dia de los Muertos–A Cupcake Tutorial!
  5. Birdcage Cupcakes~ Cake Decorating Blog Tutorial

Filed Under: Blog Tutorials, Custom Toppers & Figure Modeling, Seasonal & Holiday, Summer Tagged With: father's day

« Gum Paste Anemones & Vertical Texturing of Buttercream- Video!
Giant Slice of Cake- Cake Decorating Tutorial »

Comments

  1. trisha June 5, 2012 at 7:51 am

    Oh golly!!!!!!! How great for DAD…Making these would be a present for HIM and ME..WIN WIN! I love all your fun sayings on the T-Shirts, that is a great way to personalize!

    Reply
  2. Robin June 5, 2012 at 8:21 am

    You’ve been cupcaked! :)
    http://www.allthingscupcake.com/2012/06/05/fathers-day-cupcakes-2/

    Reply
  3. Sue {munchkin munchies} June 5, 2012 at 12:30 pm

    Love all the variety of your adorable shirts! The turned down collar is cute too:)

    Reply
  4. Beki Cook's Cakes June 5, 2012 at 2:44 pm

    Love it! I like the way you made the collared shirts.

    Reply
  5. Sophie June 5, 2012 at 4:06 pm

    These are so cute!! Is there a reason that you typically use fondant with tylose to make your cake decorations? I just wondered if it was a personal choice or if it holds up better or something like that? I just seem to prefer gum paste but wonder if I should be more fair and give fondant a chance!

    Reply
  6. Melissa Diamond June 5, 2012 at 5:02 pm

    Thanks for your comments!

    @Sophie– Good question! It’s just personal preference. I actually prefer to use gum paste for my cake toppers (figures, flowers, numbers, bows, etc.) —I make an exception with cupcake toppers though for fear that people will try to eat them! Adding just a little tylose gives me a happy medium…I can roll them a little thinner, they will dry a little more quickly, but they won’t become rock hard.

    Reply
  7. Sophie Loya June 5, 2012 at 9:02 pm

    Thanks Melissa!

    Reply
  8. MaggiesCakes June 6, 2012 at 8:21 am

    great idea! Very cute!

    Reply
  9. Jan Carmichael June 6, 2012 at 4:31 pm

    So cute!!

    Reply
  10. Tesei June 7, 2012 at 2:41 am

    Melissa, I couldn’t agree more with everyone, they are lovely, cute and fun! Thank you so much for sharing!!

    Reply
  11. Stephanie June 7, 2012 at 5:57 am

    Love!!

    Reply
  12. sharina June 7, 2012 at 8:40 am

    man these cupcakes look great! i didint know you there were special ‘write” penns. i dint use them in my workshop taarten maken

    Reply
  13. Joan Fels June 7, 2012 at 10:26 pm

    Thanks for the great idea! Just bought a new car and wanted to make a “thank you” for the salesman, plus, he’s a new daddy! I made shirts to represent both. Also, made some of my shirts like tank tops. Pictures didn’t turn out well so won’t post.

    Reply
  14. Mick and his airbrush kits woohoo June 14, 2012 at 5:28 pm

    What a nifty idea for Farthers day! Thanks a lot for sharing :)

    Reply
  15. Anita Barron June 14, 2012 at 10:01 pm

    Great Fathers Day ideas. So easy. Been out of state for one week and couldn’t wait to get back to my computer and this cake school.

    Reply
  16. pily June 15, 2012 at 7:59 pm

    Oh thanks for this tutorial!! I cant wait to make it!!
    :D

    Reply
  17. Brenda Clayton June 17, 2012 at 11:34 pm

    these shirts were really cute…and easy! Im a big fan of easy :) What brand of edible markers do you use? I can only get the Wilton ones locally…

    Reply
  18. BeBe June 18, 2012 at 8:05 am

    Hi Brenda, we used the AmeriColor Gourmet Writer, we order it online.

    Reply
  19. GlamMa8142425 June 21, 2013 at 12:06 pm

    Loved these!!! And I certainly made them and posted pictures!! Melissa you have such great ideas! Thank you for sharing

    Reply
  20. Michele Hodgden June 20, 2015 at 8:07 pm

    Oh so cute!! Thanks for sharing!!

    Reply
  21. Melissa Irvine June 24, 2016 at 6:02 pm

    Fantastic ideas. I absolutely love being part of your wonderful school as I learn so much. A big thank you from Australia ??

    Reply

Leave a Reply Cancel reply

Your email address will not be published. Required fields are marked *

You can click here to Subscribe without commenting

Add a picture

Melissa Diamond Meet MelissaWelcome! We'd love for you to check out our free cake tutorials & recipes, or join our site for online access to hundreds of videos and more!

Read More

The Perfect Gift

  • Lemon Buttermilk Cake {A Scratch Recipe}

    Lemon Buttermilk Cake {A Scratch Recipe}
  • Sweet Balloons Cake

    Sweet Balloons Cake
  • White Chocolate Coconut Cake

    White Chocolate Coconut Cake
  • Striped Buttercream Panels Cake

    Striped Buttercream Panels Cake
  • Lemon Coconut Cake with Lemon Curd Filling

    Lemon Coconut Cake with Lemon Curd Filling
  • Milk Chocolate Cake

    Milk Chocolate Cake
  • Buttercream Tulip Cake

    Buttercream Tulip Cake
  • Flamingo Ruffle Cake- A Cake Decorating Video Tutorial

    Flamingo Ruffle Cake- A Cake Decorating Video Tutorial
  • 60+ of the BEST Cake Recipes for Spring and Summer

    60+ of the BEST Cake Recipes for Spring and Summer
  • Lemon Cake {A Scratch Recipe}

    Lemon Cake {A Scratch Recipe}
Facebook Instagram Pinterest Twitter RSS
Login
Melissa Diamond Meet MelissaWelcome! We'd love for you to check out our free cake tutorials & recipes, or join our site for online access to hundreds of videos and more!

Read More

Your Favorites

  • Your favorites will be here.
  • home
  • free tutorials
  • videos
  • recipes
  • contact
  • join
  • login
  • home
  • free tutorials
  • videos
  • recipes
  • contact
  • join
  • login

Copyright © 2022 My Cake School. Melissa Diamond. All rights reserved | Terms and Conditions | Privacy Policy