Clumsy Witch!~A Halloween Blog Tutorial
Today I'm going to show you how to make an adorable Clumsy Witch Cake-- It's perfect for Halloween parties and so easy to make!

It's that time of year again....time for ghosts, goblins and all things creepy to find their way to our dessert trays! It may be a little early, but I've seen so many cute Halloween posts in blogs lately that I am in the mood to start planning.
Hmmmm....blood and guts vs. cute, any guesses on which way I'm going to go?
Let me introduce you to our clumsy witch......

Table of Contents
How to Make a Clumsy Witch Cake
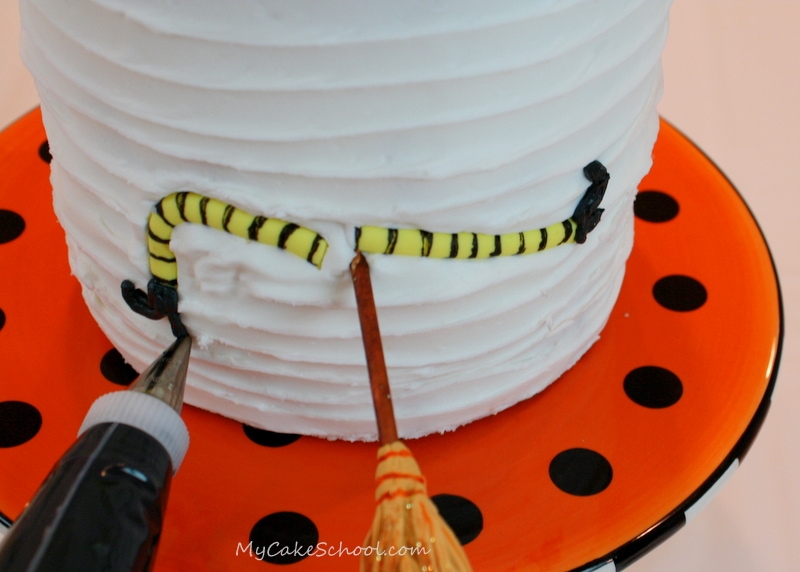
To get started, you'll need paint a lollipop stick brown. We're making a broomstick! I used a "paint" of (Americolor) Chocolate Brown with a touch of vodka. (This creates a food safe "paint" very similar to watercolors).

For the end of the broomstick, I cut and fringed a piece of tinted fondant mixed with tylose (to firm it up). The fondant is tinted with chocolate brown and lemon yellow. Gum paste would work well too....or even some yarn or floral wire!
Using a little water as glue, I wound the gum paste around the end of the lollipop stick until it looked like enough. I gave it a pinch at the top to secure it.

...and I used an Americolor orange pen and my brown "paint" from earlier to add a few extra accents.

Next, I made some witchy legs. At first I thought I'd just go with one long piece, but I later cut this in half. I used my Americolor black pen to draw stripes on the yellow fondant, but you could also create a paint similar to the brown paint we made earlier (vodka + black coloring gel). This is about 5 inches total, but go with what makes sense for your witch.

The cake that I am working with is a four layer 6 inch round cake. It is fairly tall...right around 6 inches, which gives me a nice surface to work on.
You can frost the cake any way that you'd like. I used our Classic Vanilla Buttercream, and created a ridged effect by applying a small tapered spatula to the cake while rotating it on the turntable.
I pushed the broom into the cake once the gum paste had firmed up a little. Then, I pressed the witch legs (still soft) into the cake. *If you'd prefer buttercream, you could just pipe on the legs!

Next...every witch needs a cool hat.
We made our hat out of a circle of black fondant with a bit of tylose kneaded into it for firmness (cut from a 2D piping tip) and a cone of purple fondant (Americolor Regal Purple) that I attached with a little bit of water. (I've also seen really cute "cookie/candy" witch hats like these if you'd rather go this route!

While I let my fondant hat set up a bit, I decided to give our girl some shoes. I piped these on with black buttercream using a Wilton tip 5. (You would be fine with any small round tip.) I made them really simple, piping a hook shape and then a straight little line next to it for the heel.
class="aligncenter size-large wp-image-18175" />
Now...the dress/body. I continued using my black buttercream and piping tip 5 to pipe our body. My buttercream was medium consistency..it needs to hold it's shape since we are piping a fairly thick body for dimension. I find it helpful to draw a basic outline and fill in. You could do this with a toothpick first if you are afraid to jump right in with the piping!

I used a knife to smooth some of the areas of our witch's dress. I wasn't going for total smoothness...I wanted that "crashing into the cake" rippled effect ;0)

We're getting closer! Next, the hair. This was my favorite...I love piping hair. It brings everything together. Using buttercream tinted Americolor Orange and using a tip 4, I piped several wavy lines and curls as well as a round circle of icing for the head. (We needed a little bit of dimension for the hat to rest on.)

I pressed the hat right onto the back of the head while the icing was still soft. Then, I made some little (Americolor Electric Green fondant) witchy hands and pressed them into the cake.

Our witch is now finished but before the big reveal, let's turn our attention to a super quick and easy black cat.
Using our pre-colored Satin Ice brand black fondant, and with a little tylose kneaded into it, we formed our shapes. If you want the tail to stand upright, let it dry for at least 30 minutes or so. Everything else is self explanatory.
Teeny tiny balls of white fondant were pressed into the cat's head to create the eyes, and I used our black Americolor pen to add the details. He was so small that I was able to piece him together after about 15 minutes.

Now...what should our sign say?! I went back and forth on this one. So, I printed out my top two choices on photo paper. The winning phrase was cut out, attached to a lollipop stick with tape, and outlined with glue & purple pixie dust...

Are you ready to see?

Yay! Our first Halloween tutorial of the season is done. I hope that you enjoyed it!
If you think of any other funny phrases for this crashing witch, I'd love to hear. If you try this cake, I think you'll find it to be a very forgiving and easy design.
The best part is that you don't even have to worry with making the witch's face! She would be perfect for kids' Halloween parties or even adults'.
You know, for an adult party, she could even be holding a martini glass in one hand. (Witches should never drink and fly) ;0) --
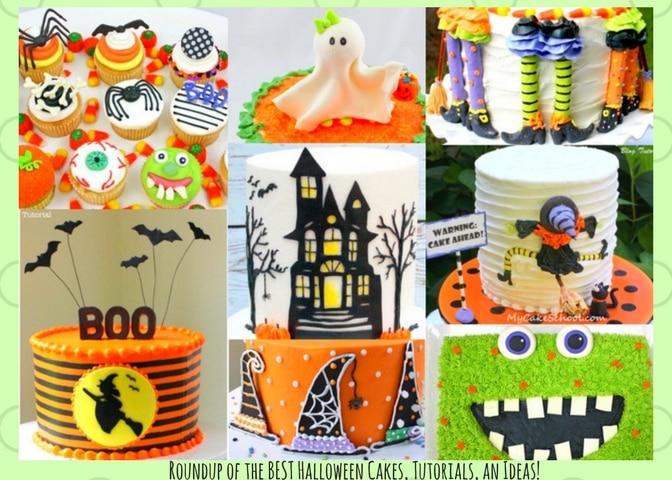
More Halloween Cake Ideas!
We’ve created tons of Halloween Cake tutorials for our Free Tutorials Section as well as our Member Tutorial section over the years! Check out this roundup of our favorites! Roundup of Halloween Cake Ideas!
Hi "gracie"- Great! I was in Sur La Table today also and saw that they were on sale. Glad that you picked one up! ;0) -- I think that you'll be fine with a 9", three layer. As long as it's approx 4" or so, you can make it work. You can always make your witch slightly smaller, or let her hat brim extend slightly past the top of the cake if necessary! ;0)
Dear Melissa thank you so much for sharing your knowledge with us. I have made this cake following your tutorial! End result was brilliant!! Everyone commented on the witch splattered on the cake and we had a lovely Halloween party with the kids! A big thank you! Much appreciated.
Hi Vanessa! Thank you so much for your nice words--I'm thrilled that you made the cake!! Sounds like the party was a success---Happy Halloween!!! xo
I Love this cake!!
I just adore this cake, so funny to x
I will have to try this one too! How cute!
"One too many brews!"
Thank you so much for wonderful tutorial & a great idea. I made this cake this year Halloween. Please see the link. Thank you again.
I feedl this is one of the such a lott significant info for me.
And i'm happy studying your article. But want to remark on few general things, The website taste is perfect,
the articles is in point of fact excellent : D. Good job, cheers
It's an awesome paragraph in support of all the online viewers; they will obtain benefit from it I am sure.
Nice answer back in return of this query with genuine
arguments and explaining everything concerning that.