Pastel Chocolate Wrap- Cake Video
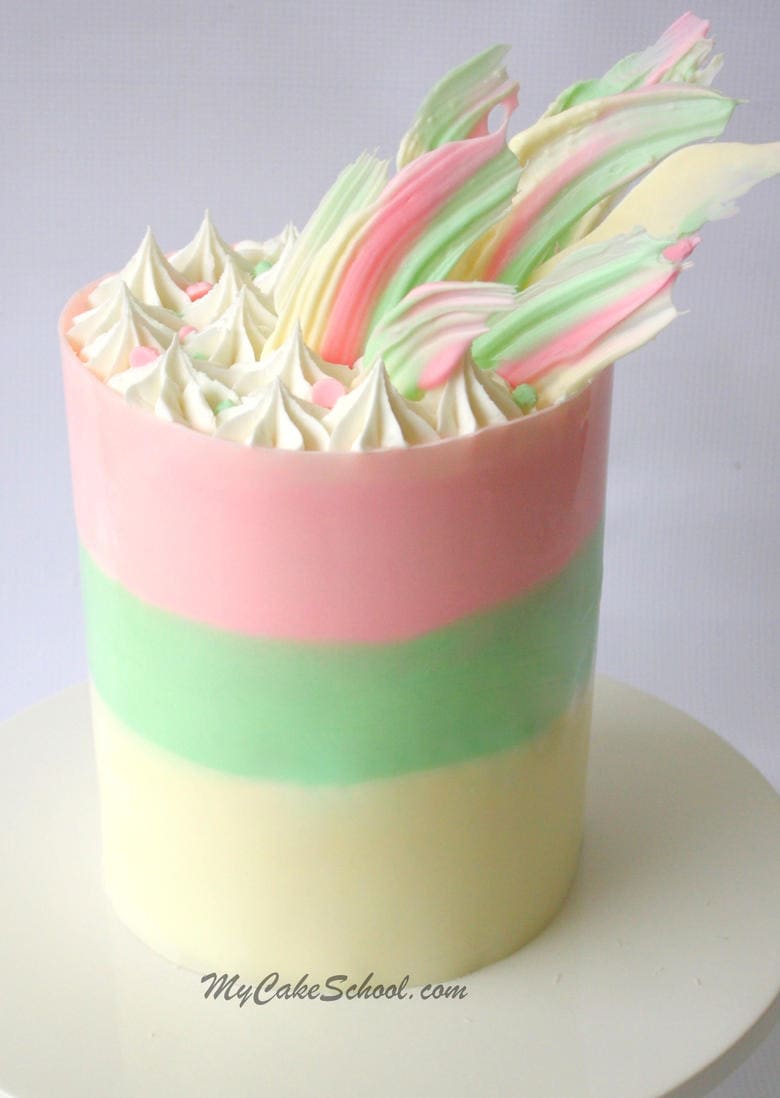
Hi everyone! Today I'm sharing a super quick cake video tutorial on how to create a beautiful chocolate wrap cake with brush stroke shards.
I love the soft colors of this cake, and even more, I love that the decorating medium in this tutorial is simple chocolate candy coating!
In the tutorial, I've wrapped a double barrel six inch cake (approximately 7 inches in height) with a chocolate wrap. This would make a perfect birthday cake, and the colors can be changed up to fit all sorts of themes. We hope that you enjoy the video!
Table of Contents
Materials:
*In this tutorial, I used a buttercream frosted double barrel cake--4 layers with a cake cardboard (and supports) halfway up. This technique would work for any size cake
White Candy Coating or Chocolate Bark Coating (*You can all use pre-colored). I used 7 blocks of bark coating (14 oz/406g)
Oil Based Candy Coloring Gels in Pink & Green- we used Americolor. (Water based gels can make the process more difficult as it thickens the melted chocolate.)
Acetate Strips (aff.)- Mine are 4 inches wide and 28.5 inches long. I taped two together with a slight overlap to get the correct height for my double barrel cake, and trimmed down the length to fit what I needed.
Disposable Piping Bags
Parchment Paper or waxed paper
misc: tape, pastry brush for shards (optional)
Notes:
My candy coating set up quickly, so it's best to work as fast as possible.
I used a bench scraper to smooth over the pink and green (didn't have time for the white) but this is an optional step to even out the thickness of your chocolate. It's not essential, especially if your chocolate has begun to set up.
Your wrap will likely have a bit of an overlap. Just let the excess acetate/chocolate hang loose until you chill the cake. This will make removing the acetate easier as I demonstrated in the video.
I didn't do my trimming when the cake was fresh from the freezer as the chocolate was too rigid. I waited until it had warmed up a bit & it could be sliced very easily with an xacto knife.
I chilled the cake before moving to a cake pedestal. You could also apply the wrap when the cake is on it's final cake base if you are worried about moving it after the fact (although it was very easy to move).
*If you have a noticeable hole or air bubble in the wrap, you can patch it with melted candy coating in the matching color, smooth away the excess with a small spatula, and even rub over it with a little vegetable shortening if it needs more blending.

Loved it. Just wish it was a longer video.?
Very pretty! Love it! Have seen a lot of this technique online lately, it's very popular :-) Fabulous tutorial as always :-)
Wow. It's lovely
Hello. I have a question. I would love to make this cake for the 4th using red white and blue chocolate. I can not find acetate anywhere local and I don't have the time to have it shipped. is there any substitution you would suggest? Or should I not try it without the acetate?
Hi Adrienne, Melissa tried the chocolate wrap using parchment paper to see if that would be an option when making this cake, but it not work. Because of the length of the chocolate wrap, she needed the stability of the acetate. I'm sorry but I can't think of a substitute for it.
Hi Adrienne-- Just adding on to Mom's comment... the parchment was just too floppy for me once the chocolate was on...you may have better luck if your cake is shorter or even if you cut the length in half and applied two panels rather than one...but it is iffy. I'm working on editing a new free video tutorial which would be a good option for you though! Very similar idea but instead of a wrap, it's chocolate panels! Hope to have it up later tonight or at least by morning! ;0)
How about a piece of poster board cut. It would offer stability and still be flexible.
Hi Tammy- I think that could possibly work as a substitute for acetate, but I would cut parchment to fit the size of the poster board and attach it (double sided tape may work). That way, you would be spreading chocolate on parchment rather than poster board. Maybe this is what you had in mind just want wanted to clarify! If you try it, I'd love to hear how it turns out!