Buttercream Camellias and Elegant Piping- A Free Cake Video
Buttercream flowers are a beautiful way to add elegance to cakes, and the buttercream camellias in this cake video are surprisingly simple to create!
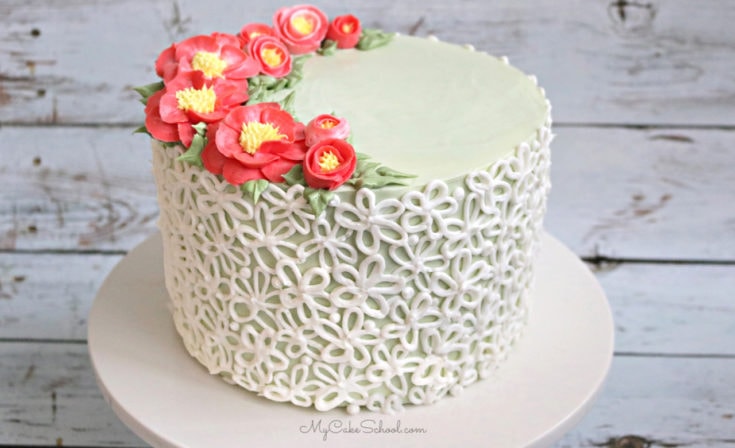
With two simple piping tips, you can easily create these gorgeous buttercream flowers in minutes!

Table of Contents
Buttercream Techniques from this Tutorial
In addition to showing you how to pipe buttercream camellias, I'll also demonstrate a piped pattern around the sides. Although the individual daisy shapes are simple, the pattern takes on the elegant and delicate look of lace as the design comes together.
Once you've learned these techniques, you can apply them to cakes for all sorts of occasions from birthdays and baby showers to weddings!
Colors
We decided to go with avocado green as our base frosting color today to better feature the lace pattern around the sides, but I've also experimented with a white on white color scheme and loved the sophisticated look!
We hope that you enjoy the video!

Cake Decorating Instruction- Learn with My Cake School!
Thanks so much for stopping by. If you give this cake a try, we would love for you to share a photo or comment below!
Don't miss our full collection of hundreds of free cake decorating tutorials and recipes in our Recipes & Tutorials Section!
Buttercream Camellias and Elegant Piping- A Free Cake Video
Learn how to make an elegant buttercream camellias cake with piping around the sides in this free cake decorating video.
Ingredients
- In this video, we frosted an 8 inch tier with our Fluffy Vanilla Buttercream recipe from the Recipes section. As usual, the tier is on it’s own cake cardboard cut to the size of the cake.
- Piping Tips: Round Tip 4, Petal Tip 104, Grass Tip 233, Leaf Tip 352
- Coloring Gels: Americolor Avocado Green, Red Red, Lemon Yellow
- Rose Nail (and waxed paper or parchment squares)
- Cookie Sheet (or cake pan to hold the frozen flowers)
- Miscellaneous: I used a bench scraper and offset spatula to frost the cake, a turntable is very helpful (we use an inexpensive Wilton turntable), cake cardboard
Instructions
- We frosted our cake in green buttercream, and followed with our floral piped "lace" design around the sides. Try to connect the daisy petals to the petals of neighboring flowers in this design when you can to achieve the look of a continuous pattern all the way around.
- For the camellias, follow video instructions, piping the flowers on waxed paper squares while rotating the rose nail. Gently remove the flowers and waxed paper, place onto cookie sheet, and chill in the freezer until firm.
- Once firm, the buttercream camellias can be easily separated from the waxed paper and placed onto the cake.
Notes
- As we noted in the video, if you plan to freeze your flowers as we did, it is best to use a frosting that contains butter. If you use an all-shortening recipe, it will take much longer for them to firm up in the freezer, and then will soften more quickly.
- When it’s time to place flowers onto the cake, I find it helpful to only take a couple of flowers out of the freezer at a time, so that the others don’t soften while you are working.
- If your hands begin to hurt from piping the pattern around the sides, it is likely that your buttercream is a little too firm. You can soften it by adding a little more liquid to your frosting. The buttercream should easily flow from the piping tip without too much pressure on your hands.
- The “lace” piping around sides would also make a pretty border or cascade if you don’t want to completely cover the sides of the tier in piping.
- As with all of my cakes, I chilled the tier in the freezer to firm things up for about 15-20 minutes before transferring the cake to the pedestal (or cake base).

Just beautiful! I love it! :-) Love the colour of the Camellias. Fabulous as always.
Very pretty!