Brush Embroidery with Buttercream- Free Video Tutorial

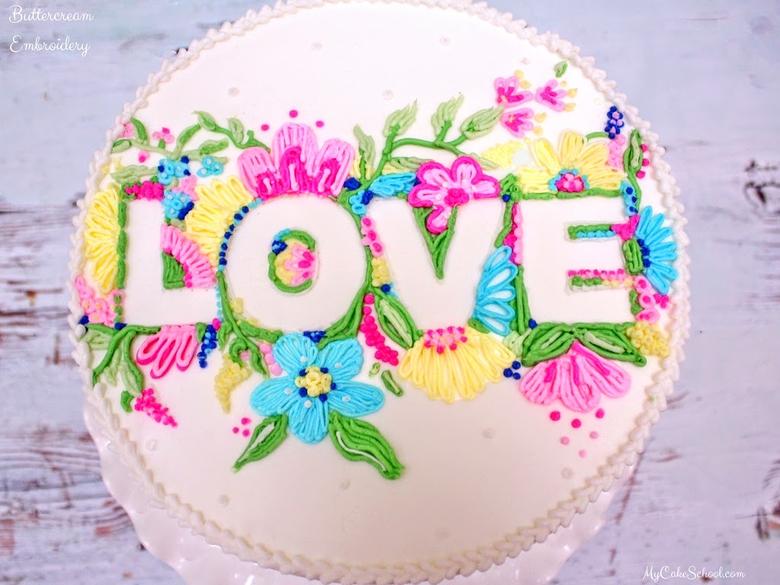
In this tutorial, you will learn the elegant technique of brush embroidery with buttercream! Brush embroidery is a method that is often used with royal icing on fondant covered cakes, or in cookie decorating.
However, it is also beautiful when used with buttercream, which is what I'll be demonstrating in this video. This is a great example of an impressive looking technique that is actually quite simple to achieve.
It is so simple that this video is much shorter than my usual tutorials! Make sure to scroll beneath the video to read about the materials and additional information. Enjoy the video!
Materials
Buttercream/Frosting (I prefer a crusting buttercream but if you'd rather use a non-crusting recipe, keep in mind that you will need to chill the cake periodically to keep the base coat of icing firm.) We used our High Ratio frosting recipe, but any of our crusting buttercream recipes would do.
Piping Tips- Small round piping tips work well. I used Wilton tips 3 & 4 for most of my piping, and I piped using a tip 2 for small white accents, and a Wilton tip 5 for the bead border.
Small paint brushes-- I like smallish brushes with a flat edge for brush embroidery, although as you see in the video, I still use a brush with a smaller tip for finer details. These brushes should of course be reserved for cake decorating purposes only ;0) - You want to make sure that the bristles do not fall out easily.
Cookie Cutters- Optional. We did not use cookie cutters, but if you are worried about freehanding your flowers, making an impression in the icing with a cookie cutter is a good idea. This will give you something to trace.
*The cakes that I used in this tutorial are 8 inch/6 inch/4 inch tiers.
Colors used: We used Wilton Rose for the dark pink, Americolor Soft Pink for the lighter shade, Americolor Leaf Green combined with a little bit of Avacado Green. For the lighter green, we used Americolor Electric Green.
As I mentioned in my video, I wanted to add more color and texture by brushing on additional buttercream. Usually, brush embroidery simply extends the icing of the border inward. This would have also been very pretty, but I'm happy with the look of our flowers! It's always a good idea to do a little experimenting on waxed paper before piping on your cake to establish the look you are going for. Have fun, and I hope that you enjoyed the tutorial!
{Alternative Video Format}
**We have a similar cake video tutorial on Buttercream Embroidery. This technique involves a bit more piping for an embroidered look. You can find the cake video here!: Piped Buttercream Embroidery
Thanks for stopping by! Also, don't miss our full collection of our favorite cake and frosting recipes in our Recipes Section!


thank you! I am new to this type of classes on videos. they are very easy to follow.
I am unable to open this video. I am viewing on an ipad. Is that the problems?
Hi Elaine--I'm sorry, are you able to see it now? If not, let us know! (You can e-mail at info@mycakeschool.com and we can talk about possible fixes.) Thanks!
Hi Melissa!
Thanks to you for teaching me this technique. I made it and it looks great. How can I share the picture of the cake with you?
Hi Sandy, We would love to see your cake. On the homepage click on the Member Gallery heading at the top of the page, there you will find instructions on posting your picture.
What did you dampen brush with?
Hi Terry, Melissa's brush is lightly dampened with water.
Please help Hope I can get a answer today. I willing be making a wedding cake this weekend the picture is of the bottom layer of the cake it’s 15” inches it will be 2 layers but only one layer has that split/crack. My cake will be 4 tiers. 15 12 8 and 6. Can I use this layer?? If so do I place the split/cracked layer on the cake board fill the crack with the buttercream chill and then fill with buttercream. All the layers will be filled with buttercream. I will have to travel about a hour to get to the venue to set up the ceremony starts at 5 I will have a thick cake drum underneath my cake. Or should I just bake another layer HELP HELP ????????????
Hi Carol- I'm sorry that you are having to worry about this! To me, the crack looks small and shallow- I don't think that you need to rebake. If the crack was top to bottom and you were relying on buttercream to hold it all together, I would worry more. I think your plan sounds like a good one.
Thank You Soo!!! Much Wish Me Luck