Christmas Petit Fours Tutorial
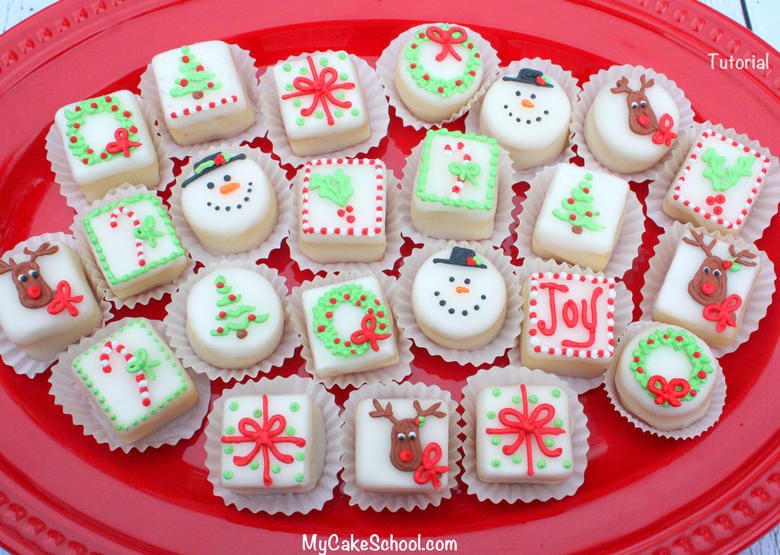
In this tutorial, I'm going to show you how to make adorable Christmas Petit Fours!

I just love these tiny cakes- they can make any occasion feel a bit more special. In this video, I will demonstrate our favorite method of creating these petit fours as well as several fun designs for the holidays! I hope that you enjoy the tutorial!
Table of Contents
Materials for Christmas Petit Fours:
We baked our pound cake recipe in an 11x15 sheet cake pan. Our cake was about 1 ¼ inches in height.
11x15 Pound Cake {sheet cake}
Buttercream Frosting (We used our fluffy vanilla recipe. Choose a frosting that has butter for best results. I have only tried American buttercreams with this technique.)
Royal Icing for decorations
Piping Tips: I used small round tips for everything- Tip 3.
Colors: I used Americolor Super Black, Super Red, Mint Green, Chocolate Brown
Petit Four Icing (see recipe below)
Misc: Candy Thermometer (optional). Our glaze was approximately 115-120 degrees when we dipped them, waxed paper, angled spatula for frosting, long knife for slicing frozen petit fours. Skewer(s) for dipping.
Cooling rack (We rigged up our dipping station by suspending the rack (with tape) with 3 cake mix boxes on each side. Improvise with books or whatever you have on hand. An elevated rack is really helpful.
Additional notes
If you'd like to see our first video on Petit Fours, we cover a couple of other methods for dipping the cakes in glaze, as well as splitting the petit fours to add filling & tinting the glaze.
*There are 2 very important factors to ensure success with petit fours. First, you must be working with a dense cake. Pound cake works the best for us. If it isn't dense, the squares will not have a clean & uniform look. Also, the cake must be frozen when slicing and also when dipping. The glaze is warm and so the cake must be frozen in order to control crumbs and also to keep it from falling off of the stick!
*If the glaze seems too thick, add a bit more hot water.
After dipping, the petit fours set up fairly quickly...I would say about 10 minutes before I could safely move them to their liners.
The glaze preserves the freshness of the cake. You would be fine to leave these out at room temperature for a couple of days. If you are baking further in advance and want to refrigerate, do a test run with 1 petit four first. We had no trouble with refrigerating, but everyone's refrigerator is different. You'll want to make sure that your royal icing decorations will hold up when chilled before chilling your entire batch.
The process is simple, but petit fours are time consuming. Make sure to charge accordingly if doing these as a business order! xo
Classic Petit Four Glaze:
INGREDIENTS
9 cups sifted confectioners’ sugar (sift then measure) (945 g)
½ cup (164 g) light corn syrup
½ cup water
1 teaspoon clear vanilla extract
½ teaspoon almond extract (optional)
Gel food coloring, in desired colo
DIRECTIONS
In a heatproof bowl set over (but not touching) simmering water, mix sugar, corn syrup, ½ cup water, and flavoring together until warm and smooth.
I like a thin consistency and so approximately 115 degrees F was the temperature that worked well for us.
Don’t worry if you do not have a candy thermometer..I just wanted to give you an idea. I prefer a nice, thin consistency.
Stir in enough food coloring until desired color is reached. Do not overheat.
Another awesome tutorial. Petit fours are so time consuming. You make it look so easy :) I love the idea of putting the icing on and then putting them on the rack the way you did. By any chance do you have a recipe for a chocolate glaze? Thanks!!
I second everything Joan said! So pretty and you make it look so easy!
Thank you Joan & Guppy Love!! Joan, I have not experimented with a chocolate glaze yet--I will let you know as soon as I do! (Let us know if you find something that you love first!)!
Very cute! I've been thinking about making these this year :) You make it look easy. Might give it a try.
These look great, which cake recipe holds up the best for these?
Hi Victoria, A dense cake works best. We used the pound cake recipe from the recipe section,
What is the length of your serrated knife? I would love to have one that long! Great video as always.
Hi mdmay! We bought this knife years ago and just now when I searched online I cannot find it. It measures 23 inches in total length, 19 1/2 inches of that is the blade. The brand is LamsonSharp. This is definitely an "extra , don't feel that you have to have one for the petit fours but it is nice to have when you want to make long slices!
Thank you Bebe going to try these this week
They are really adorable, Thank you.
Hi Melissa/ Bebe I already have a cake tin almost this size it's 13 by 9, do you recommend I leave out some of the batter or will they be fine slightly thicker?
Hi Victoria, I would fill the pan 2/3's full. It may still bake up higher than you need but you you can level it to the height you like. I would use two rose nails inverted in the bottom of the pan to help it bake more evenly. Pound cakes bake up with a crust on the top, as you may know, and you will trim this off.