Lilly Pulitzer Inspired Cupcakes
Today's Lilly Pultizer-Inspired Cupcake tutorial combines some of my favorite things~ Cupcakes, buttercream, bright colors, and fun patterns!

I'm taking my inspiration today from the vibrant prints of Lilly Pulitzer. In fact, I was shopping with my daughter a couple of days ago, & found myself in a sea of preppy Lilly dresses & accessories, & it it's entirely possible that all of that Lilly-ness went to my head. I began to think about cupcakes....and Lilly...and then, Lilly-inspired cupcakes!
You will love these. They are SO much fun to make, and without the high price tag ;0)
Table of Contents
How to Make Buttercream Lilly Pulitzer-Inspired Cupcakes!
First, I pulled out my coloring gels and tinted my Crusting Vanilla Buttercream. Today's design features smoothing which is only possible with a crusting buttercream....however as you will see, some of the designs look great without smoothing. So, if you prefer non-crusting buttercreams, no worries!
COLORS: Wilton Rose coloring gel (for my light and deep pink shades), Americolor Turquoise (for light & deep blue shades), Americolor Electric Green (for both light and deep green shades), and lemon yellow. Also, I tinted a very small amount of black for my flamingo. Tinting all of this buttercream is going to be your least favorite part. After this, it's simple!
PIPING TIPS: I used Wilton tips 10 or 12 for the base layer of frosting, and for anytime that I needed larger areas of color. For most of the designs, I used small round piping tips: 1,2,3,4-- I used tips 1 or 2 for my thin lines, and tips 3 or 4 for thicker lines.

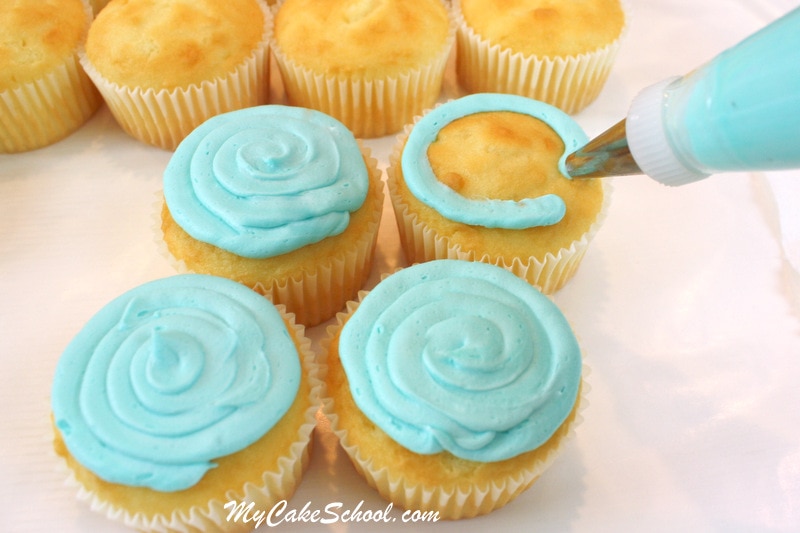
Here, I applied my base frosting with a Wilton 10 piping tip. I circle around first (just shy of the edge) and spiral inward, keeping frosting level consistent all the way across. And so on and so on....
Smoothing the Cupcakes (optional step)
Then, I smoothed each cupcake with a Viva paper towel after the buttercream had crusted. Just place a piece of the paper towel over the frosted cupcake and gently smooth your hand back and forth.
(It just takes about 5-10 minutes for your frosting to crust). I didn't invent this "Viva Method if Smoothing Buttercream", it has been around for years--but I do love it for creating a smooth finish.
Viva brand does not have impressions or quilting which is why it is the paper towel of choice for this method. If you don't have Viva brand in your area, any non-quilted paper towel or napkin will do.
Some decorators improvise with parchment or cardstock. (The "hot knife" method would be fine to use to smooth the base coat of frosting, it just doesn't work so well with smoothing the featured patterns in this tutorial.)

Using a piping tip 1, I piped a simple flower on one of my cupcakes. This will be the center.

Next, I piped another "daisy shape" around the first. No rules or guidelines here except that I made sure that my second piped "daisy" made contact with the first with each new petal that I piped. This makes a very simple design look complex. (The other cupcake pictured was made with the same method, just two small ones rather than one large.)

I finished out the cupcake (on the right) with a third "daisy shape". Then, filled in here and there with dots of white & light pink for variation, and a few teardrop shaped leaves piped with a tip 3. The cupcake on the left also features a partial flower which is a nice option. Just a couple of squiggles does the trick!
So, here's where the Viva method comes into play. You could leave these as is, for a very artsy & whimsical floral design... or you can smooth them.

Just lay the Viva over your crusted flower, gently press/pat down on top of your design and rub your finger gently over. Pull up the towel and we have the look of a beautiful, smooth printed design!


Here they are, after smoothing!
Here's another of the same pattern, just a different color. (Before Smoothing)

Here it is after smoothing...and with a few blue outlines piped with a tip 1!

Here is the start of my hibiscus... first, I outlined the shape of the petals using a tip 2. Then, I filled in with light pink (also a tip 2) and piped a couple of dark pink lines on each petal for an added detail. Not looking too pretty yet...but it will! ;0)

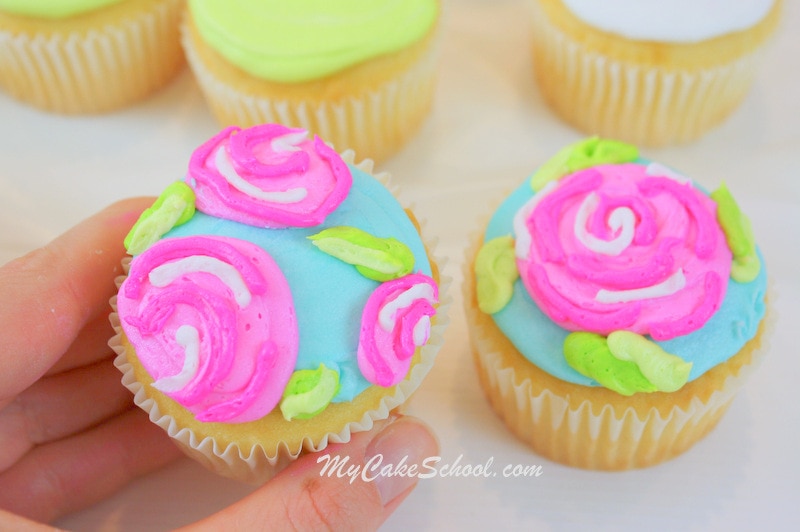
After adding a couple of green leaves, I allowed everything to crust and smoothed over with my Viva. Then, I piped the center of the hibiscus with a tip 2. With this as well as a few other cupcakes, I added piped details after smoothing, so that some designs would have raised accents also. Next, some roses! Here's an example of a flower where I used my larger round piping tip 10 for the "base" of the rose.

Then, I layered on white and darker pink shades with my piping tip 2 or 3...as well as my leaves (two shades) using a tip 4. This is a very loose design for a rose as you can see ;0)

Here's another version of a rose cupcake...same technique but with two smaller roses...
After smoothing...

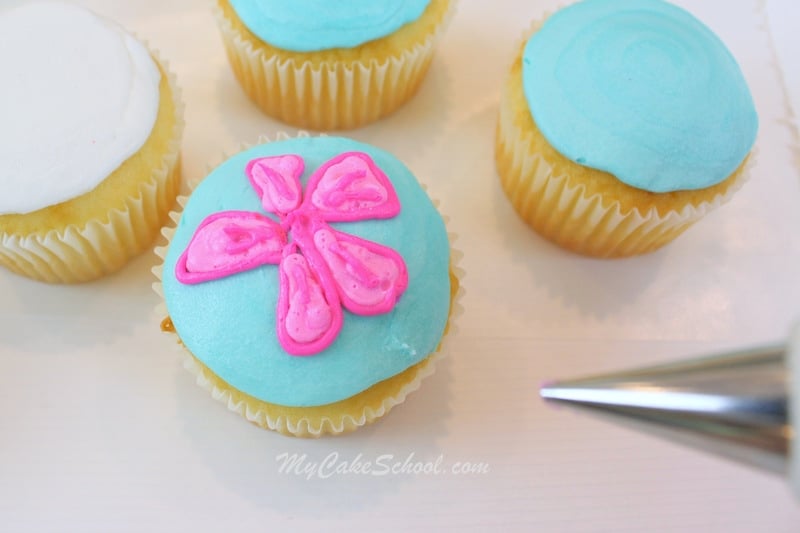
Here's a very abstract looking flower with "squiggle" petals. Everything was piped with a tip 2.

Here it is after smoothing... I piped a few dots of buttercream to the center after smoothing for a raised detail.

I'm sure that you have the idea by now of our piping & smoothing method...but I'll continue to show a few "before" and "afters" in case you need ideas!
Here is a simple daisy/sunflower look. Large pink center & yellow petals were piped with a tip 10. Little dark pink spiral and white dots added to the center with a tip 2.

And here we are after smoothing! I decided to add a bright green outline (tip 1) to my yellow petals for a raised accent in a contrasting color. These are so much fun because there is no "wrong" as far as color or design. Just think big, bright and cheerful!

Flamingo! Light pink piped with a tip 2, then other colors layered on (also tip 2). When I remember, I prefer to pipe the legs after smoothing so that I don't wind up with thick flamingo legs! ;0)

Legs were added with a Wilton tip 1, and eyes & beak are black buttercream piped from a disposable bag (with very end snipped off). Love him! ;0)

Are you tired yet? I must have had a lot of coffee because I just wanted to keep going and going with these designs. It can be addictive!
Here is just a basic blobby flower with a couple of partial daisies continuing off of the cupcake. ;0) This was a tip 10 for the large petals and then I defined them a little more with a tip 2. Tip 2 or 3 for all of the other details works great.

Here is the smoothed version (with a couple of additional outlines added after smoothing). The tiny green centers were piped with a tip 1.

Here, I piped a very abstract looking rose with my tip 3. You can see, it's just a series of semi-circles. I started from the center, and worked my way around & out.

Here it is, after smoothing but with additional piping using the lighter shade as an accent color.


Finally, a lot of "Lilly" designs incorporate sea life. Here, I made a shell using a tip 2. I started by piping a small circle on the left, and then worked my way to the right, segment by segment. You can see that the shape gets wider and then smaller again by the time that we reach the right side of the shell.
I added other little details...starfish, seaweed, and another simple shell.

After smoothing... (and upside down on the platter) ;0) I guess there's no right or wrong though, right? ;0)

Whew! That was a lot of piping, but I loved playing with the different combinations of color & the endless design options!
This isn't even all of them, but now that you know the basic technique and colors that I've used for these cupcakes, you will have no trouble creating your own!
Even choosing just one or two of these cupcake designs would make for a lovely platter! Perfect for your summertime themes~ beachy parties, luau parties, or just because... ;0)
Here are some close-ups~


Now, time for a group photo!~

That's all for now! For more Lilly design inspiration, (aside from the Lilly Pulitzer website), you can find a ton of close-up shots of various Lilly prints & patterns on Pinterest & Google images. Have fun, and stop by again soon!!
Thank you BeBe - so kind of you to explain that to me. I have never been able to find the "correct" answer! It makes perfect sense.
Thanks again and Happy Monday :)
I love how you made these, and have tried this method before, though I am not really fond of the super sweet frosting required..
Have you come across any other recipe that will crust over??
Thank you!!!! I am doing a cake for a Lilly themed bridal shower next month. This is just the inspiration I needed! Thanks for the details, making this a much less stressful cake to tackle.
Great!! Thanks for your post.
Really beautiful thanks for sharing
I would love to see a video of this application, for us newbies to cake decorating.
These are so cute and I'm doing a Lilly Pulitzer rose theme cake this weekend and seeing how you did the roses helps a lot! I looked around to see if you have done that pattern on a cake but I didn't see one, I could've overlooked it though. I plan on doing mine with buttercream but I've also seen some painted on the cake and some done in fondant. I would love to see your different techniques on how to do that!?
Hi Natasha! I'm glad that you enjoyed the tutorial- I actually don't have a cake done in a Lilly design but I think that you could definitely apply some of the cupcake designs all over the cake! I've seen lots of options on Pinterest. Good luck, I hope that you can apply some of these techniques to your cake!
I loved them ??
Great job ???