Marbled Chocolate Panel Cake- Free Video Tutorial
In this cake video tutorial, I'm going to show you how to make elegant and impressive marbled chocolate panels for your special occasion cakes!
Nobody would ever guess how simple this cake technique is, and the design options are endless!

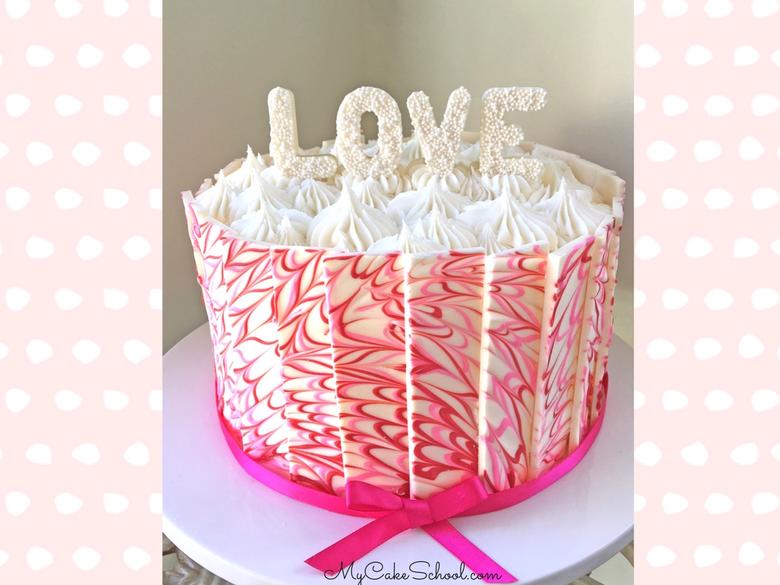
With Valentine's Day just around the corner, our white chocolate panels are swirled with pink and red for an effect that is beautifully unique.
Keep this chocolate panel cake method in mind to suit the color scheme for whatever your occasion may be. I also love the simple elegance of solid white or chocolate panels, especially for wedding cakes.
Table of Contents
Working with Candy Coating in Cake Decorating
One reason that I LOVE to work with chocolate candy coating is because it is so quick and easy.
There is no tempering required. Simply melt your coating in the microwave, create your designs, chill, and they are ready to apply to cakes or cupcakes in minutes!
We have many cake tutorials that incorporate candy coating designs in one way or another, but panels are one of my favorites!
The look is so impressive and elegant, and the decorating technique is so simple!

How to Make a Chocolate Panel Cake
- Once your frosted cake is ready to be decorated, melt each color of candy melts separately in microwave safe bowls. (If your plastic wrap is microwave-safe, you can line your bowls for easier cleanup.)
- Line a large cookie sheet with waxed paper, and lightly mark off the area that you want to cover. Ours was an area approximately 10 inches wide, and 15.5-16 inches long.
- Spread the melted white coating over the cookie sheet. We are actually going to be creating two rows from this amount of candy coating.
- Drizzle your pink and red melted candy coating across the white candy coating- work quickly so that it doesn't begin to set up before you have a chance to swirl!
- Use a toothpick to gently drag through your colors, marbling them with the white coating.
- Allow to the candy coating to set at room temperature. This may only take 5 minutes-- or it could take closer to 10-15. When it begins to change from a glossy finish to a matte finish, it's time to mark your chocolate panels.
- Use a sharp knife cut your large rectangle of coating in half lengthwise, creating two long panels (approximately 5 inches in height if you are going by our measurements). Then make your small cuts across the length of your rectangles, to create two rows of panels. Ours were approximately 1.25 inches wide. (But I was eyeballing it, not measuring).
- When you are ready to decorate the cake, chill the panels in the freezer for about 10 minutes (or in the refrigerator for a bit longer.) until firm. Otherwise, they may be too fragile!
- Apply the chilled chocolate panels all the way around the cake, slightly overlapping the one before. If your buttercream has crusted, you'll need to attach your panels with a little freshly applied buttercream. *If you are short on panels, you can place them side by side rather than overlapping.
Thanks for Stopping by! We hope that you enjoy the video! If you make a chocolate panel cake of your own, we would love for you to leave a photo in the comments below!
More Valentine's Day Cakes to Share!
We've made so many Valentine's Day Cakes and Recipes over the years! Don't miss these collections of our favorites!
Favorite Valentine's Day Cake Designs
The Best Valentine's Day Cake Recipes


Marbled Chocolate Panel Cake FAQs
This is the Chocolate Letter Mold That I used in the tutorial: Alphabet Candy Silicone Treat Mold
The Pink Ribbon *I didn't show it in the video, but you can see that I used a pink ribbon at the base of this cake to create a border. You can secure the ends in back with a dot of piping gel, chocolate, or your edible glue of choice. We tied the front bow separately and attached with a dot of chocolate.
What is the Set up time for the Candy Coating? The set up time for the candy coating can vary based on the temperature of your kitchen and countertops. So, try to work as quickly as possible. If your countertop is cold to the touch, it's a good idea to place a dish towel or pot holder beneath it so that it will not cool off so quickly.
How thick Should the Chocolate Candy Coating be Spread? I spread the chocolate to a thickness of about ⅛ inch. You'll want to reserve a bit of the chocolate for the "LOVE" topper.
The chocolate was spread into a rectangle about 15.5-16 inches long and 10 inches wide. (You can use a waxed paper lined cake board instead of a cookie sheet for your spreading if you'd rather, but the cookie sheet retains the cold from the freezer better.)
Letter Mold Alternative If you do not have a letter mold like we used, you could also pipe the word love on a waxed paper lined cookie sheet and sprinkle with white sprinkles or sugar pearls as we did. Just keep in mind that the thinner the letters are, the more fragile they will be.
Incorporating Candy! Another idea for chocolate panel cakes, especially when the panels extend beyond the top edge of the cake as ours do, is to fill the top with chocolate candy, strawberries, raspberries, chocolate curls, or other favorite toppings for a bit of drama and height!
Marbled chocolate shards can be made in the same way, but you would make your scoring more triangular, or you could break the chilled bark off piece by piece without scoring at all.
Enjoy the Video!
We hope that you enjoyed this marbled chocolate panel cake tutorial! If you give it a try, we would love for you to leave a comment and photo below.
You can find our full collection of hundreds of free cake tutorials and recipes in our Recipes and Tutorials Section. We have so many cakes to share with you!
Marbled Chocolate Panel Cake- Free Video Tutorial

Learn how to make a beautiful, simple marbled chocolate panel cake in this step by step cake decorating video tutorial! It is perfect for Valentine's Day, anniversaries, and more!
Ingredients
- *We used an 8 inch tier, frosted in our fluffy vanilla buttercream recipe.
- Vanilla Buttercream We used a double batch of our Fluffy Vanilla Buttercream.
- 24 oz White Candy Coating (for panels and letters) We used Candiquik
- 45g (¼ cup) Pink Candy Melts
- 45g (¼ cup) Red Candy Melts
- White Sprinkles for LOVE topper (optional)
- Chocolate Letter Mold (optional)
- Tip 869 (french tip or other large star tip for top of cake)
- Miscellaneous Piping Bags, Scissors, Waxed Paper, Cookie Sheet, Scissors, Sharp knife
Instructions
- Once your frosted cake is ready to be decorated, melt each color of candy melts separately in microwave safe bowls. (If your plastic wrap is microwave-safe, you can line your bowls for easier cleanup.)
- Line a large cookie sheet with waxed paper, and lightly mark off the area that you want to cover. Ours was an area approximately 10 inches wide, and 15.5-16 inches long. (Create as much length as you can to be on the safe side so that you can have spare panels if you need them.)
- Spread the melted white coating over the cookie sheet. Keep in mind that you are actually creating two rows of panels from this large rectangle of coating.
- Drizzle your pink and red melted candy coating across the white candy coating. Work quickly so that the chocolate doesn't begin to set.
- Use a toothpick to gently drag through your colors, marbling them with the white coating.
- Allow to set at room temperature. This may only take 5 minutes-- or it could take closer to 10-15. When it begins to move from a glossy finish to a matte finish, it's time to mark your panels.
- Use a sharp knife cut your large rectangle of coating in half lengthwise, creating two long panels (approximately 5 inches in height if you are going by our measurements). Then make your small cuts across the length of your rectangles, to create two rows of panels. Ours were approximately 1.25 inches wide. (But I was eyeballing it, not measuring).
- When you are ready to decorate the cake, chill the panels in the freezer for about 10 minutes (or in the refrigerator for a bit longer.) until firm.
- Apply the panels all the way around the cake, slightly overlapping the one before. If your buttercream has crusted, you'll need to attach your panels with freshly piped strips of buttercream. *If you are sort on panels, you can cover more ground by simply placing them side by side rather than overlapping
For the LOVE Topper
- Add remaining melted candy coating into the cavities of your mold. Scrape off excess with a knife, and sprinkle with white sprinkles.
- Chill in the freezer for about 15 minutes or until firm.
- Cover the top of the cake in buttercream stars piped from a french tip 869 (or your tip of choice). Top with LOVE.
Notes
The cake that we are decorating in this video is an 8 inch tier, frosted with our Fluffy Vanilla Buttercream Frosting Recipe. Any frosting would be fine with this design, and the panels could be applied to cakes of all sizes, as well as tiered cakes! Have fun!
Hi Miranda! Thanks for your feedback about the Candiquick, I can see how amounts may vary depending on how thin the chocolate is spread. I'm so glad that you tried this & that you were happy with the cake! xo