My Cake School

Cake Tutorials & Recipes

  • Facebook
  • Instagram
  • Pinterest
  • Twitter
  • Free Cake Videos
    • The Basics
    • Buttercream Techniques
    • Carved/3D
    • Chocolate Techniques
    • Cupcake, Cake Pop, etc. Methods
    • Gum Paste & Fondant
    • Themes and Occasions
    • See All Videos
  • Free Blog Tutorials
  • Recipes
    • Cakes and Cupcakes
    • Fillings
    • Fondant/Gumpaste
    • Frostings and Glazes
    • Miscellaneous
  • Contact
  • About

How to Make a Frog Cake Topper ~ A Blog Tutorial

March 9, 2012 By Melissa Diamond 41 Comments

377 shares
  • Share
  • Tweet

Hi everyone!  I hope that you’ve had a great week!  Today I’m going to show you how to make adorable frog cake toppers! 
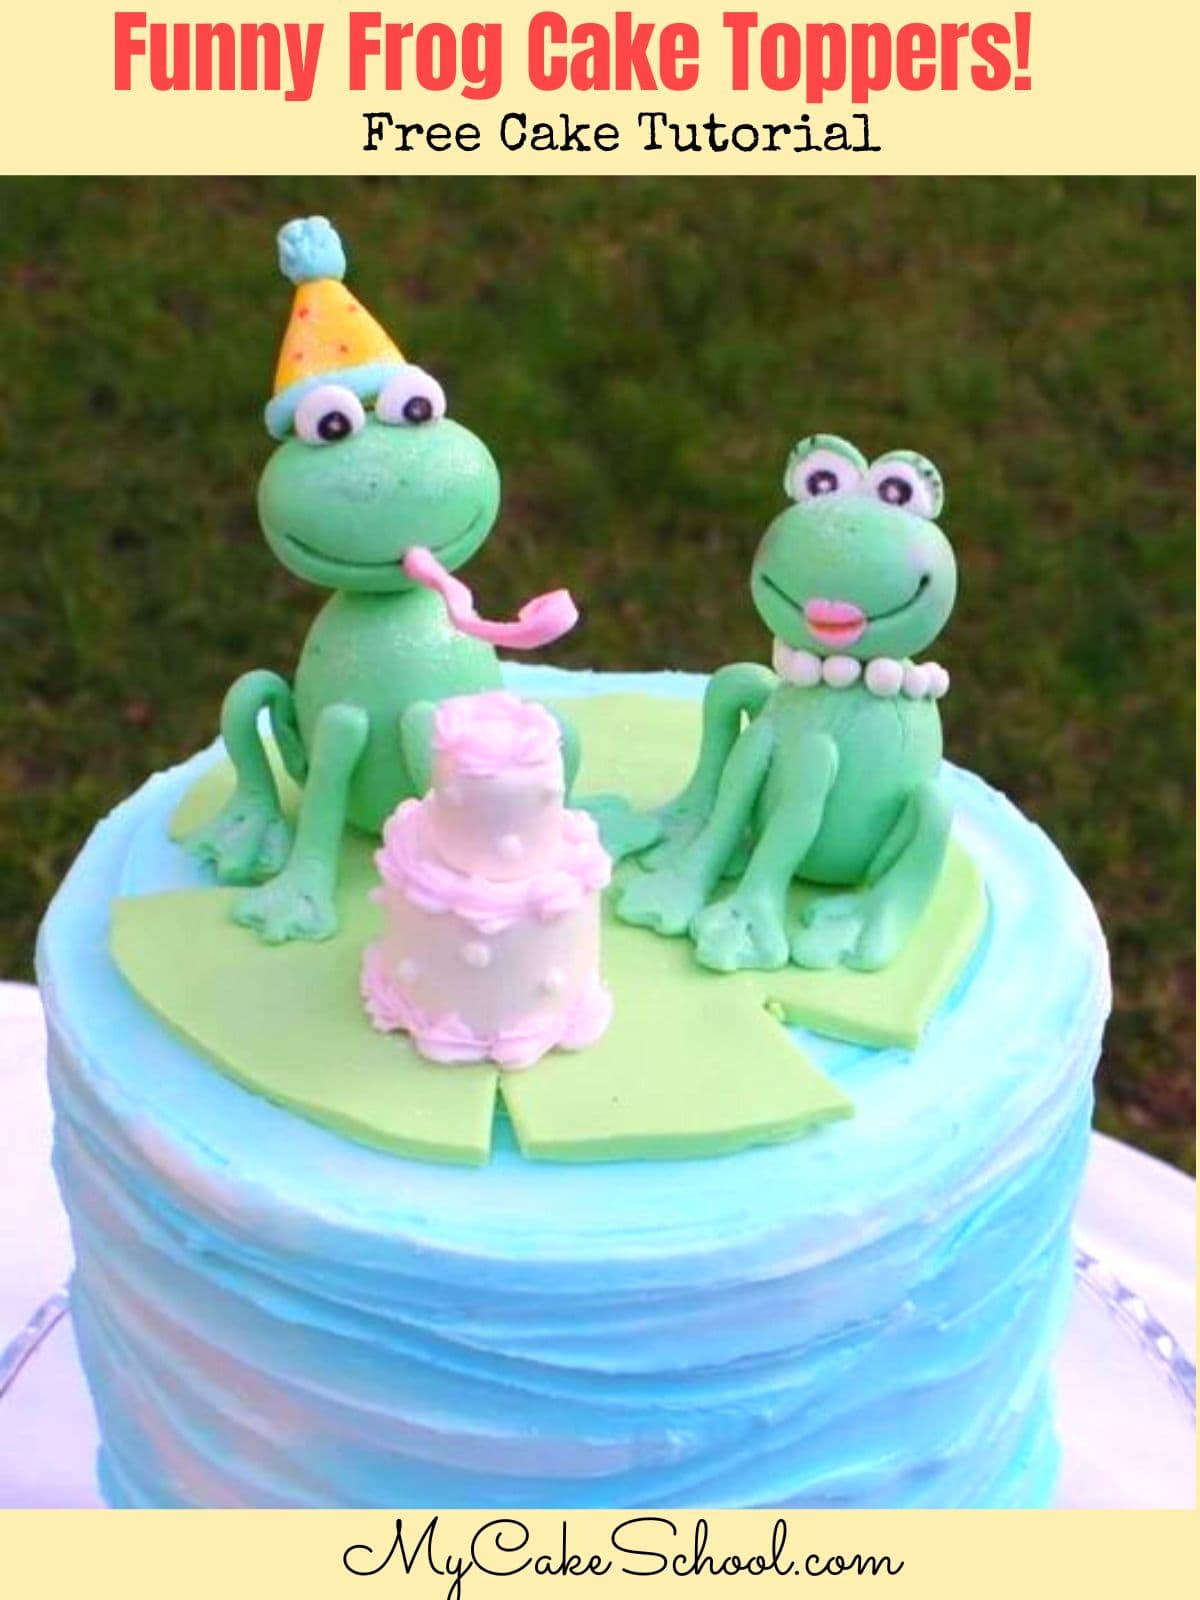
Figure modeling cake toppers from gum paste is my favorite part of cake decorating–and if you’ve never tried it, what are you waiting for?  There is no better way to personalize a cake or to give it that extra burst of personality!

Even the most unlikely cake toppers….like frogs for instance, are sure to bring smiles  :0) –I hope you’re in a froggy kind of mood—because you are about to learn how to make some really cute ones! Let’s go!

Okay, so today I used Satin Ice gum paste tinted with Leaf Green Americolor coloring gel.   I prefer to do all of my modeling with gum paste—and if I don’t have any on hand, I use fondant with a bit of tylose powder kneaded into it (you’ll be able to feel the elasticity increase as you work it in.)  I don’t like to use straight fondant because it is too soft for my taste–the figures are prone to sagging a little as they sit.  (We don’t want saggy frogs.)–

First, I rolled my gum paste into two balls–one slightly larger than the other.  I shaped the larger ball into somewhat of an egg shape.  This will be the body.  The smaller ball I shaped into an oval.  This will be the head.  While the gum paste is still soft, go ahead and give your frog a smile—I used a toothpick, but use whatever you’d like.  Sometimes I use my scribing needle for this–or even a “real” needle would work.  Anything sharp with a fine point.


Notice that I used my toothpick to make two holes.  One in the top of the body, and one at the bottom of the head.  These will be lined up later, and joined with a piece of  dried pasta.  But first, we’re going to let the two pieces dry overnight (along with the tongue–we’ll get to that soon.)

Soon after forming the head and body, I used a small piece of floral wire to create a hole in the center of the mouth.   You only need to do this step if your frog will have a tongue like mine.


The tongue is a strip of gum paste tinted with Americolor Deep Pink.  The tongue is optional, but it’s too cute for me not to share with you…

The next day (or after several hours), when your pieces are nice and firm, add a little piece of dry pasta or toothpick into the hole that you made earlier.  I like to dip the toothpick in a little sugar glue before inserting.  Next, brush the bottom of the head with a little more sugar glue, and twist the hole that you made earlier onto the dried pasta.  You’re just piecing these together like a puzzle.  The pasta/toothpick is optional, but I like the added bit of support.

To make the eyes, I formed two circles of gum paste and flattened slightly on the bottom.  When the surface feels nice and dry (after 5-10 minutes), you can safely draw on your black dots with a food coloring pen.  Then, glue them to the top of the frog’s head with a little sugar glue.

Next, I made four froggy legs and each leg started with a ball of gum paste.  Here’s what I did for each leg….

Once finished with the legs, I just attached to my frog with a little sugar glue.  The gum paste legs were still soft when I attached them.

My frog’s tongue was nice and firm after a night of drying, so I went ahead and inserted the tongue/floral wire anchor into the hole that we made in the mouth yesterday.  I used just a tiny bit of sugar glue around that hole before inserting the tongue.

Hey there little fella~

I made a little party hat for our frog–Just a  thick triangle of yellow gum paste (or fondant) with blue accents & pink food coloring pen polka dots.  It was sturdy enough to place right on after only a few minutes.  I brushed the bottom with a little sugar glue before placing on our frog~

Have I even mentioned that I love Disco Dust?  ;0) Frogs love it too.

In the same way that we made frog #1, we made a frogette!  The only difference is that instead of the tongue, I gave her pink lips as you see here :0) .  Just a flattened piece of pink gum paste placed over the mouth (once the head and body had a chance to dry).  I used my toothpick to re-form the line of the mouth that we lost when we placed on the pink fondant.


I gave her some pink blush with a little pink petal dust (applied with a dry brush).  I also gave her some eyelids with little slivers of green gum paste (applied while still soft)–and drew on some eye lashes!

Just a few more final touches…..a cake (this is a 6″ frosted in buttercream & tinted with Americolor Sky Blue), a fondant lily pad….a little fondant cake with buttercream borders..and somewhere along the way, Frogette found a pearl necklace! :0)


And that’s all there is to it!


I hope that you enjoyed this little tutorial!  Some day, sometime when you least expect it,  you will need to know how to make a frog–and when you do, this tutorial will be here waiting for you  — and I want to see pictures!  ;0)


Have a great weekend!

Related posts:

  1. Owl Cupcake Tutorial
  2. Mother Goose Cake Topper Tutorial
  3. Frog Cake Tutorial- My Cake School
  4. Springtime Bunnies~ A Cake Tutorial
  5. Forever a Spring Chicken– Free Cake Tutorial

Filed Under: Kids, Blog Tutorials, Custom Toppers & Figure Modeling, Animals/Animal Print, Gum Paste & Fondant

Comments

  1. Barbara Jackson March 9, 2012 at 11:24 pm

    So gorgeous! And so simple when you know how. Thanks so much.

    Reply
  2. jeanette williams March 9, 2012 at 11:50 pm

    OMG soooooooooooo cute definatly going to have a go

    Reply
  3. angelwings March 10, 2012 at 12:16 am

    Cute cute cute, of course. =)

    Reply
  4. Helena March 10, 2012 at 4:54 am

    Melissa, no tengo palabras para agradecer todo lo que estoy aprendiendo contigo. Todos tus tutoriales son fantásticos. Bs

    Reply
  5. Sadia Wasim March 10, 2012 at 4:58 am

    Soooo cute! Loved it!

    Reply
  6. Wensday March 10, 2012 at 7:05 am

    You make it look so simple to do.. Thank you for all the lovely tutorials!

    Reply
  7. Joy March 10, 2012 at 11:23 am

    Soooooooo darn cute!

    Reply
  8. Tami March 10, 2012 at 11:44 am

    Very cute! I love the effect on the side of the cake. How did you do that?

    Reply
  9. Connie March 10, 2012 at 3:36 pm

    So cute! How did you frost the cake? I like it!

    Reply
  10. Wafaa Sobhy March 10, 2012 at 3:53 pm

    You r so talented Milessa i love seeing your videos and i love your patience ,i will try this and for sure if it is fair good i will post the photo.
    REALLY I LOVE U:)

    Reply
  11. Barbara March 10, 2012 at 4:07 pm

    Oh, I love this, and can’t wait to try it.

    Reply
  12. Brenda @ SweetSimpleStuff March 10, 2012 at 4:43 pm

    Great tutorial … thank you! Your little frogs are very cute and have personality!

    Reply
  13. sonia March 10, 2012 at 9:43 pm

    I love this it is so cool i have to try it out .

    Thanks

    Reply
  14. peggy March 10, 2012 at 9:48 pm

    Sooooo cute. Cant wait to try making it. Thanks

    Reply
  15. Cinzia March 11, 2012 at 4:22 am

    Hi, melissa, I’ m from italy, and I love modelling,. I find you looking for cake decorating. Thanks for the tutorial very precise. Bye.

    Reply
  16. Erica March 11, 2012 at 9:18 am

    This is soooo cute!!! Can’t wait to try it!! Thank you

    Reply
  17. Paula March 11, 2012 at 4:36 pm

    Sooooooooooo cute!

    Reply
  18. Kathie Shea March 11, 2012 at 5:34 pm

    I love it! :)

    Reply
  19. Allison March 11, 2012 at 11:42 pm

    How did you do the icing on the cake? I love how it looks like waves! You should do a video tutorial on how to ice the cake like that!

    Reply
  20. JUDY CLUNE March 12, 2012 at 12:04 am

    MELISSA, THIS IS SO ADORABLE. I’M GOING TO BE DOING THIS VERY SOON. ILOVE THIS STYLE ICING…..WOULD YOU SHOW US HOW YOU DID THIS? PLEASE PLEASE WITH (ICING ON TOP):) THANKS !!!!!!

    Reply
  21. Grammy Sue March 12, 2012 at 12:40 am

    Too cute!

    Reply
  22. Betty johnson March 12, 2012 at 8:40 am

    How do you do the icing on this cake. I love it!

    Reply
  23. Stephanie Hamley March 12, 2012 at 12:57 pm

    Love it! Thanks Melissa!

    Reply
  24. Melissa Diamond March 12, 2012 at 1:59 pm

    Thanks everybody! I’m glad that you like them :0) —

    For those of you that are asking about the icing, I first crumb coated the cake in white icing, and then for the final coat of buttercream, I took my sky blue frosting (which wasn’t completely combined–still some white swirls)–and spread on the final coat. I spread the final coat pretty smooth. Then, as I spun the turntable, I took my small angled spatula (which has a narrow tip) and pressed it into the buttercream. It really just took about 5 minutes–a very quick way to frost a cake! I’ll have to do a video–

    Reply
  25. trisha March 12, 2012 at 11:03 pm

    Where does Mrs Froggy get her blush and lipstick (or are those lip injections..I didn’t want to be rude and ask her that) anyways she is a looker and her froggy date isn’t so bad himself. I must say that I do think that everything is better with a sprinkle of disco dust. I just might try it on myself these days and see what it does for me! HA!

    Reply
  26. Annie Hill March 13, 2012 at 12:46 pm

    Would love to see a video of the icing technique.

    Reply
  27. Cakelover888 March 13, 2012 at 10:54 pm

    Once again a great cake Melissa! you are such a great inspiration to us..thank you!

    Reply
  28. enza vespoli March 14, 2012 at 7:35 am

    Hi Melissa, I love your frogs and I love your buttercream design even more and yes please do a tutorial :)

    Reply
  29. Brenda March 20, 2012 at 8:31 pm

    Very cute and memorable idea…I hope. I’ve needed little farmer boys and pigs but no frog yet. But that is today.

    Reply
  30. Sasmita March 23, 2012 at 11:36 pm

    This is so beautifulllll !
    Love the way u designed so simply and with details. :)

    Reply
  31. Ghada Hamdan March 27, 2012 at 7:59 pm

    Love it!!!! You do an amazing job and you make it look so simple!!! Thanks

    Reply
  32. Janet Sawyer April 11, 2012 at 4:34 pm

    I absolutely love this they are soooooooooooooooooooooooo Cuteeeeeeeeeeeeeee!!!!

    Reply
  33. Melissa Diamond April 11, 2012 at 6:07 pm

    Thank you!!! :0)

    Reply
  34. sally May 14, 2012 at 3:59 pm

    Love it!!! im a chef i was thinking of a creative idea for my daughter’s 6th b-day

    Reply
  35. SugarSwirls May 25, 2012 at 7:02 pm

    Thank you for your creative tutorials. You are SO creative and do some amazing stuff! Keep it up… and please keep sharing ♥

    Reply
  36. Melissa Diamond May 26, 2012 at 7:46 pm

    Thanks Sally & SugarSwirls!!

    Reply
  37. Erica Gunderson August 3, 2012 at 4:32 pm

    Ahhh man, I just had an order last week for froggy cupcakes and I couldn’t figure out how to do it! Mine turned out cute, but these are much cuter…next time :)

    Reply
  38. Danielle August 29, 2013 at 7:36 pm

    Thank you so much for sharing your recipe for gum paste as well as tips for working with it. I’m basically just a beginner, but I was able to make a really cool birthday cake for my husband, with your help. This was my first experience with gum paste and it was amazing! Had lots of fun creating! I took pictures to share, but don’t know how to attach them here. If you’re interested in seeing the results, let me know how to share them here–I’d be pleased to.

    Reply
  39. Fen February 27, 2014 at 4:19 am

    Super cute!

    Reply
  40. ka8y August 30, 2014 at 3:52 pm

    I just made two cute frogs for my baby’s birthday cake! tnx!!!

    Reply
  41. BeBe August 30, 2014 at 6:22 pm

    Wonderful!!

    Reply

Leave a Reply Cancel reply

Your email address will not be published. Required fields are marked *

  • Lemon Buttermilk Cake {A Scratch Recipe}

    Lemon Buttermilk Cake {A Scratch Recipe}
  • Sweet Balloons Cake

    Sweet Balloons Cake
  • White Chocolate Coconut Cake

    White Chocolate Coconut Cake
  • Striped Buttercream Panels Cake

    Striped Buttercream Panels Cake
  • Lemon Coconut Cake with Lemon Curd Filling

    Lemon Coconut Cake with Lemon Curd Filling
  • Milk Chocolate Cake

    Milk Chocolate Cake
  • Buttercream Tulip Cake

    Buttercream Tulip Cake
  • Flamingo Ruffle Cake- A Cake Decorating Video Tutorial

    Flamingo Ruffle Cake- A Cake Decorating Video Tutorial
  • 60+ of the BEST Cake Recipes for Spring and Summer

    60+ of the BEST Cake Recipes for Spring and Summer
  • Lemon Cake {A Scratch Recipe}

    Lemon Cake {A Scratch Recipe}
Facebook Instagram Pinterest Twitter RSS
  • Free Blog Tutorials
  • Free Cake Videos
  • Recipes
  • Contact
  • About
  • Free Blog Tutorials
  • Free Cake Videos
  • Recipes
  • Contact
  • About

Copyright © 2022 My Cake School. Melissa Diamond. All rights reserved | Terms and Conditions | Privacy Policy