Fondant Ruffle Rose Cake- Free Tutorial!
Today I'm going to show you how to make an elegant fondant ruffle rose! This is a beautiful fondant cake design, and the elegant fondant ruffle technique is much easier than it looks!
Keep this beautiful ruffled flower design in mind for all sorts of special occasions from birthdays and bridal showers to wedding cakes!

In this quick step by step cake tutorial, I'm going to demonstrate how to create these gorgeous fondant ruffle roses! Whether you are creating just one rose or several, the results are always impressive!

Table of Contents
How to Make a Fondant Ruffle Rose Cake
I started off by rolling out a 50/50 mix of fondant and gum paste to about ⅛" thickness....go even thinner if you can. I like thin ruffles!
After rolling it out, I cut the fondant into strips. I used my trusty adjustable FMM Multi Ribbon Cutter (aff.) which sped things up a bit. I use this often for borders and ribbons.
Of course you can also just can use a sharp knife and measure out your strips of fondant or even just eyeball it!
I used about six, approx. 11 inch long fondant strips, which were about ½ inch wide.

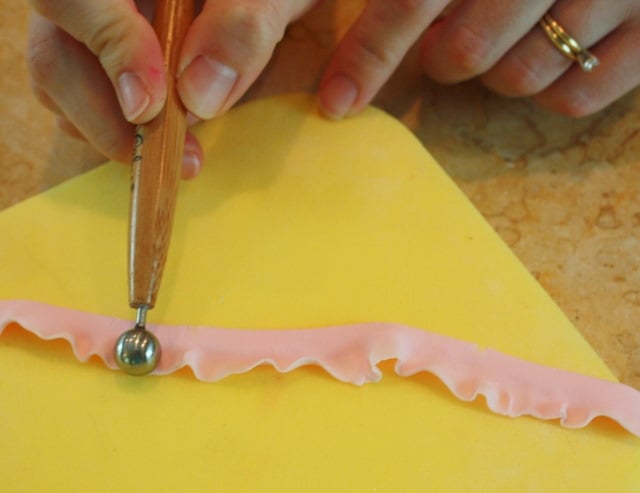
One at a time, I placed a strip on my cel pad , and using a ball tool, I applied pressure as I slid the ball along the edge of one side. This is going to naturally give a nice frilled effect as the fondant becomes thinner.

The other strips of fondant were waiting for their turn under a piece of vinyl that we bought from the fabric store. You can also keep them under a glass bowl or in an airtight container while they wait.

Now for the fun part--- Decide how big of a flower you want to make, and use a paint brush to brush on some piping gel where your first strip will be placed. The first strip of fondant determines how large of a flower you are going to have.
Then, start arranging your strip. You may have to add a little more piping gel here and there. (Sugar glue or tylose glue works well too.)
Don't press the frilly edge of the fondant into the glue--you'll need that fluffiness for dimension.

Continue with your circular pattern, brushing the area with piping gel and then wrapping around your fondant.

It only took about 5 strips before my flower was almost full. The last little space in the center of the flower I decided to fill with a rolled piece of fondant.

So pretty! Our fondant ruffle rose is really taking shape! You can use a toothpick or Q-tip to manipulate the petals however you like.

I finished it off with a tiny buttercream bead border around the top (using a tip 3) and a ribbon border around the bottom.
I couldn't decide if I liked the ruffle rose better front and center like this...

Or just off center like this.....

I think that I like it at both angles! My favorite part about this fondant ruffle rose is that once you have cut your fondant strips, the process goes very quickly! It's a great way to add the elegance of a fondant/gum paste flower without the wait!
I hope that you liked this technique--& I hope you'll consider adding a little frilliness to one of your creations very soon. Until next time, happy caking!
Hi - I got very excited by your ruffle rose, which looks simple enough that even someone as useless as me could do it! Along those lines - I'm using black fondant and I have gum tragacanth to mix with it (never used gum trag before). Given your experience, would this work? And do you have an idea of how much gum trag I should use? I have 500g of black fondant. I'm a ruffle rose virgin, so all help gratefully received!
Gina
Hello Gina! Yes, you can use gum trag. I really just go by the feel of it...I never measure it out although a general rule of thumb is a rounded tablespoon per pound of fondant will give you gum paste. However, I would use less than that since you probably want to shoot for a consistency in between fondant & gum paste...so that it won't dry as hard as gum paste would.
I would just knead in a small amount, and you'll notice a change in the elasticity of your fondant. Thinly roll it, and if it is still too soft to do anything with it, just let it sit for maybe 10 min (checking on it now and then) until you can easily pick it up without it stretching becoming distorted (but still very pliable.). You'll want to keep the other strips covered as you work so that they won't become too firm or dry.
Good luck!
Thanks, Melissa it was great to get such a fast reply - and one that made so much sense. I'm icing my cake tomorrow, I'll keep you open on my ipad so I can read and stay sane!
Gina
Thanks for the post. Would this ruffle work using homemade marshmallow fondant on its own. Have no idea in Australia where to find tylose power at short notice. Do I need to use glue to stick them on or can I adhere with just water, thanks.
Hi Sue, I haven't tried this with just straight fondant-- I think that if you roll it very thin, and let it begin to set, you may be able to make it work. You'll just have to check on it every 10 minutes or so to make sure that it isn't getting to firm that it loses pliability. (If you tried to use it immediately it would be too soft to cooperate with ruffling or holding it's shape.) - If the petals are thin enough, you could probably make it work with just a little water or piping gel. If you need to, you can also take a small amount of white fondant, knead the smallest amount of water into it to create tacky pieces that can be used to adhere the ruffles.
Can this be done in buttercream? If so, do you have a tutorial on that technique?
Hi Brenda, Yes, Melissa does have a video using buttercream, link below. Be sure to read her updated comment at the end of the written text on a quicker way to dry the center of the flower.
When I cut the strips with the ribbon cutter to make the frilly ruffle rose, should I make the strips different length so when I put it together they won’t all be the same and they will get smaller to make the shape of the ruffle rose?
Hi Becky, you can do it that way if you'd like-- more often than not, I just continue winding it around. Once all of the ruffles are filled in, it is hard to see where one ruffle starts and another one stops and so its a very forgiving technique.
Also, we have a video tutorial on this method as well (carrying the design all the way around the cake) if you'd like to see. This used to be in our member section but we've opened all of those videos up now for everyone. Hope you enjoy the technique!