A Bouquet of Billy Balls!~A Cake Decorating Blog Tutorial
Today I'm going to show you how to make a Bouquet of Billy Balls Cake Design.
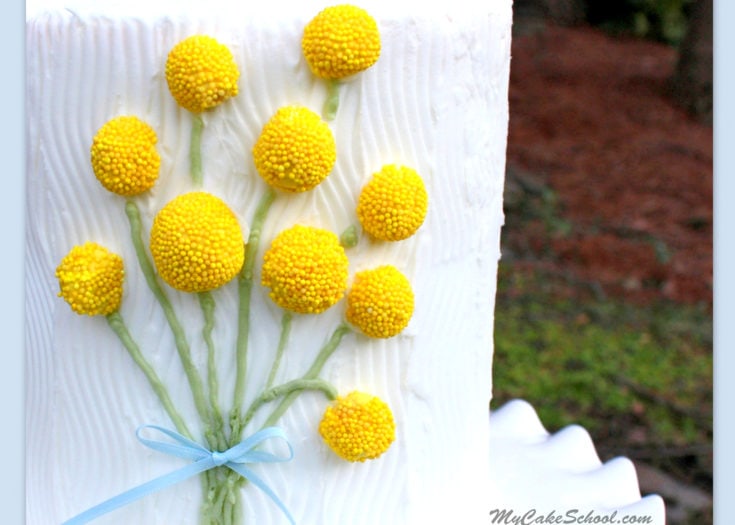
This might just be the easiest flower tutorial on our site! It is so cheerful- we love it!
 What are Billy Balls?
In the summer, I see these cheerful billy ball flowers in bouquets everywhere, not to mention all over Pinterest.--I LOVE them but had no idea what they were called until recently. A quick Google search for "Yellow Ball Flowers" led me to a sea of photos of......billy balls!
Have you seen them? If not, HERE's a picture! I'm probably the last to know what a billy ball is.
These cuties, which are also known as Craspedia and even billy buttons are so simple and cheerful that I just had to make some. You will not believe how quickly they come together...
How to Make EASY Billy Ball Flowers for Cakes
I frosted a 6 inch double barrel cake with vanilla buttercream today and it's the perfect backdrop for some billy ball cuteness.
(By the way, in case you've never made a double barrel cake, it's a taller-than-usual cake that has a cardboard cake circle about halfway up with dowels or supports beneath.
That way, nobody's walking around with a 7" slice of cake hanging off of their plate, and the cake will be nice and sturdy. Not to mention that tall cakes mean more room for decorating! )
You can find a more in depth explanation in our Cookie Jar Cake Tutorial.
Ready to make some flowers?
- First, you'll need some yellow balls of fondant (I tinted my white Satin Ice fondant with Americolor Lemon Yellow).
- You'll also need a sharp knife, a little water, and some yellow nonpareils. Mine are CK brand. You'll need a ziplock or plastic bag too.

- One at a time, I took the fondant balls and dampened them with a little water.
- Then, I rolled the ball in my palms to make sure that the dampness covered every part of the fondant. This creates a stickiness that acts as an adhesive for our next step. Just a small amount of dampness should do the trick.

- Next, I shook the ball of fondant in a bag of yellow nonpareils until covered.

- Next, I gently sawed the ball of fondant in half. (By the way, you could do this step first and then shake the halved balls in the sprinkle bag....but I preferred doing it after.)
- Sawing them in half makes them more lightweight and will also give you more surface area for you to use to adhere the billy balls to the cake.

- After sawing your billy balls you may have to slightly reshape them to restore the roundness, since the fondant will still be a little soft.

I made several....

- Here I am combing my cake with my favorite Ateco cake comb. I'm using the side with the smallest teeth, and just combing vertically, section by section.

- I cut away the excess frosting around the top edge of the cake with my knife.
 Then, I combed the top of the cake too.

- Now, for the best part of all...building the bouquet! A little fresh buttercream is all that we need to adhere the billy balls to the cake.


- After applying the flowers to the cake, I piped several stems using some buttercream (tinted with Americolor Avocado Green), and using a Wilton Piping Tip 3.

- After piping all of my stems, I chose a thin blue ribbon (lightly greased with vegetable shortening to prevent later discoloration), tied a bow and applied it to the cake with a dot of buttercream! Look how pretty!

I hope that you enjoyed this tutorial! Remember these billy balls when you are looking for something sweet and cheerful.
I just love the country chic feel that they add, and they would be perfect for just about any occasion from birthdays to bridal showers. Have fun experimenting with this design and designs of your own--see you next time!

A Bouquet of Billy Balls!~A Cake Decorating Blog Tutorial
Learn how to make these cheerful billy ball flowers for your cakes in our step by step tutorial!
Materials
- For this project, we decorated a 6 inch double barrel (tall) cake..but the design can be recreated on cakes of any size. We frosted our cake with vanilla buttercream frosting, which we textured using a cake comb.
- Fondant (tinted yellow)
- Coloring Gel: Americolor Lemon Yellow, Avocado Green
- Yellow Sprinkles
- Small bowl of water or a little piping gel
- Piping Tips: Tip 3
- Cake Comb (optional)
- Small Blue Ribbon (optional)
- ziplock bag
Instructions
- Roll your tinted yellow fondant into balls. (You will half them later.)
- Lightly damped them with water, rolling them in your palms to make them slightly tacky. (You could brush them with piping gel if you would rather)
- Shake them in a bag of yellow nonpareils.
- Slice them in half.
- Attach them to the cake with a bit of buttercream.
- Pipe green buttercream stems using a Piping Tip 3, creating the look of a bouquet.
- Attach a small bow with a dot of buttercream. I lightly greased the ribbon with shortening to prevent splotchiness from developing.
I am new to this. Is fondant edible?
Regardless, I like what you made.
Thanks!! --
Jeannette~ Yes, fondant is edible. Not everyone eats it --but it is edible! ;0)
What is the size of the cake rounds for this cake and how many layers?
This is gorgeous but I have to be HONEST, I laughed pretty hard at the name Billy Balls - but then again, I behave like 10 yr old boy sometimes.
@Emon- These are 6" cake layers-- 2 layers, cake board (with supports beneath) and two more layers. The cake is approximately 7 inches tall, but this design would be cute on any size cake!
@Trish-- You are so crazy ;0) --It is so much more fun to say Billy Balls than their more formal name (Craspedia), don't ya think? ;0)
Melissa, I get so excited when a notice comes in my email that you have something new to show us ! ....you never disappoint me ! I so love these little yellow flowers ! I need to tell you once again how great of a teacher you are....you have a way of explaining ideas and techniques that makes me want to do whatever the new project is..immediately..thank you for that.:). can't wait for the next one.
This is so pretty! Not only have I never heard of Billy Balls, I've never even seen them before looking at the picture from the link that you posted.
I love the simplicity and beauty of this cake!!