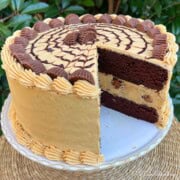
Chocolate Peanut Butter Cheesecake Cake
This decadent Chocolate Peanut Butter Cheesecake Cake is so moist and flavorful!
Servings: 15
Ingredients
For the Cheesecake Layer
- 16 oz cream cheese, room temperature (We used two 8 oz bricks of full fat cream cheese.)
- ½ cup creamy peanut butter (128g)(Avoid natural peanut butter and reduced fat as the texture will be different).
- 1 cup sugar (200g)
- ¼ teaspoon salt
- 3 tablespoons all purpose flour (23g)
- ⅓ cup sour cream
- ¼ cup milk (we like whole milk or 2 percent)
- 3 large eggs
- ½ cup chopped Reese's Cups (optional- adjust amount to your liking).
For the Chocolate Cake Layers
- ¾ cup unsalted butter, room temperature (This is the equivalent of 1½ sticks of butter or 170g)
- ¼ cup vegetable oil (68g)
- 2 cups granulated sugar (400g)
- 2 ¾ cups All Purpose Flour (325g)
- ¾ cup unsweetened cocoa powder (62g)(measure first, then sift. If using a dry measuring cup, lightly spoon and level for most accurate measurement.)
- 2 teaspoons Baking Soda (10g)
- ½ teaspoon Baking Powder (2g)
- ½ teaspoon Salt (2g)
- 1 cup Sour Cream (242g)
- 1 cup Milk (220g)
- 4 large eggs, room temperature
- 1 teaspoon vanilla (4g)
- ¾ cup Very Hot Coffee (We made ours by stirring instant espresso granules in hot water).
Chocolate Glaze
- 3 oz Heavy Cream or Whipping Cream
- 4 oz semi-sweet or dark chocolate
Peanut Butter Buttercream
- 1 cup Creamy Peanut Butter (255g) (We don't recommend "natural" peanut butter as the consistency is different.
- 1 cup unsalted butter (This is 2 sticks, or 226g unsalted butter, room temperature)
- 4 cups powdered sugar (460g)
- ¼ cup milk plus 2 Tablespoons - use more if needed to reach the consistency you like (60g) (We use whole milk or 2 percent)
- 2 teaspoons vanilla extract (8g)
- pinch of salt
Instructions
For the Peanut Butter Cheesecake Layer
- Place a 9x13 (or similar size) pan filled with one inch of water on a rack in the bottom ⅔ of the oven. (Just under the rack where your cheesecake layer will bake)
- Preheat oven to 300 degrees F
- Line the bottom of a 9 inch spring form pan with a circle of parchment paper.
- In a mixing bowl, mix softened cream cheese until smooth at low speed. Then, add the peanut butter and mix until combined. (We used a stand mixer but handheld is fine also).
- Continuing at low speed, mix in the sugar, salt, flour.
- Add sour cream and milk. Mix at low speed until smooth and incorporated. Add eggs one at a time. Mix until well combined. Gently stir in chopped Reese's Cups.
- Pour the cheesecake batter into springform pan lined with parchment and place on a rack just above the pan of water.
- Bake for 40-45 minutes. The cheesecake should be set at this point- it may jiggle slightly.
- Turn off the oven and leave cheesecake inside for 20 more minutes with the oven door slightly open. (This helps the cake to cool without cracking.) However, if a crack forms, don't worry, it won't show when assembled.
- Allow the cheesecake to cool on the countertop. Then, place foil on the pan and chill in the freezer for 2-3 hours. If you are not in a hurry, you can refrigerate the cake for 5-6 hours or overnight.
For the Chocolate Cake Layers
- Preheat oven to 350 degrees. Grease and flour two 9 inch cake pans. We also like line the bottom of the pan with a circle of parchment paper.
- Flour Mixture: In a medium sized bowl, combine the flour, cocoa powder, baking soda, baking powder, and salt. Whisk 30 seconds to blend and set aside for later.
- Place the softened butter in the bowl of your mixer. With the mixer on medium speed, mix the butter until smooth. Add the vegetable oil and vanilla. Then, add the sugar and mix for 4-5 minutes until lightened and fluffy.
- Add the eggs one at a time, mixing after each egg just until the yellow of the yolk has blended. Scrape down the sides and bottom of the bowl as needed.
- Mixing on low speed, alternately add the flour mixture with the milk and the sour cream. (We added about a third of the dry mixture, followed by the sour cream, then the next addition of flour mixture, followed by the milk, and then the remaining flour mixture.) Mix until *almost* completely mixed.
- Slowly add the very hot coffee to the batter and mix until combined (approximately 20 seconds).
- Divide the batter between the two prepared cake pans. Bake at 350 F for 25-30 minutes or until an inserted toothpick comes out clean or with a few crumbs attached.
- Allow the baked cakes to cool in their pans on a cooling rack for 8-10 minutes before turning out.
For the Glaze
- Combine the 4 oz. semi-sweet or dark chocolate and 3 oz. heavy cream in a microwave safe bowl. Heat in the microwave in small increments (30 seconds or less), stirring occasionally in between, until the chocolate is almost completely melted.
- Then, allow to sit a minute or two and gently stir to melt any remaining pieces of chocolate. Cool the ganache to desired consistency for dripping. We like to apply the glaze using a disposable piping bag with the tip snipped away.
For the Buttercream
- In the bowl of your mixer add the butter and mix on medium speed until the butter is softened and smooth. Add the peanut butter and mix until blended.
- Gradually add the powdered sugar alternately with the milk. Add vanilla. Mix on medium speed 4 to 5 minutes until smooth. ***Peanut butter brands labeled "Natural" that we have tried do not work as well with this recipe because the consistency isn't as smooth & creamy. We've used Jif & Peter Pan (Creamy) with good results!
Assembling the Cake
- Place the first cooled cake layer on the cake plate or pedestal. Spread with a thin layer of peanut butter frosting. Optional- Drizzle over the top with glaze (we didn't use a lot of glaze, just enough to add some additional richness).
- For the cheesecake layer, run a thin knife (I like to heat it with hot water) between the cake and side of the cake pan to help prevent sticking. Release the sides of the springform pan.
- Place the cheesecake upside down onto the first cake layer. remove the bottom of the cake pan. If it sticks at all, use a thin, hot knife to slide between the pan and the cake to release.
- Remove the parchment if you haven't already ;0)
- Spread the cheesecake layer with a thin layer of frosting. Drizzle with some of the chocolate glaze for added richness (optional). Top with the second chocolate cake layer.
- *If your cheesecake layer is slightly wider than your cake layers, just trim away the excess with a hot, sharp knife.
- Frost the cake as usual. After the first thin layer of frosting, we like to chill it in the freezer for about 10 minutes to firm everything up before applying the final layer of frosting. (This is optional but helps with sliding).
- Apply the drizzle on top- decorate however you like! We decorated ours with chocolate drizzle and sliced Reese's Cups. We also used a small star tip 21 for a top border. (See notes for additional details if you're interested in the chocolate pattern we made.)
- This cake should be refrigerated.
Notes
Springform Pan Alternative for the Cheesecake Layer
If you do not have a springform pan, you can also make this cake by lining a 9 inch cake pan with aluminum foil. The foil should come all the way up the inside of the pan.
When I've used this method, I also lined the bottom of the pan (on top of the foil) with a circle of parchment.
Freeze the baked cheesecake, still in the pan, until firm- I left mine overnight because I wasn't in a hurry- and when ready to assemble the cake, lift the cake out of the pan using the excess foil, peel away the wrapping from the sides, and flip it over onto the first frosted cake layer.
Remove the foil and parchment, and double check that there are no remaining pieces of the wrapping on the cake before adding the next layer of frosting.
Chocolate Design: If you're feeling fancy, here's how we made the pattern for the top of our cake: Using a piping bag with the tip snipped away, we created a spiral on top of the cake, beginning in the center and spiraling outward until we reached the edge of the cake. Then, we lightly dragged a toothpick from the center outward to create our design. (You can alternate directions that you are dragging toothpick if you'd like).