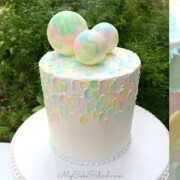
Painted Buttercream and Chocolate Spheres- Cake Tutorial
Learn how to make a beautiful painted buttercream cake with chocolate (candy coating) spheres in this free cake decorating video tutorial!
Servings: 16 -20 servings
Ingredients
- Your Cake of Choice- We decorated a 6 inch double barrel cake.
- Vanilla Buttercream- We used our Fluffy Vanilla Buttercream Recipe. Our Classic Vanilla is a good option also.
- Silicone Spheres Mold. We used spheres that were about 1 ¾ and 2 ½ inches diameter.
- Candy Coating - Use your candy coating of choice. We used Candiquick bark coating
- Coloring Gels- We used Americolor Candy Color Gels in Pink and Green to tint both our white chocolate coating and our buttercream so the shades of buttercream and chocolate would be a close match. We used Americolor Sky Blue -regular gel color instead of Blue Candy Color since we liked the shade of blue better. However, it does make for a slightly thicker texture when mixed with the candy coating.
- Offset Spatula- I used a small rounded offset spatula but a small tapered one would work well also.
- Piping Tips: I used a Tip 4 for the bead border
- Disposable Piping Bags
- Misc: I applied my colorful chocolate accents to the spheres with a medium sized flat small paintbrush with fairly stiff bristles. You can improvise with the brushes you have on hand or with a small spatula.
- Cake boards and supports as needed if making a double barrel cake.
Instructions
- We decorated a four layer, 6 inch double barrel cake. As usual, the bottom two layers are on their own cake cardboard cut down to size, with four bubble tea straws inserted and cut to the height of the bottom two layers. Then the next two (filled) cake layers are on their own cardboard cake circle cut to size, and placed on top of the bottom tier. Cake is frosted as one.)
- Frosting the Cake Apply the frosting with an offset spatula. I like to do a thin crumb coat first, chill it in the freezer for 15-20 minutes (or longer in the refrigerator) to firm everything up and then apply the second coat of frosting.
- Next, smooth around the sides with a bench scraper while rotating the cake on a turntable. Smooth with your method of choice. Heating the metal bench scraper under very hot water before smoothing the frosting makes it extra smooth.
- Decorating the CakeStart with a chilled, frosted cake so that the base coat of frosting is firm. Re-chill as needed (15 minutes in the freezer).
- Using a disposable piping bags with the tips snipped away, pipe dots of buttercream (in varying shades) onto the cake. After piping the dots, I used a small offset spatula to spread it downward. We started at the top edge of the cake and worked our way down (covering about half of the cake). We also did this on top of the cake. Many of our "brushstrokes" overlap the colors beneath.
- Chocolate BallsTint melted candy coating/or white bark coating with candy coloring. (You can also use pre-colored candy melts like SweetTooth Fairy brand).
- Brush here and there on the inside of your sphere molds in difference colors. Chill in the freezer for 5-10 minutes.
- Then, spoon a bit of melted white candy coating into wells and use a brush to spread it over the inside, from bottom to top. Chill for 10 minutes in the freezer until firm. Go back in with a second coat of white coating. Chill to firm up. (15 min or until firm).
- Piece the chilled spheres together, "gluing" with melted white candy coating. Wipe away excess melted chocolate. Allow to firm up in molds. Chill if needed before applyting to cake.
- If you are concerned about the weight of the larger balls, you can place a bubble tea straw beneath, snipped to the height of the cake.
Video
Notes
- This design can be transferred to cakes of any size! Chill the frosted tier until the base coat of buttercream is firm before adding the colorful buttercream accents.
- Don't wash off your brushes in between applying the different colors as moisture may seize the melted candy coating. Just wipe them off on a paper towel instead.We matched the colors of our spheres to the frosting colors used on the cake.
- For best results, use candy coloring gels to tint your candy coating. This is because these colors are oil based and are less likely to effect the consistency of the melted coating. (We did use Americolor Sky Blue for the blue coating as we didn't have pretty blue candy color option.)
- We used the same coloring gels for both buttercream and melted coating for the balls so that they would match.