How to Make a Cartoon Cake
Learn how to make a CUTE Cartoon Cake in this free cake decorating video tutorial!
Servings: 15
Equipment
Ingredients
- Your Cake of Choice we used our Vanilla Buttermilk Layer Cake- 8 inch
- Vanilla Buttercream- We used two batches of our Classic Vanilla Buttercream Recipe
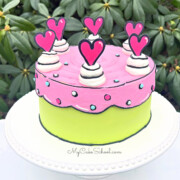
- Coloring Gels: We used Americolor Electric Green Deep Pink, Sky Blue (for dots), and Black
- Bench Scraper or Offset Spatula we used both
- Piping Tips: We used Tip 3 for black outlines and Tip 2 for outlining hearts
- Turntable - Optional but helpful
- Disposable piping bags
- Candy Coating- We used pre-colored Pink and Black Coating-- about ¼ cup of black and about ½ cup of pink (Ours was Sweet Tooth Fairy Brand- bright pink & black)
- Parchment-lined cookie sheet
Instructions
- For the Candy Coating Hearts
- (If you do not have pre-colored candy coating, you can tint white bark coating/candy coating using oil-based candy colors)
- Melt the coating in small, microwave-safe bowls. Heat in small increments until almost melted- then, stir until smooth.
- Pipe black candy coating outlines of hearts onto a wax paper or parchment paper-lined cookie sheet. You will need 6 total--but make a few extra just in case of breakage. You can slide a heart template beneath the parchment or wax paper if you need a guide.
- If the chocolate is way too runny, it with thicken slightly if you wait a minute or two.
- Next, fill in the hearts with melted pink coating. Again, if the coating is way to runny, let it cool just a few minutes more.
- Make the points of the hearts a bit longer than usual as they will be pushed into the frosting later.
- The hearts will firm up as they cool. You can speed this along by popping them in the freezer for 5 minutes, or in the refrigerator for a bit longer. It is fine to leave at room temperature--but I prefer to chill just before handling so that they are extra firm. We used the smooth side of the hearts.
For the Cake
- Bake the cake as usual and cool layers completely.
- We filled and crumb coated the cake with vanilla buttercream. Then, frosted the cake with green frosting. You can use a metal bench scraper for a smooth finish around the sides. We like to chill the frosted cake in the freezer for 10 minutes before gliding back over it with a hot bench scraper for a smoother finish.
- Next, we piped on our pink frosting. I used a piping tip 12 for piping the scalloped pattern around the sides of the cake. We filled in with pink frosting, smoothed with an offset spatula. (Chill as needed for 10 minutes in the freezer and glide over with a heated offset spatula for a smooth finish).
- As an optional step, we also created a spiral on top of the cake with an offset spatula.
- Outline the pink frosting scallops and top edge of the cake with black buttercream piping-- we used a piping tip 3. Outline the base of the cake also --We forgot to do this during the video and so we added it later! ;0)
- Pipe small black buttercream circles on top of the pink frosting and fill with various colors for "sprinkles".
- Pipe 6 large dollops of frosting on top of the cake. We outlined these as well. Top with the chilled chilled hearts. We added white buttercream accents to the hearts as well as here and there along our pink scalloped design.
Video
Notes
We tinted approximately 4 cups of buttercream green, and 3 cups of frosting pink.