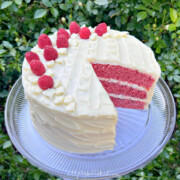
Raspberry Cake (Doctored Cake Mix)
This delicious Raspberry Cake starts with a box of white cake mix! Raspberry cake layers are filled with raspberry jam and whipped cream, and frosted with cream cheese frosting!
Servings: 15
Ingredients
- 1 Box white cake mix ( 15.25 oz) (432g) (We used Duncan Hines Perfectly Moist White Cake Mix)
- 1 Small box ( 3 ounce) (85g) Raspberry Jello powder (Do not prepare the Jell-O)
- ¼ Cup (30g) All purpose flour
- ¼ Cup (50g) Sugar
- 1 teaspoon (4g) Baking Powder
- 4 eggs
- ¾ Cup (162g) Vegetable Oil (We use Canola Oil)
- ½ Cup Milk (We use 2% or Whole)
- ¾ Cup (170g) Raspberry Puree, strained to remove seeds Use a blender to puree fresh or frozen raspberries. We used a 12 oz bag of frozen, *thawed, raspberries.
For the Whipped Cream Filling
- 1 cup (240g) heavy cream
- ¼ cup (29g) powdered sugar
- 1 teaspoon (4g) vanilla extract
For the Cream Cheese Frosting
- 1 cup (226g) unsalted butter, softened
- 2 (8 oz) packages cream cheese, softened (total weight 452g)
- 2 teaspoons (8g) vanilla extract
- ½ teaspoon (2g) salt
- 6-6½ cups (690-747g) confectioners sugar
Miscellaneous
- Seedless Raspberry Jam (for glazing cake layers)
- Fresh Raspberries for decoration on top
Instructions
- Preheat over to 325℉. Grease and flour three 8 inch cake pans. (We like to line the bottom of the prepared pans with circles of parchment also.) You can also use two 9 inch cake pans.
- In the bowl of your mixer, whisk/combine the dry ingredients: cake mix, flour, sugar, raspberry jell-o, and baking powder.
- Using a food processor or blender, puree fresh or frozen (fully thawed) raspberries. We used a 12 oz bag of frozen raspberries.
- Hold a fine strainer over a bowl, pour puree into it, and use back of a spoon to press the puree through, to remove the seeds. Remember to scrape the underside of the strainer where puree tends to collect. Measure out ¾ cup of the seedless puree.
- Add remaining ingredients to the mixing bowl: ¾ cup puree, eggs, vegetable oil, and milk.
- Using an electric mixer, mix on low for 15 seconds to combine. Then, increase to medium and mix for 2 minutes. This recipe makes about 6 cups of batter.
- Divide the cake batter between the three prepared cake pans. Tap each pan a few times on the counter to make air bubbles rise. Bake at 325 for 25-30 minutes, or until the centers spring back when lightly touched or a toothpick can be inserted and removed with just a few crumbs attached (or none at all).
- Allow the cakes to cool, still in their pans, on a wire rack for 10 minutes before turning out.
For the Whipped Cream
- Chill the mixing bowl and beaters/ whisk attachment in the freezer for 10 minutes.
- Pour the whipping cream, powdered sugar and vanilla into the chilled mixing bowl, begin beating on low speed gradually increasing to medium high speed. I use a handheld electric mixer for this.
- Mix until you've reached stiff peak stage (this may take about a minute or so). When you lift the beaters of your electric mixer and the cream forms a peak that stands on its own, it is ready.
For the Cream Cheese Frosting
- Add the softened butter to the bowl of your mixer. Beat on low to medium speed until the butter is smooth.
- Cut the softened cream cheese into pieces and add to the butter, beating at low to medium speed until incorporated.
- Add the vanilla. Gradually add the powdered sugar beating on low speed until blended. Cover the bowl with a towel to keep down the cloud of powdered sugar.
- Increase mixing speed and beat until fluffy. Don't over beat or it will become too soft. If it becomes too soft, just refrigerate a short while to firm it up a bit.
- This frosting will pipe best if used while still chilled. You can make it in advance, refrigerate and when ready to use let it soften slightly (do not microwave) and remix.
Assembling the Cake
- Place the first cooled raspberry cake layer on your cake base or pedestal.
- Spread with a thin layer of seedless raspberry jam, stopping just short of the edge of the layer. I find it easiest to scoop some jam into a small bowl and give it a good stir to soften it first. This makes it more spreadable.
- Pipe a dam of cream cheese frosting about ¼-1/2 inch from the edge of the cake. I do this using a disposable piping bag with the tip snipped away. (You could also use a tip 12). You can also use a ziplock bag with the corner snipped away.
- Spread about half of the whipped cream over the raspberry jam, within the dam. Top with the next cake layer.
- Repeat the steps of the thin layer of jam, dam, and whipped cream. Top with the top cake layer.
- Fill in any gaps between the cake layers with cream cheese frosting. I do this with the same piping bag that I use for the dam. Apply a thin, "crumb coat" of cream cheese frosting around the top and sides of the cake.
- I like chill the cake at this point to firm everything up before applying the final coat of frosting. Chill in the freezer for 15 minutes or longer in the refrigerator. If your bowl of cream cheese frosting is very soft, you can use this time to chill it in the refrigerator as well (10 minutes).
- Frost the top and sides of the cake, decorate however you like. I used a bench scraper & spatula to smooth around the sides & top of the cake to even out the frosting. I then added texture with a small offset spatula.
- I added fresh raspberries to the top of the cake, and piped frosting leaves using a Wilton tip 366.