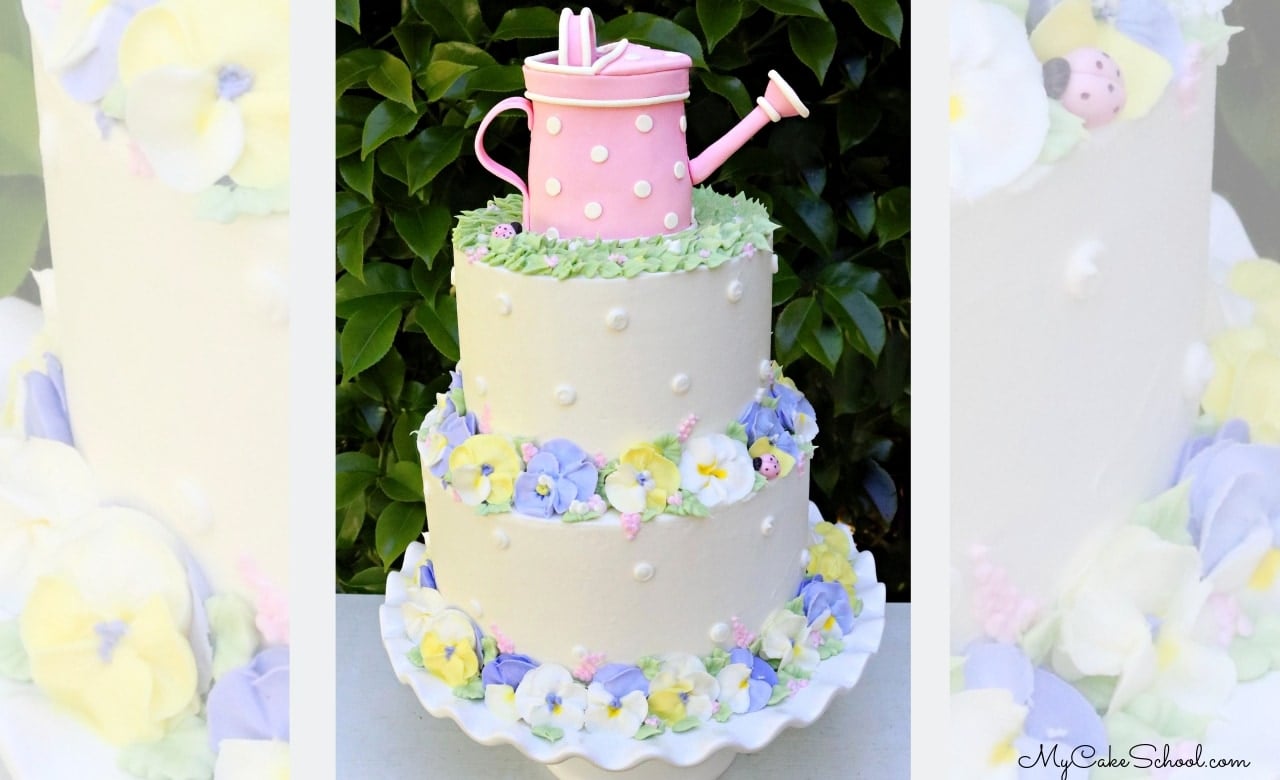
Buttercream Pansy Cake (with Watering Can Topper)
Today's Pansy Garden Cake is the perfect design for spring and summer celebrations! In this video, I'll show you how to pipe simple buttercream pansies as well as how to make a cute and simple watering can cake topper!

These buttercream pansies can be created in a variety of colors- I love how easy they are to create with just a little practice--and as with most buttercream flowers, once you know how, you can create them so much more quickly than the gum paste version!
As for our watering can, we can never resist an excuse to make a cute cake topper- this watering can seemed like the perfect choice for our pansy garden cake- however, it would look really cute sitting on top of all sorts of spring or gardening themed cakes. Know someone who loves to garden? Keep this watering can topper in mind for their next birthday cake! ;0)
The buttercream pansies would be really pretty on their own, or combined with a variety of buttercream flowers. They would make really sweet cupcake decorations too! We hope that you enjoy the video!
Table of Contents
Materials for Buttercream Pansy Cake
This cake consists of two stacked 8 inch and 6 inch layers, frosted in our fluffy vanilla buttercream. Each tier is on its own cardboard cake circle cut to the size of the cake. The top tier is supported by 4 bubble tea straw supports. (See our video tutorial on tier stacking if you have never worked with stacked tiers before!)
Rice cereal treats for the watering can (we used 4 of the 22g. size pre-made cereal treats)
Gum Paste for the watering can - approx 220 g.
Buttercream- We used our Fluffy Vanilla Buttercream recipe but any crusting recipe is fine--preferably one that contains butter so that they will firm up quickly in the freezer for easy placement onto the cake. Our Classic Vanilla buttercream is a good choice also.
Colors: We used Americolor coloring gels: Violet+a speck of Deep Pink to create the two shades of lavender. We used Wilton Leaf Green+ Americolor Avocado Green for the leaves/grass. Americolor Yellow. Also, black if you make the little ladybugs like we did- see below.
Extruder- We used our Makin's Ultimate Clay Extruder to extrude the white piping around the watering can. (optional)
Lollipop Stick
Shortening for greasing the cereal treat before adding the gum paste.
Piping Gel: we used piping gel as our glue. Use your food-safe glue of choice.
FMM Multi Ribbon Cutter for cutting strips for our watering can handle, etc. - optional. You can also cut by hand.
Piping Tips: Tip 104 for flower petals, 352 leaf tip, tip 6 for the white dots on cake, Tip 2 or 3 if adding dots to the center of flowers as for the little dotty filler flowers that we piped around the cake & in the grass on top. We used a tip 12 to cut out dots for the watering can.
Rose Nail for piping pansies
Parchment squares or wax paper squares
A cookie sheet/tray for keeping flowers in the freezer until firm.
Additional Notes
Off camera, after finishing the video, I decided to add a couple of lady bugs as a little optional decoration.
This is basically just a pink ball of gum paste pressed into a smaller black ball of gum paste (or fondant). Make a small impression on the pink ball to represent the two wings, and then add black polka dots with a food coloring pen.
To be on the safe side, allow a couple of days for your watering can to firm up. Ours was ready after a few hours but humidity levels, etc. can really effect dry times.
Of course, having the rice krispies treat center makes a huge difference in supporting the gum paste but if you are new to working with gum paste, and are unsure how long gum paste normally takes to firm up in your kitchen, it's best to play it safe and make it well in advance.
Don't freeze your pansies for hours. It's best to freeze them when you are almost ready to place on the cake. Then, just take a few out at a time so that they don't soften as quickly.
More Buttercream Flowers!
We love creating buttercream flowers for our cakes! In addition to today's buttercream pansies, don't miss these other buttercream floral cake tutorials!
Easy Textured Buttercream Flowers
Buttercream Floral Wreath Cake
Just beautiful! I love it! :-) Pansies are a fabulous flower to pipe, so many colour options. Definitely adding it to my To Do List :-) Love the watering can too!
Such a pretty cake. I really like the Pansies.
Wow!
Every cake is just so beautiful to keep looking at
Thank you for your nice comment, Angela!
This cake is what I call a ‘happy cake’. ?. It is bright and joyful to look at, which in turn creates happiness. Love it ?
Thank you Stephanie!